9
The manager web interface is designed to handle user accounts, set up and attach service plans and services to customers.
To access the manager web interface, enter an IP address of Middleware/manager in your browser's address bar. On the opened page enter the login and the password specified in the equipment passport.
The left panel of the web interface contains links to settings pages, pages are organized into groups. The presence of pages and groups depends on the hardware configuration of the server and the privileges of the currently logged in system user.
The manager web interface can include:
|
Group |
Page |
Function |
|
User |
Does not contain pages |
Log out and go to the authorization page |
|
Customers |
Manage customers and their accounts |
|
|
Add and edit customer groups |
||
|
Billing |
Manage service plans and services |
|
|
Manage standalone services |
||
|
Combine content in media groups |
||
|
Media content |
Manage media groups |
|
|
Manage languages which used to describe content |
||
|
Accounting |
Manage prepaid cards |
|
|
Close accounting periods |
||
|
Security |
See received activation requests |
|
|
Reports |
Create and upload charge reports |
|
|
See a content view rate |
||
|
See a low balance customers report |
||
|
Dictionaries |
Create the list of banks |
|
|
IPTV Distribution |
Upload and delete video, manage transcoding settings |
|
|
Video stream processing |
Manage processing presets for output streams |
|
|
Manage input and output streams |
||
|
System settings |
Add users and manage privileges for them |
|
|
Manage SNMP and Public Alert and General Alarm; |
||
|
Add and delete currencies |
||
|
Update firmware |
||
|
Start and stop the services |
||
|
Download licenses |
||
|
Android client |
Manage messages for STB users |
This group doesn’t contain any pages. Use it to log out. Click Logout to go to the authorization page.
The following actions are available on the page:
1.Add a customer
Click on the corresponding button, then select a customer type: Individual or Organization. In the opened window fill in the fields and click Create. As result, you can see the Customer information page
2.Export activation codes
Click the menu icon and select the Export activation codes. The data will be downloaded as a CSV file.
3.Find a customer
Select one of the possible search criteria (Name, login, account ID, access card, contract number) and enter in the search bar the value for this criteria. The results will be displayed on the same page.
|
|
In the list of personal accounts, the Customer column displays the full name of the individuals and the abbreviated name of the organization |
4.Filter the list of customers
Select the values for one or both filters: Personal account state and Customer group. The results will be displayed on the page.
|
|
If a customer has a personal account, the Status column of the list displays Active, Blocked or Closed state for this customer |
5.Sort the list of customers
Use corresponding elements to sort the list by Customer ID or Personal account number, ascending or descending order and also determine the number of customers that should be shown on one page.
|
|
When a customer does not have an account, the Account column in the list displays a dash. |
6.See detailed information about a customer
Use sorting, filtering or search bar to find a customer and left-click on the line with the customer’s data.
If the customer has a personal account, you will jump to the Customer’s personal account page. Left-click on the customer name to open the page with detailed information about the customer.
If the customer does not have a personal account yet, you will immediately see the Customer information page.
Read more about these pages below.

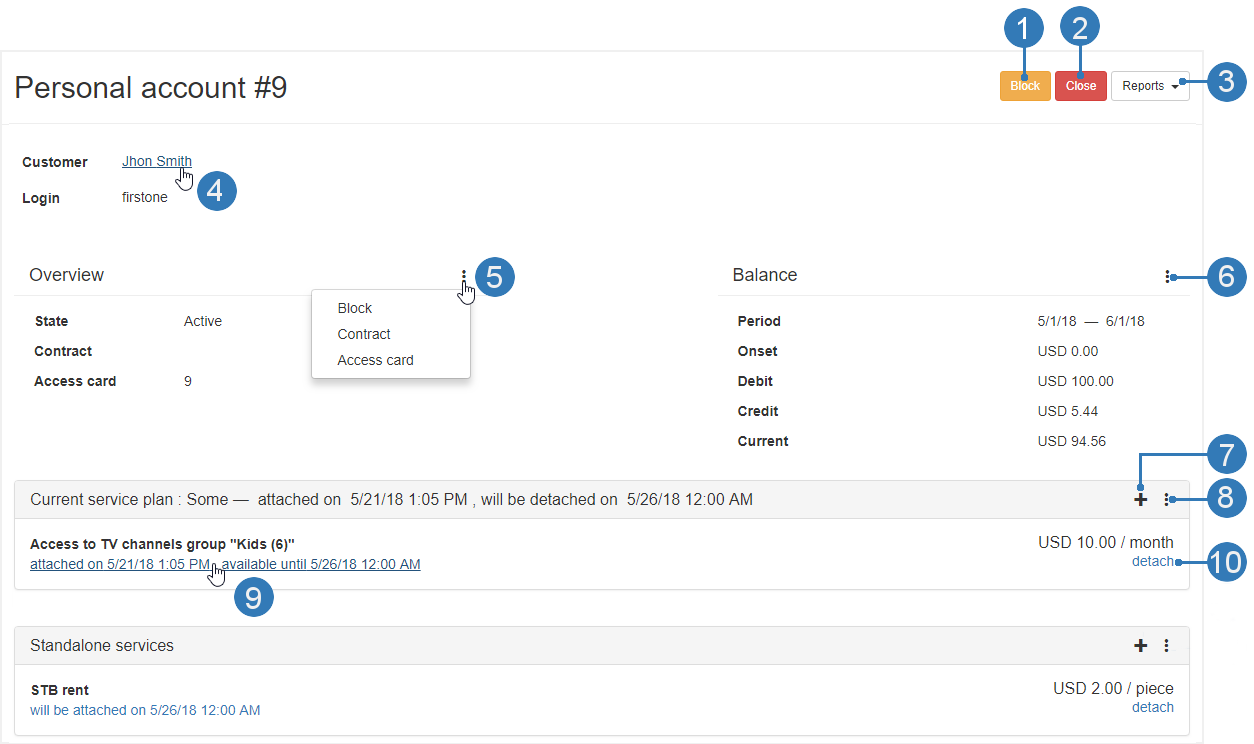
The following actions are available on the page:
1.Block or unblock a personal account
Click on the corresponding button on the page. In the opened window specify the Start and End date of the block, if necessary, and confirm the action.
|
|
If the personal account is blocked, the page displays the Unblock button |
2.Close a personal account
Click on the corresponding button on the page. In the opened window confirm the action of closing the account.
3.Generate a report
Click on the Report button and select one of the available reports from the drop-down list: Report on locks, Financial report or Attached services history. Report data will be displayed in a separate window.
4.Open the customer information page
Click on the customer name.
5.Edit contract number and date
Click the menu icon on the Overview panel and select Contract. In the opened window modify the data and click Save.
Delete or generate an activation code (including PIN and license key)
Click the menu icon on the Overview panel and select Access card. In the opened window click Delete or Generate activation code on the Activation codes panel
6.Make a payment
Click the menu icon on the Balance panel and select Payment. In the opened window fill in the fields and click Save.
Set an overdraft limit
Click the menu icon on the Balance panel and select Overdraft limit. In the opened window write the sum and click Save.
Adjust a customer balance
Click the menu icon on the Balance panel and select Adjustment. On the opened page find a service or a payment you want to correct and left-click on it. In the opened window make changes and click Save.
7.Attach a service
Click on the Attach service button on the Current or Next service plan panel or on the Standalone services panel. In the opened window, fill in the fields and click Save.
8.Attach or detach a service plan
Click the menu icon on the Current service plan panel and select Attach or Detach. In the opened window fill in the fields and click Save.
Switch a service plan
Click the menu icon on the Current service plan panel and select Switch. In the opened window fill in the fields and click Save.
|
|
If you specify the Start date for the next service plan, the Next service plan panel will appear on the personal account page |
See an attached services history
Click the menu icon on the Current or Next service plan panel or on the Standalone services panel and select History. Attached services history will be displayed in a separate window.
9.Edit the End date of a service
Click on the date under a service on the Current or Next service plan panel or on the Standalone services panel. In the opened window make changes and click Proceed.
10.Detach a service
Click on the corresponding button on the Current or Next service plan panel or on the Standalone services panel opposite the service you want to detach. Confirm the action in the opened window.
To open a customer’s personal account page:
2.Use filtering, sorting and search bar to find a customer.
3.Left-click on the customer’s data:
–if the customer has an personal account, you will see the Customer’s personal account page;
–if the customer does not have any personal account, you will see the Customer information page. Click on Create a new personal account. In the opened window write the Personal account number, if it necessary, select the currency and click Create.
|
|
The Customer information page for organizations has additional panels: the Bank details and Contact persons. The Passport panel is absent for organizations |
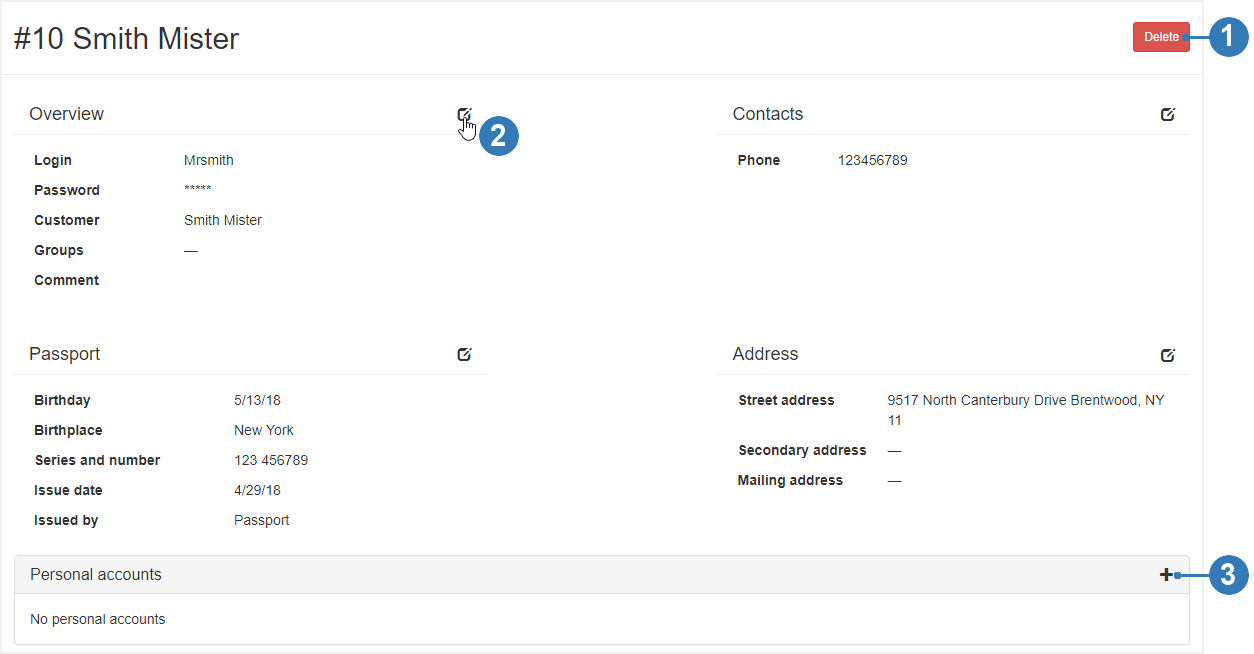
The following actions are available on the page:
1.Delete a customer
Click on the corresponding button and confirm the deletion in the opened window.
2.Edit a customer profile
Click Edit on the panel which displays data you want to modify. In the opened window make changes and click Save.
3.Add a personal account
Click Create a new personal account. In the opened window select a currency and write a personal account number, if it’s necessary, then click Create.
|
|
Personal account number is created automatically. For the hotel solutions the personal account number must match the room number, so you need to write it manually |
|
|
If the list does not have the currency, you need to add it on the Currencies page (for more info, see Currencies) |
To open a customer's information page:
2.Use filtering, sorting and search bar to find a customer.
3.Left-click on the customer’s data:
–if you see the Customer’s personal account page, left-click on the customer name to open the page with detailed information about the customer;
–if the customer does not have any personal account, you will immediately see the customer information page.

The following actions are available on the page:
1.Create a customer group
Click on the corresponding button on the page. In the opened window enter the Name and click Create.
2.Edit a group name
Left-click on the group name you want to modify. In the opened window, make changes and click Save.

The following actions are available on the page:
1.Create a service plan
Click on the corresponding button on the page. In the opened window fill in the fields and click Create. After that, you will automatically get to the Service plan page
|
|
For more info, see the Service plansand Create a service plan |
2.Find a service plan
Enter ID, Name of the service plan or Comment in the search bar and the search results will be displayed on the page.
3.Filter the list of service plans
Select the State of a service plan (for more info, see Service plans) and the results will be displayed on the page.
4.Sort the list of service plans
Use corresponding elements to sort the list by ID or Name, ascending or descending order, and also determine the number of service plans that should be shown on one page.
5.See detailed information about a service plan
Use sorting, filtering or search bar to find a service plan and then left-click on the line with its data to open the service plan page.
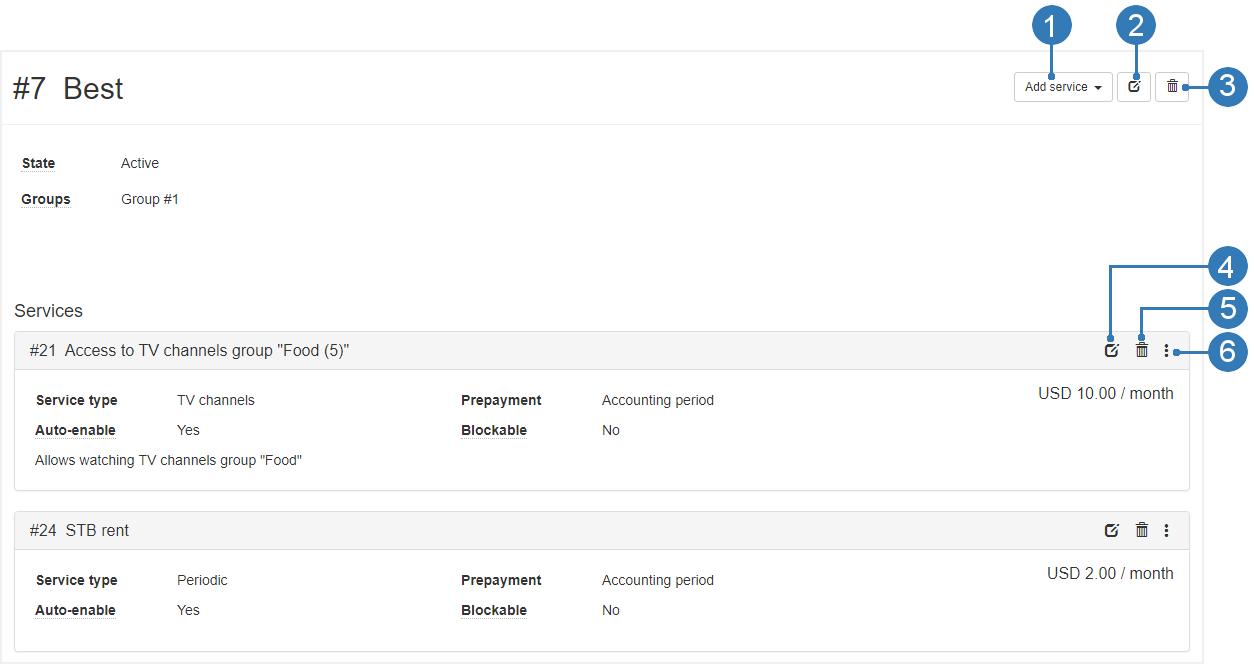
The following actions are available on the page:
1.Add a service to a service plan
Click on the corresponding button and select a service type from the drop-down list. In the opened window, fill in the fields and click Save. After that, the service will appear at the bottom of the page as a separate panel. For more info, see Services
2.Edit a service plan
Click on the corresponding button on the page. In the opened window make changes and click Save. For more info, see Service plans.
3.Delete a service plan
Click on the corresponding button and confirm the deletion in the opened window.
|
|
You can not delete the service plan that was attached to at least one customer. Change the state of a service plan to “Obsolete” if you want it not be attached to customers |
4.Edit a service
Click on the corresponding button on the panel of the service you want to modify. In the opened window, make changes and click Save.
5.Delete a service
Click on the corresponding button on the panel of the service you want to remove. In the opened window confirm the deletion.
|
|
You can not delete the service that was attached to at least one customer |
6.Enable or disable a service for multiple personal accounts
Click on the menu icon on the panel of the service you want to enable or disable for a customer group, and select the corresponding item. In the opened window, fill in the fields and click Save.
|
|
You can attach or detach the service to the customer group, if the service plan that includes this service has been attached to the selected customer group |
To open the service plan page:
1.Open the Service plans page.
2.Use filtering, sorting and search to find a service plan.
3.Left-click on the line with the service plan data.

The following actions are available on the page:
1.Add a service
Click on the corresponding button and select a service type from the drop-down list. In the opened window fill in the fields and click Save. After that, the service will appear at the bottom of the page as a separate panel.
2.Edit a service
Click on the corresponding button on the panel of the service you want to modify. In the opened window, make changes and click Save.
3.Delete a service
Click on the corresponding button on the panel of the service you want to remove. In the opened window confirm the deletion.
|
|
You can not delete the service that was attached to at least one customer |

The following actions are available on the page:
1.Find a media content
Enter a Name or Media content code in the search bar and the search results will be displayed on the page.
2.Filter the list of media content groups
Select the values for one or both filters: Media content type (Movies, TV, Radio) and Name of media content group. The results will be displayed on the same page.
3.Sort the list of media content groups
Use corresponding elements to sort the list by Name or Media content code, ascending or descending order, and also determine the number of service plans that should be shown on one page.
4.Add media content to groups or remove it from groups
Use sorting, filtering or search bar to find a media content and mark it (check a box), then click on the Add to groups or Remove from groups. In the opened window add or remove media groups and click on the corresponding button to confirm the action.
|
|
You can add a media content via the web interface on the following pages: TV Channels, Radio and Movies |
5.Edit the list of media content groups for one media content
Use sorting, filtering or search bar to find a media content for which you want to edit the list of groups and click on the line with the media content data. In the opened window delete / add groups and click Save.

The following actions are available on the page:
1.Create a new media group
Left-click on one of the available media content types (Movies, Radio, TV) and click on the corresponding button on the opened page. In the opened window write a group name and click Save.

|
|
You can not delete a media group, you can only edit its name |
2.Edit a media group name
Left-click on the media group you want to modify and click on Edit media group name on the opened page. In the opened window make changes and click Save.

3.Create a subgroup
Left-click on the media group for which you want to create a subgroup. On the opened page click Create new media group. In the opened window write a media group name and click Save.

This page contains the list of languages that can be used to describe content.
The following actions are available on the page:
1.Add a language
Click on the corresponding button on the page. In the opened window select a language and click Save.
2.Select the default language
Click on the corresponding button next to the language you want to set as the default language, and confirm the change in the opened window.
3.Delete a language
Click on the corresponding button next to the language you want to remove, and confirm the action in the opened window.

The following actions are available on the page:
1.Create prepaid card series
Click on the corresponding button on the page. In the opened window fill in the fields and click Create.
2.Find a card by its number
Click on the corresponding button. In the opened window write a card number and click Search.
3.Export to CSV
Click on the corresponding button and the data will be downloaded as a CSV file.
4.Unblock or block series
Click on the corresponding button and click Unblock or Block in the opened window.
|
|
If you want unblock or block one card: 1)use the search to find it; 2) click Unblock or Block in the opened window |
5.Delete series
Click on the corresponding button and then click Delete in the opened window.

The following actions are available on the page:
1.Sum up
Click on the corresponding button on the page to prepare financial documents for old accounting periods.
2.Close period
Click on the corresponding button if the list contains one or more accounting periods which have the Old state.
|
|
Each accounting period is automatically closed at the end of the period. If for some reason this does not occur, its state changes to Old |
|
|
These actions are executed for all accounting periods in the Old state |

The following actions are available on the page:
1.Find a request by its IP address
Enter the IP address in the search bar and the page will display all requests sent from it.
2.Filter the list of requests
Select values for following filters: Request state and / or Time range. The results will be displayed on the same page.
3.Sort the list of requests
Use corresponding elements to sort the list by Modified or IP address, ascending or descending order, and also determine the number of requests that should be shown on one page.
4.Reset the counter of activation requests
Left-click on an IP address for which you want to reset the counter. In the opened window change the state to Active and the counter value to zero, then click Save.

The following actions are available on the page:
1.Generate a report
Select values for following filters: Time range and Content type. The results will be displayed on the page.
2.Sort items in a report
Use corresponding elements to sort items by Date, Customer name or Cost, ascending or descending order, and also determine the number of items that should be shown on one page.
3.Download a report as a CSV file
Use filters to generate a report and then click on the corresponding button on the page. The data will be downloaded as a CSV file.

The following actions are available on the page:
1.Generate a report
Select Time range for the report and use corresponding elements to sort TV channels by Viewing rate, Unique subscribers or Channel name, and also ascending or descending order. The results will be displayed on the same page.
2.Download the report as a CSV file
Use filters to generate the report and then click on the corresponding button on the page. The data will be downloaded as a CSV file.

The following actions are available on the page:
1.Sort items in a report
Use corresponding elements to sort the list by Expiration date or Customer name, ascending or descending order, and also determine the number of items that should be shown on one page.
2.Download the report as a CSV file
Click on the corresponding button on the page and the data will be downloaded as a CSV file.

The following actions are available on the page:
1.Create a bank
Click on the corresponding button on the page. In the opened window fill in the fields and click Create.
|
|
Add a bank to simplify the filling of bank details when you are creating an customer as an organization |
2.Find a bank
Enter the Name and / or BIC of a bank in the search bar. The results will be displayed on the same page.
3.Sort the list of banks
Use corresponding elements to sort the list by ID, BIC, Name, ascending or descending order, and also determine the number of banks that should be shown on one page.
4.Edit bank details or delete a bank
Use sorting, filtering or search bar to find a bank, then click on the line with the bank data. In the opened window make changes and click Save or click Delete, to remove the bank.

The following actions are available on the page:
1.Upload video files
Click on the corresponding button on the page. In the opened window select the files you want to load, or drag the files into the window. The download will start automatically. When the download is complete, close the window. Uploaded files will appear in the list.
2.Find a video
Enter the File name in the search bar and the search results will be displayed on the page.
3.Filter the list of video
Select the Status of a video and the results will be displayed on the page.
4.Sort the list of video
Use corresponding elements to sort the list by Title or State, ascending or descending order, and also determine the number of video that should be shown on one page.
5.Transcode or delete a video
Use sorting, filtering or search bar to find a video, then click on the line with its data. In the opened window fill in the fields and click Transcode to process the video or click Delete to remove the video.
If the file was processed earlier, the Reset button will be displayed in the window. Reset the transcoding settings and process the file again if necessary.
|
|
In the web interface, open the Movies page and find the media content which was created in the transcode process there. Open it and add information about the video (name in different languages, description, logo, etc.). If you create a media content before transcoding, the media content will be displayed in the drop-down list in the Transcoding window (see Create a VOD content (a video, a movie) ) |

The following actions are available on the page:
1.Add a preset
Click on the corresponding button on the page. In the opened window select processing parameters you want to store in the preset and click Save.
|
|
Presets are classified into the following types: Pass through (pass the stream as is, without processing), Stream processing AVC, HEVC or MPEG-2. For all preset types except Pass through, you can configure video and audio processing parameters |
2.Find a preset
Enter the preset name in the search bar and the search results will be displayed on the page.
3.Edit or delete a preset
Left-click on the line with preset data you want to edit or delete. In the opened window change parameters and click Save or click Delete to remove the preset.
|
|
You can not change the preset type |
|
|
Changing parameters does not affect output streams that were configured using this processing preset. A set of preset settings is used only to quickly fill out web forms |
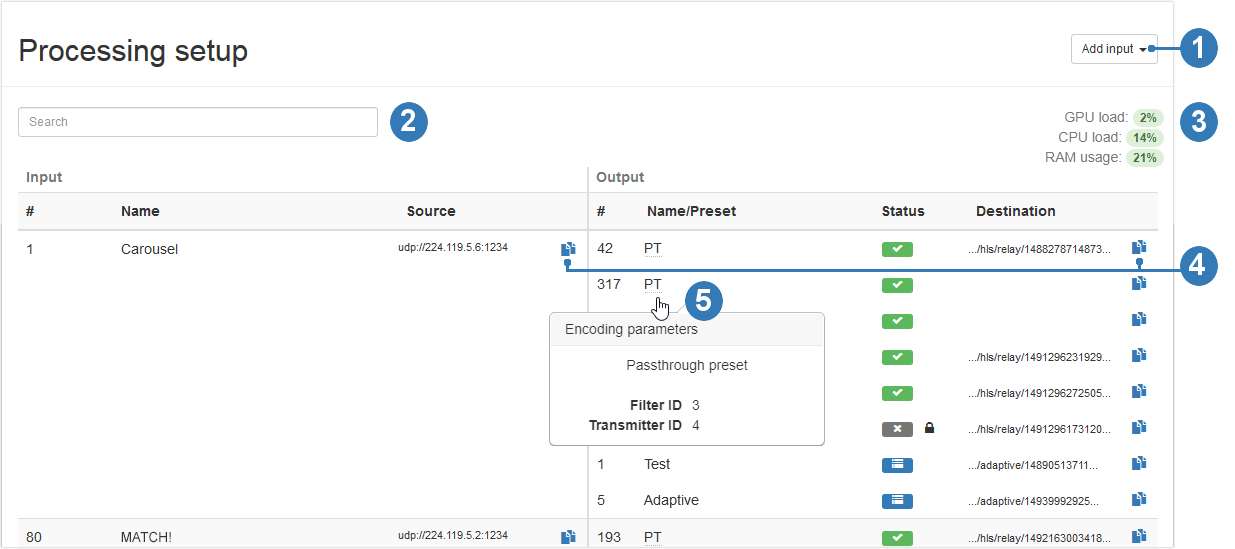
The following actions are available on the page:
1.Add input
Click on the corresponding button and select one of the options – from NetUP Streamer, from network video stream or from file. In the opened window, fill in the fields and click Save. After adding the stream, you automatically get to the Manage output streams page
|
|
Connect to the server via SSH and upload the video file to /netup/playlist/ before adding a stream from the file |
2.Find an input
Enter the input name in the search bar and the search results will be displayed on the page.
3.See a transcoder load
The transcoder load is displayed in the upper right part of the page.
4.Copy an input or output address
Click on the corresponding button next to a stream address. Data will be automatically copied to the clipboard.
5.See encoding parameters
Hover the mouse over an output name to show the pop-up window that contains transcoding parameters for the output.
 – Stopped
 – Error
 – Adaptive stream
 – Encrypted stream
7.Stop input, delete it or edit its parameters
Left-click on the line with an input data to open the Manage output streams page (read the description of this page in the next section). In the upper-right corner click one of the following buttons:
–Stop input to stop broadcasting all output streams configured for this input;
–Delete input to remove the input;
–Edit input stream to make changes.
8.Manage output streams
Left-click on the line with an output data. In the opened window make changes and click Save or Delete to remove the output stream.
You can Stop output stream (excluding an adaptive). Left-click on the line with an output data and click corresponding button in the opened window.
|
|
When the output stream is stopped, the interface displays the Start output button. Click on the button to restart broadcast |
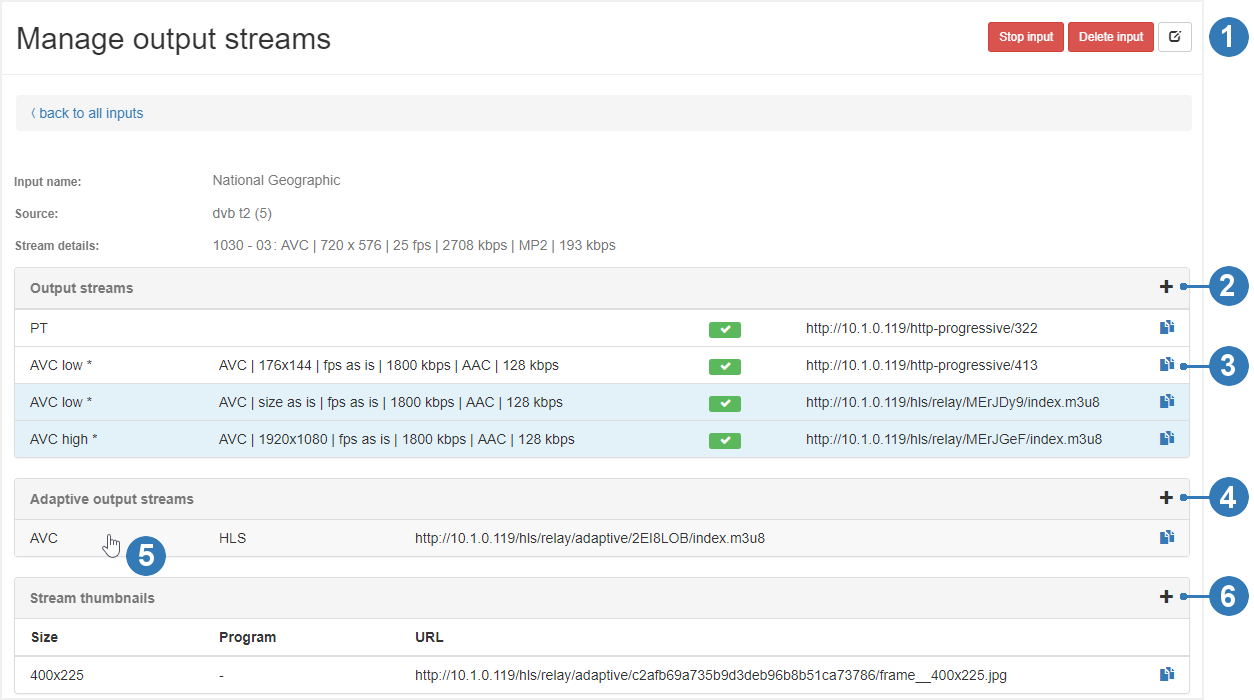
The following actions are available on the page:
1.Stop an input, delete an input stream or edit its parameters
Click on the corresponding button on the page to stop the input. If you stop the input, the broadcast of all output streams configured for this input will also be stopped.
|
|
When the input is stopped, the interface displays the Start input button. Click on the button to restart input. Restarting the input, you are restoring the broadcast of all output streams that worked before the input was stopped |
Click on the corresponding button to delete the input stream and confirm the action in the opened window.
Click Edit input stream to change its parameters, then make changes and click Save in the opened window.
2.Add an output stream
Click on the corresponding button on the page. In the opened window fill in the fields and click Save. The new stream will displayed on the Output streams panel (more info Set up transcoding )
|
|
While adding the output stream, you can change processing settings on Video and Audio tabs. These changes do not affect the preset. |
3.Copy an output stream address
Click on the corresponding button next to a stream address. Data will be automatically copied to the clipboard.
4.Add an adaptive output stream
Click on the corresponding button on the page. In the opened window select streams you want to include in the adaptive stream, then click Save. The new adaptive stream will be displayed on the Adaptive output streams panel.
|
|
Before creating an adaptive stream, add the required number of output HLS streams which should be included in it. Use the corresponding button on the Output streams panel to add streams |
5.See the output streams included in an adaptive stream
Hover the mouse over an adaptive stream and the streams that are included in it will be highlighted on the Output streams panel.
6.Add a thumbnails stream
Click on the corresponding button on the page. In the opened window specify the Thumbnail size and click Save. The new thumbnails stream will be displayed on the Stream thumbnails panel.
|
|
The thumbnails with default size are used in the NetUP Android IP STB interface. |
|
|
Thumbnails are used in the TV channels menu, in the STB interface. If you do not add the thumbnails stream for an input, the STB menu will display a TV channel logo |
7.Edit parameters of an output, delete or stop it
Left-click on the line with an output data (including an adaptive and a thumbnails streams). In the opened window make changes and click Save or click Delete to remove the output stream.
You can stop an output stream (excluding an adaptive and a thumbnails streams). Left-click on the line with an output data and click corresponding button in the opened window.
|
|
When the output stream is stopped, the interface displays the Start output button. Click on the button to restart broadcast |

The following actions are available on the page:
1.Create a new user group
Click on the corresponding button on the page. In the opened window write a group name and click Create.
|
|
System users are created as members of system user groups. Each system user group has its own set of privileges |
2.Create a new user
Click on the corresponding button on the panel of the group to which you want to add a user. In the opened window fill in the fields and click Create.
3.Edit privileges
Click on the corresponding button on the panel of the group for which you want to set privileges. On the opened page check the boxes opposite the privileges you want to grant the user group and click Save.
4.Edit a group name
Click on the corresponding button on the panel of the group for which you want to edit the name. In the opened window make changes and click Save.
5.Edit user data or delete a user
Left-click on the line with the user data. In the opened window make changes and click Save or click Delete to remove the user.
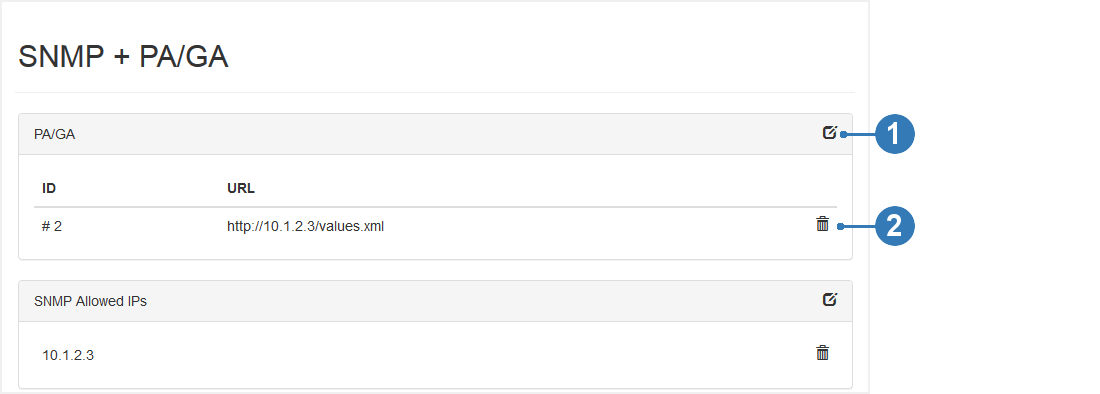
This page contains an interface for setting up interactions over SNMP and setting up services shutdown in case of a Global Alarm. After receiving such a signal, the system will stop its components, until the alarm signal turns off.
The following actions are available on the page:
1.Add or edit an item
Click on the corresponding button on the page. In the opened window fill in the fields and click Save.
2.Delete an item
Click on the corresponding button in the line with the item you want to delete. In the opened window click Delete to remove the item.

The following actions are available on the page:
1.Add a currency
Click on the corresponding button on the page. In the opened window select a currency from the drop-down list and click Add.
2.Delete a currency
Click on the corresponding button in the line with the currency you want to delete. In the opened window click Delete to remove the currency.

The following actions are available on the page:
1.Upload a firmware
Click on the corresponding button on the page. In the opened window select the files you want to load, or drag the files into the window. The download will start automatically. When the download is complete, close the window. Uploaded files will appear in the list.
2.Install or delete a firmware
Left-click on the line with the firmware you want to install or delete. In the opened window click Install or Delete to remove the firmware from the list.
|
|
Firmware of different versions of the NetUP.tv system may not be consistent with each other. |
|
|
Older firmware versions can be uploaded and will be shown in the list, but can't be installed |
This page displays the list of the system services and their statuses (started or stopped).
|
|
Left-click on a service name. In the opened window click Start or Stop to switch the service |
This page displays information about uploaded licenses (components, numbers, expiration dates and restrictions). Use this page to upload new licenses.
|
|
Set the correct timezone before uploading the license (see Date and time) |
|
|
Make sure the new license is fully compatible with the old one before uploading it |
This page displays the list of the STB messages on the current date.
|
|
Select the date and then click Create message. In the opened window select a customer or a customer group, write a message and click Create |