8
Web interface is used for setting up various server parameters and client's STBs.
To access the web interface, enter an IP address of Middleware server in your browser's address bar. On the opened page enter the login and the password specified in the equipment passport.
|
|
It is strongly recommended to change the password immediately after logging in for the first time. For more info, see Security |
The left panel of the web interface contains links to settings pages, pages are organized into groups. The presence of pages and groups depends on the hardware configuration of the server and the privileges of the currently logged in system user.
The web interface can include:
|
Group |
Page |
Function |
|
Interfaces |
Does not contain pages |
Jump to the manager web interface |
|
Streaming |
Control the NetUP Streamer, see CAM module parameters, set up transponders and output streams |
|
|
Media content |
Manage languages which used to describe content |
|
|
Manage TV content |
||
|
Manage Radio content |
||
|
Manage VoD content |
||
|
Import EPG |
||
|
Manage advertising messages |
||
|
Manage media groups |
||
|
Set up parameters for broadcasting scheduled video files |
||
|
System status |
Reboot the system and remote channel switch |
|
|
Get info about components, license and server hardware |
||
|
Get info about NetUP.tv systems |
||
|
Get info about disk space usage |
||
|
Android client |
Set up the Android shop |
|
|
Set up the Android home page |
||
|
Set up parameters of the NetUP.tv client for Android |
||
|
Edit the Android home page menu |
||
|
Edit the Android info page |
||
|
IPTV |
Set up SNMP, download the MIB file |
|
|
System administration |
Download the Administrator’s Guide |
|
|
Reboot and shutdown server |
||
|
Get info about the services |
||
|
Manage backup |
||
|
System configuration |
Manage network interfaces and VLANs |
|
|
Manage user routing rules |
||
|
Change the admin password |
||
|
Start and stop the services |
||
|
Select timezone and set up server time |
||
|
Download licenses |
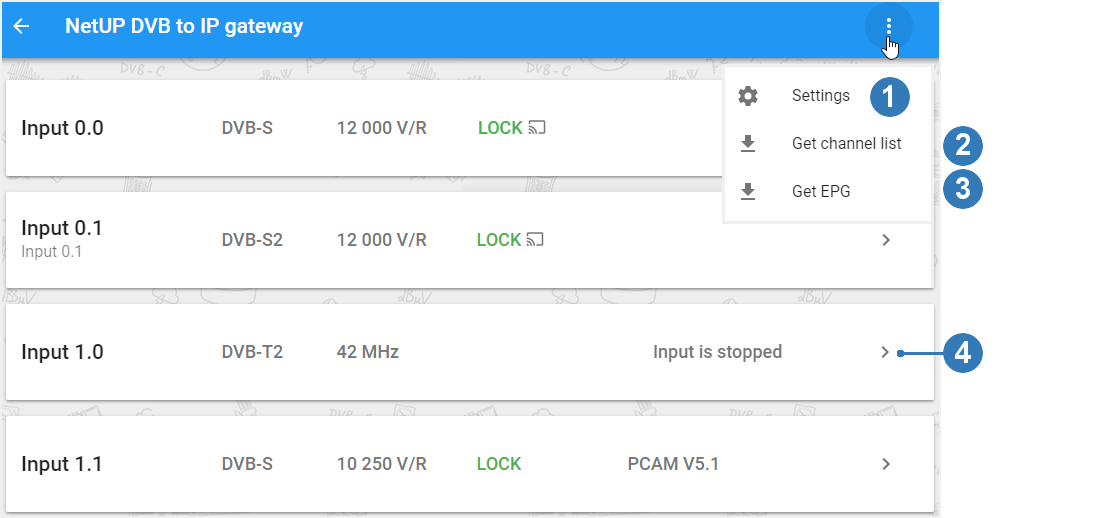
This page displays all available inputs. Each input has its own panel.
If an Input is enabled, the panel displays mode and frequency of the input stream, signal decoding information, and CAM name.
If an Input is not enabled, the panel displays Input is stopped.

|
|
Inputs in the web interface are numbered as inputs on the rear panel of the NetUP Streamer (see Streamer) |
The following actions are available on the page:
1.Tune the page interface
Click on the Interface options button and select Settings. In the opened window, enable or disable the available options and click Close. For more info, see Interface options
2.Get channel list
Click on the Interface options button and select Get channel list. In the opened window, select a format: XML or M3U, and click Download or Copy.
3.Get EPG
Click on the Interface options button and select Get EPG. In the opened window, select a format: JSON or XMLTV,and click Download or Copy link to EPG.
4.Expand the panel with input settings
Left-click on the corresponding button on the input panel you want to configure. For more info, see Input panel
Click the button in the upper-right corner of the DVB to IP gateway page to open the Interface options window and enable / disable the following options:
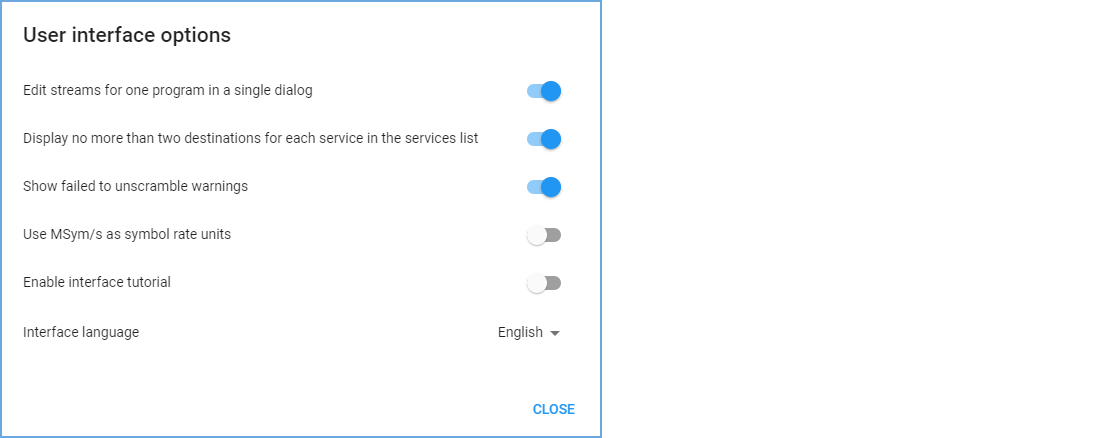
–Edit streams for one program in a single dialog – enable the option if you want to set up all output streams for one program in a single common window. For more info, see Set up streaming.
–Display no more than two destinations for each service in the services list – enable the option if you want to display no more than two destinations for each service in the common list of services in the input panel.
–Show failed to unscramble warnings – disable the option if you want to hide warnings about decoding errors on the NetUP DVB to IP gatewaypage.
–Use MSym/s as symbol rate units – enable the option if you want to switch symbol rate units. Default symbolic speed is in KSym/s.
–Enable interface tutorial – enable the option if you want to run a short tutorial on NetUP DVB to IP gateway.
–Interface language – select English or Russian for the interface.
Click Expand input on the required input panel to access its settings.
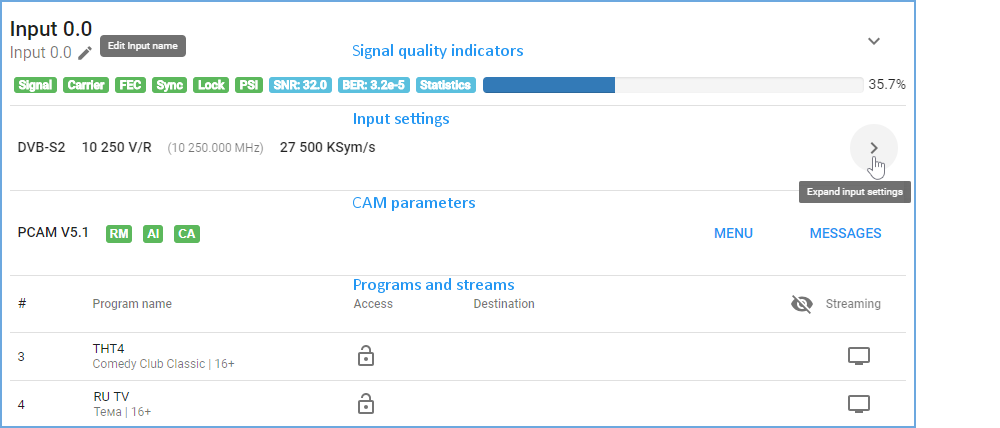
If you have already configured the signal for the selected input, the expanded input panel displays:
If the input signal is not set or turned off, the expanded input panel only includes transponder settings. How to configure the input signal, see Configure an input.
|
|
Click on the pencil icon under the input number, write ‘Input name’ and save it. |
Click Expand input on an input panel to see quality indicators
If the input is enabled, there are the following indicators:
–Signal – denotes presence of the signal (red means no signal);
–Carrier – denotes presence of the carrier frequency (red means no carrier);
–FEC – denotes the error correction;
–Sync – denotes synchronization with the signal;
–Lock – means that the adapter has locked on the signal and is decoding it successfully;
–PSI – program specific information: PAT, PMT, SDT, NIT, EIT, and etc. Click on the indicator to see more;
–Statistics – transport stream statistics. Click on the indicator to see more;
–Signal strength – signal strength in percent.
The status of the indicators changes after each update of the input signal parameters.
Click Expand input settings to access the settings.
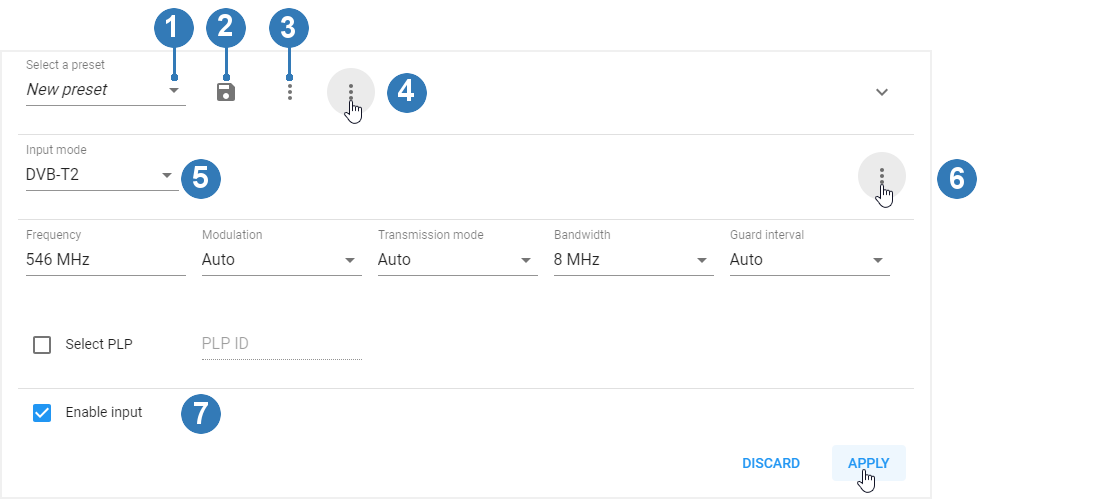
The following actions are available on the panel:
1.Upload input and streaming settings from a preset
Select a preset from the list and the web form displays the parameters stored in the preset. If necessary, you can change parameter values.
|
|
Changing parameter values in the web form does not affect the preset. To find out how to modify a preset, please see Configure an input using a preset |
At the bottom of the panel, click Apply and select Apply input settings to upload only input settings, or select Apply both input and streaming settings to load the input settings first and then click Load to upload the streaming settings from the same preset.
|
|
Input settings and streaming settings from the same preset are downloaded separately. |
2.Save or edit a preset
Set the parameters to configure the input and click Apply. If necessary, set up streaming settings, then select from the preset list New preset and click Save preset. In the opened window write the preset name and click Save.
|
|
The preset stores input and streaming settings. Read more here Set up streaming |
Select a preset from the preset list, modify input settings and / or streaming settings, apply changes and click Save preset. In the opened window edit the preset name, if necessary, and click Save.
|
|
For more info, see Create and edit a preset |
3.Delete a preset
Select the preset from the list and click Delete preset.
|
|
Deleting a preset does not affect the broadcasting. A set of preset settings is used only to quickly fill out web forms |
4.Import or export a preset
Click Other actions and select Import. In the opened window select a file and click Open.
Select a preset from the list, click Other actions and select Export. The preset will be uploaded to a file.
|
|
Exporting and importing templates is done in json format |
5.Set transponder parameters manually
Select Input mode (DVB-S, DVB-S2, DVB-T, DVB-T2, DVB-C Annex A, ISDB-T), set all parameters manually and click Apply.
|
|
Each of Input modes has its own set of parameters, and the list of available modes depends on the DVB adapter type. For more info, see Input modes |
6.Get transponder settings
Click Get transponder settings and select one of available lists: Satellite database or Browse network. In the opened window, select one of available transponders to fill in the form using its parameters.
|
|
Browse network is available for DVB-S and DVB-S2 |
7.Enable or disable an input
Turn on or off the corresponding flag on the input panel and click Apply.
|
|
After disabling the input, all output streams will be automatically disabled. After re-enabling the input, all output streams that were set up before disabling will be automatically enabled |
|
Input mode |
Parameter |
Description |
|
DVB-S/DVB-S2 |
Frequency |
The signal frequency |
|
Symbol rate |
The rate of symbol transfer |
|
|
Polarization |
Vertical / Right, Horizontal / Left or Disabled |
|
|
LNB type |
Dual Ku band, Single Ku band, С band. Once it is selected, the corresponding values of LNB parameters appear in their fields |
|
|
LNB low frequency |
The LO frequency for the low-frequency range of satellite signal. See the hardware specifications for particular values |
|
|
LNB high frequency |
The LO frequency for the high-frequency range of satellite signal |
|
|
LNB switch frequency |
The border between satellite signal frequency ranges |
|
|
Port group |
A, B, C, D or off |
|
|
Tone |
Enables controlling the LNB by feeding a special 22 kHz tone to it |
|
|
DVB-C Annex A |
Frequency |
The signal frequency |
|
Modulation |
QAM 16, QAM 32, QAM 64, QAM 128, QAM 256 or Auto |
|
|
Symbol rate |
The rate of symbol transfer |
|
|
DVB-T/DVB-T2 |
Frequency |
The signal frequency |
|
Modulation |
QPSK, QAM 16, QAM 64 or Auto |
|
|
Transmission mode |
1К, 2К, 4К, 8К, 16К, 32К or Auto |
|
|
Bandwidth |
8MHz, 7MHz or 6MHz |
|
|
Guard interval |
1/32, 1/16, 1/8, 1/4 or Auto |
|
|
For DVB-S2 and DVB-T2, the Select PLP option is available |
PLP (Physical Layer Pipe) is a logical channel that may carry one or multiple services. You can specify the ID of the channel that you want to receive in the corresponding field.
Click Expand input on an input panel to see the CAM parameters:
|
|
If CAM is not enabled, the panel displays only “CAM: missing” |
–CA (Conditional Access Support)
|
|
Click MMI to close MMI session |
Click on RM, AI, CA indicator to see more details about CAM.
Click Expand input on an input panel to see the list of received programs and to set up streams.

|
|
You can see the list of received programs, if you have configured the input signal. How to configure the input signal, see Configure an input |
The following actions are available on the panel:
1.Open program properties
Click on a Program number to see program properties.
2.Open the program schedule for the near future
Click on a Program name to see the names of the program that is on the air and the next one.
3.Test descrambling
Click on the corresponding button, then select programs in the opened window, and click Test. The test results will be displayed opposite each of the programs.
|
|
This option is available for encrypted streams. If the lock is closed, the stream is encrypted. If the lock is opened, the stream is decrypted |
4.Hide idle services
Click on the corresponding button on the panel, now only programs with active streams are shown. Click on this button again to show all programs.
5.Copy an output stream address
Click on the copy icon next to the stream address. If the program has more than one output stream, click the copy icon and select the address you want to copy If the stream is one, it will be copied immediately after clicking.
6.Set up streaming
Click on the corresponding button opposite of the program you want to set up output streams for. In the opened Stream setup window, add and configure required number of streams, then click Apply and close the window. Added streams will appear in the program list in the column Destination.
|
|
The description of the Stream setup window is in the next section. See an example of setting up a stream here Set up streaming |
On the input panel, opposite the required program, click on the button in the Streaming column to open the Stream setup window. The window is divided into two parts: Streams list and Stream settings.
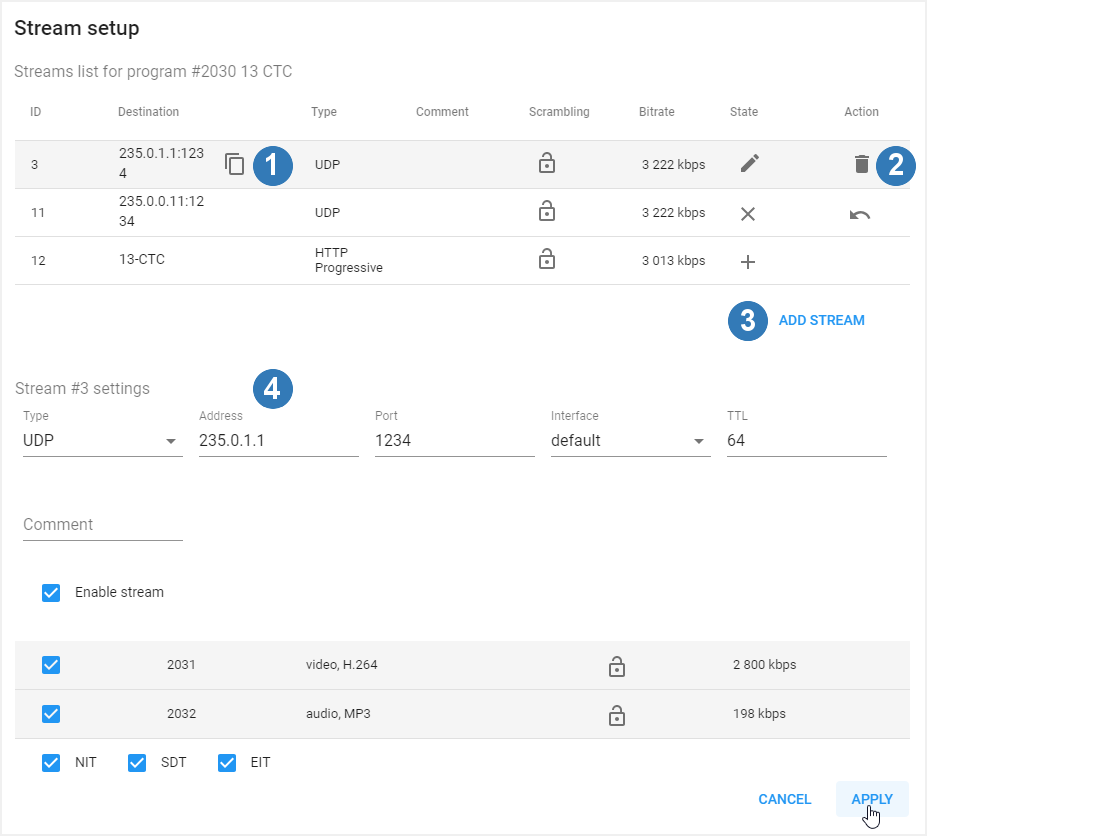
|
|
Turn on the corresponding option in the user interface options to edit streams for one program in a single dialog (see Interface options). |
The following actions are available in the window:
1.Copy an output stream address
Click on the copy icon next to the stream address. The stream address will be copied to clipboard.
2.Delete an output stream
Move the mouse over the line with the stream you want to delete and the Action column will display the delete icon. Click on this icon and the State column will display the appropriate mark. Click Back to uncheck the mark or click Apply to delete the selected stream (streams).
3.Add a stream
Click Add stream and set the stream parameters. Click Apply to save the added stream (streams).
4.Configure stream settings
Add a stream or select the existing one with the left mouse button and make sure that the Stream settings panel displays the required stream ID. Select the stream Type and fill in the parameter fields. Each type of stream has its own set of parameters. Then check PIDs and service tables (NIT, SDT, EIT) that you want to include in the stream. If necessary, change settings of other streams and click Apply to save changes.
|
|
In the Stream list, the State column displays the pencil icon for streams which have been edited and the plus icon for streams which have been added. |
This page contains the list of languages that can be used to describe content.
The following actions are available on the page:
1.Add a language
Click Add, then in the opened window, fill in the fields and click Apply.
2.Delete a language
Left-click on the language you want to delete, and in the opened window, click Delete.
3.Select a default language
Left-click on the language you want to set as default. In the opened window check the set as default box and click Apply. You can do this when adding a language to the system as well.
This page displays the list of TV channel profiles. The profile may contain the name and logo of the TV channel, description in various languages, genres, channel number, etc.

The following actions are available on the page:
1.Add a profile
Click on the Add button or the Plus-shaped button. In the opened window fill in the fields and click Apply.
2.Edit a profile
Left-click on the profile you want to edit. In the opened window click Edit next to the row you want to change, fill in the fields and click ОК. Make changes and click Close.
3.Delete a profile
Left-click on the profile you want to delete. In the opened window click Make obsolete.
|
|
See an example of adding a TV channel here Add a TV channel ) |
This page displays the list of radio profiles. The profile may contain the name and logo of the radio channel, description in various languages, channel URL, multicast address.
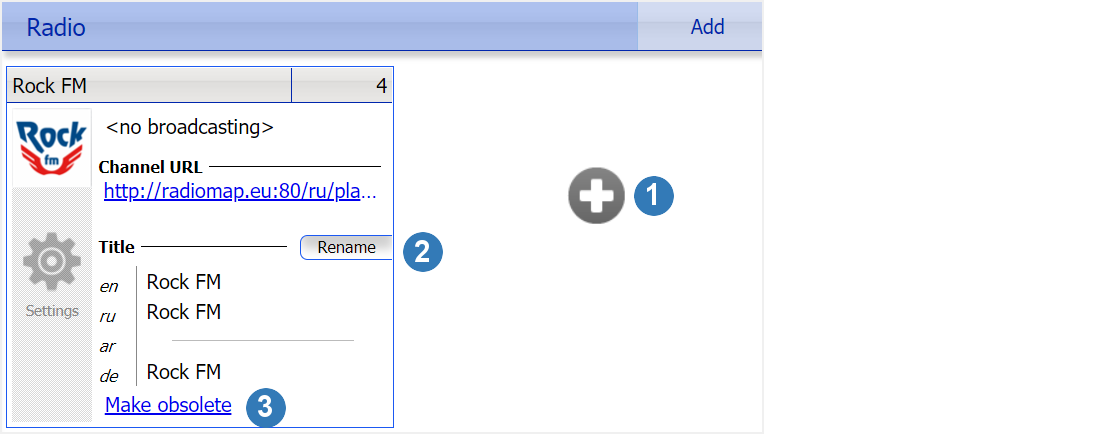
The following actions are available on the page:
1.Add a profile
Click on the Add button or the Plus-shaped button. In the opened window, fill in the fields, upload the logo and click OK.
2.Edit a radio channel name
Click Rename in the profile of the radio channel you want to edit. In the opened window write the name in all available languages and click Apply.
3.Delete a radio channel
Click Make obsolete in the profile of the radio channel you want to delete.
This page displays the list of movie profiles (media content). The profile may contain a variety of information about the video, including a poster and a trailer.
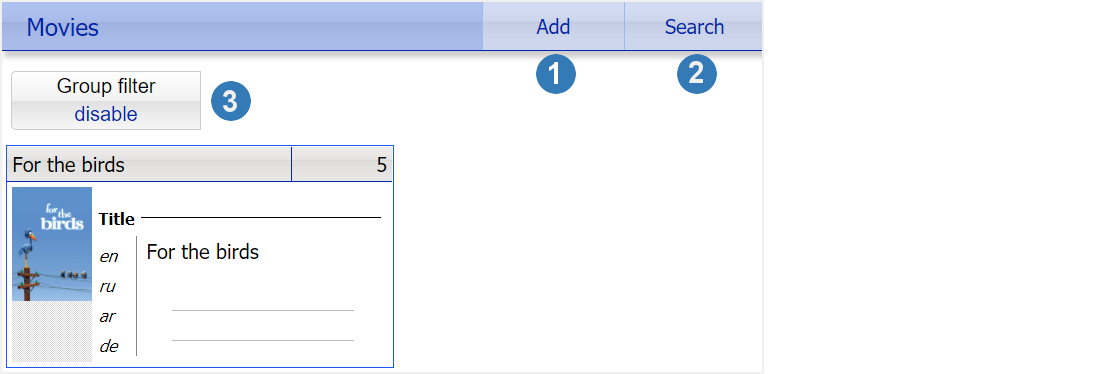
The following actions are available on the page:
1.Add a media content (profile)
Click Add, then in the opened window, write a name of a new movie and click OK.
|
|
A media content can be automatically created as a step in the video transcoding process. For more info, see Manage VoD content and Create a VOD content (a video, a movie) |
2.Find a media content by its name
Click Search, then in the opened window, write the media content name and click OK. The search will open the window for editing the found profile.
3.Filter media content by group
Click Group filter, select from drop-down list one of the groups and the page will display media content from this group. If you want to see all available media content, select disable.
|
|
For more info, see Media content |
4.Edit a media content
Left-click on the media content you want to edit. In the opened window click Edit next to the row you want to change, fill in the fields and click ОК. Make changes and click Close.
5.Delete a media content
Left-click on the media content you want to delete. In the opened window click Make obsolete.
This page displays a list of program guides that have been added to the system. Each EPG has its own panel.
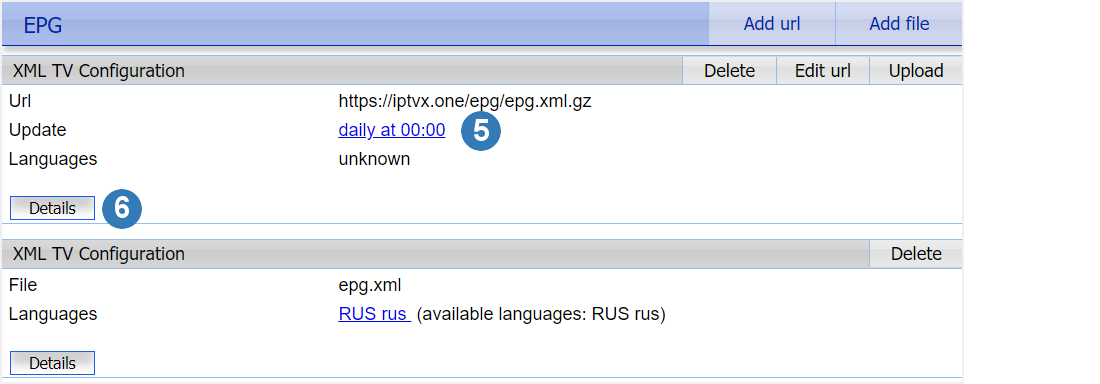
The following actions are available on the page:
1.Add an EPG
Click Add url to download the program guide from URL or click Add file to upload a XMLTV file. In the opened window fill in the fields and click Save.
|
|
You can set an update schedule for the EPG downloaded from URL |
2.Delete an EPG
Click Delete on the panel of the EPG you want to delete.
3.Change URL for an EPG
Click Edit url on the panel of the EPG for which you want to edit the URL. In the opened window edit the URL and click Save.
4.Upload an EPG
Click Upload on the panel of the EPG downloaded from URL.
5.Edit an update schedule for an EPG
Left-click on the update schedule you want to change. In the opened window make changes and then click Apply.
6.Edit an EPG
Click Details on the EPG panel to see a program list. Make changes and click Save. Then click Hide details to collapse the program list.
|
|
For more info about adding and editing an EPG, see Upload a program guide (EPG) |
This page displays a list of ads shown via STB.

The following actions are available on the page:
1.Add an ad schedule
Click Add recurrent show, then in the opened window, select time and days to repeat ads and then click Apply.
|
|
All ads are displayed during each of the shows |
2.Show ads now
Click Show now to run ads immediately.
3.Change a show time
Left-click on the show time you want to edit. In the opened window make changes and then click Apply.
4.Add a show time
Click Add show in the column of the day you want to show ads. In the opened window select the time and click Apply.
5.Set an ad sequence
Drag the ad with the button on the left and place it in desired position. Ad number in the list will change accordingly.
|
|
The priority of showing ads depends on the ad number in the list |
6.Edit or delete an ad
Left-click on the number of the ad you want to edit or to delete. In the opened window make changes and click Apply to save the ad or click Delete to remove it.
7.Add an ad
Click Add message, then in the opened window, specify the add duration, write the ad text and click Apply.
|
|
WYSIWYG editor window is used to add and edit messages |
This page displays the list of media groups. A media group can combine content of the same type: TV, Radio, VoD.
The following actions are available on the page:
1.Create a new media group
Click Add, then in the opened window, write a name of a new group, select the content type and click Apply.
|
|
You can not delete a media group, you can only edit its name |
2.Edit a media group name
Left-click on the group you want to edit. In the opened window make changes and then click Apply.
This page displays the list of created channels and video broadcast schedules for them.
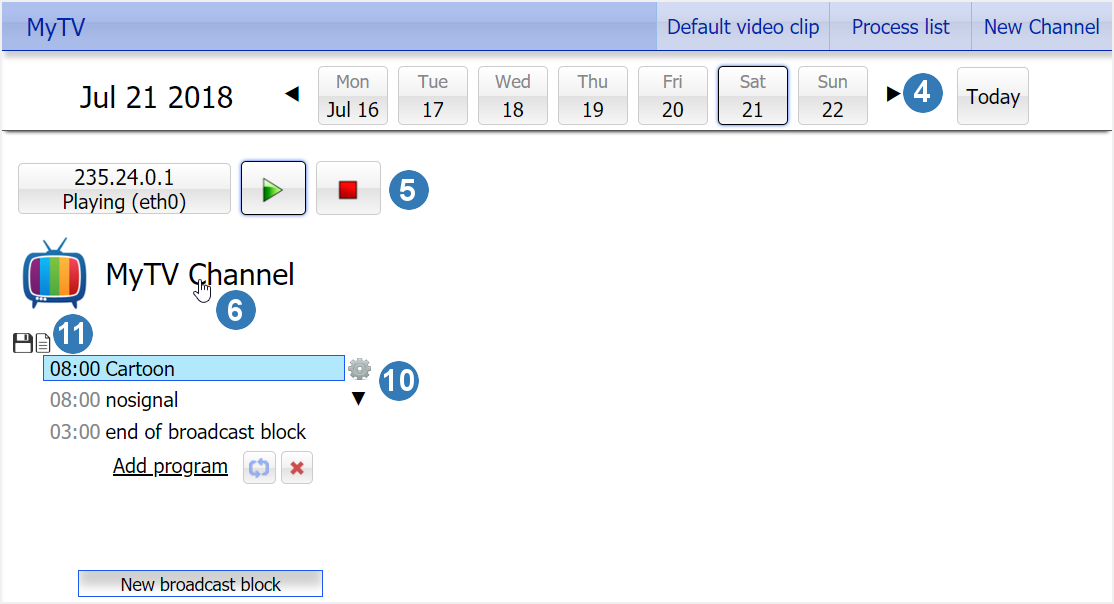
The following actions are available on the page:
1.Add a default video
Click Default video clip to upload the video file you want to play on all MyTV channels during pauses in the schedule.
|
|
Use FTP or SCP to delete video from server |
2.See a list of transcoding videos
Click Process list to open the list of videos queued for transcoding. In the opened window select the video file you want to transcode out of turn and click Encode.
3.Add a new MyTV channel
Click New TV Channel, then in the opened window, write the name of the channel, its multicast address and click OK.
4.See a broadcast schedule
Left-click on the date for which you want to open the broadcast schedule. Use left and right arrows to move through the calendar for the week forward or backward, and click Today to open the current day schedule.
5.Play or stop broadcasting
Click on the corresponding button on the panel of the channel you want to play or stop broadcasting.
|
|
Under the channel address, you can see the broadcast status: Stopped or Playing |
6.Edit a channel profile or delete it
Left-click on the channel name. In the opened window make changes and click Close to save them and close the window or click Make obsolete to delete the channel.
7.Create a video broadcast schedule
|
|
The schedule consists of blocks. For each block, you need to set the start time of the broadcast and download or create a playlist (video set) |
Click New broadcast block, then in the opened window set the start time and click OK. Click Add program, then in the opened window choose one of the options for uploading videos: Upload (upload a new video and transcode it if necessary), Encode (transcode uploaded video) or Reuse (add already used video).
Select the video and click OK.
8.Enable block repeat
Click on the corresponding button under the block you want to repeat and when the last video from the playlist ends, the first video from this playlist will start playing.
9.Delete a block from a schedule
Click on the corresponding button under the block you want to delete.
10.Change the video sequence or remove a video from the block
|
|
The video sequence – from top to bottom |
Left-click on a video name and additional buttons will appear to the right of the video. Click on the arrow icon to move the video up or down.
Click on the cogwheel icon and then click Delete in the opened window to remove the video from the block.
11.Save or load a playlist
Click on the corresponding button on the block panel to save a list of videos as the playlist or load the one of the previously saved playlists.
This page displays two lists (STB clients and PC clients), which show info about the connected customers.

The following actions are available on the page:
1.Reboot an STB remotely
Click Reboot STB, then in the opened window, enter the number of the access card used by the STB and click OK.
2.Switch a channel remotely
Click Remote channel switch, then in the opened window, select the channel you want to switch and click Next. Select STBs for which you want to switch the channel: All STBs (all connected set-top boxes), Group (STBs of customers included in a certain group) or STBs with access card number and click OK. After that, you will see the statistic window. It will show how many STBs succeeded and failed.
|
|
Remote channel switch is only available for Android based STBs |
3.Download an STB log
Click STB log, then in the opened window, enter the number of the access card used by the STB and click Download.
4.Sort the list of connected clients
Click on the left part of the sort button to select the sorting criteria: Access card number or Host. Click on the arrow next to the sort button to sort the list by ascending or descending order.
5.See detailed information about a connected client
Click on corresponding button in the Details columns on the panel of the selected customer.
This page keeps info about the NetUP.tv system: product and firmware versions, build numbers of individual systems, information about the license and server hardware (CPU, memory, hard drives and network interfaces).
This page displays all the systems of the NetUP.tv. Each of the systems has a separate panel. The panel displays a list of systems with which interaction is possible. Addresses of interacting systems are links.

The following actions are available on the page:
1.Change a system address (server host)
Left-click on the system address you want to change. In the opened window write the address manually or click Auto detect to detect the address automatically, then click Apply to save changes.
This page displays disk space usage S.M.A.R.T. and RAID condition report.

|
|
Click on details to see the detailed S.M.A.R.T. or RAID condition report. |
This page contains the interface for setting up a shop. The shop is displayed in the menu of the NetUP.tv Android client.
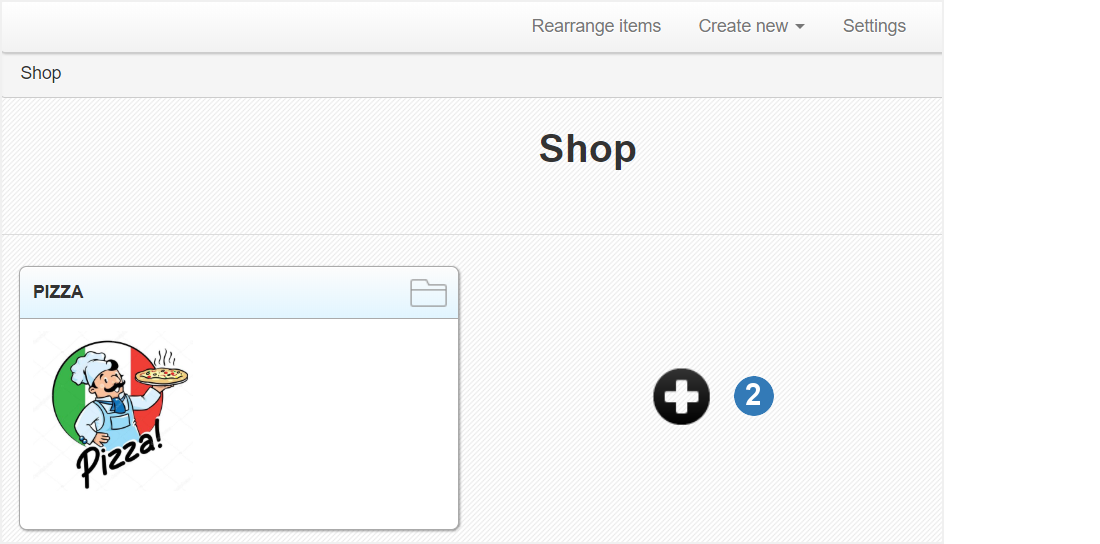
The following actions are available on the page:
1.Rearrange items on the page
Click Rearrange items and use the mouse to move and arrange items in the required order. Then click Save to confirm the new order or click Cancel to return to the previous order.
2.Add items
Click Create new or the plus-shaped button and select Item or Category. On the opened page, write the item or category name, upload the logo and click OK.
|
|
The category may contain subcategories |
3.Change general settings
Click Settings, then in the opened window, write Currency (that you want to use for all items in the shop), Send orders to (the e-mail for orders) and Sender address, then click OK.
4.Edit an item or delete it
Left-click on an item or a category. In the opened page click Change name to edit the item or category name or Upload to set an image for the item or category. In the upper right corner, click Remove to delete the selected item or category.
This page contains a toolbar for customizing your home page. The home page is displayed on the main screen of the NetUP.tv Android client interface.
The TinyMCE editor is used to configure the page. Using the tools of this editor, you can not only customize the appearance of the home page, but also add HTML widgets, for example, AccuWeather or Twitter (the corresponding button is located in the bottom row of the toolbar).
|
|
Click Save in the upper right corner to apply the changes |
This page contains a set of parameters that configure the NetUP.tv Android client:
|
Global settings |
|
|
Home page URL |
Write the address you want to display for the home page |
|
Stop playback when idle |
Check the box if you want TV playback to stop automatically when a customer hasn't pressed any buttons on their remote for a certain time. Set the timer in the Idle time (minutes) row. |
|
Restart playback after given time in minutes |
Check the box if you want TV playback to resume automatically after a certain time. Set the time limit in the Playback time (minutes) before restart row |
|
Start up mode |
Select the required STB launch behavior: Regular startup, Resume TV playback (turn on the TV channel that played before turning off the STB) or Play by URL (turn on a certain channel). In the last case, specify the channel URL |
|
Home page background |
Select an image for the home page background |
|
Allow prepaid cards |
Check this box to allow customers to use prepaid cards |
|
Update URL |
Specify the address where the update file is located |
|
Request confirmation before installing updates |
Check the box if you want to show confirmation before installing updates |
|
Install updates when download finishes |
Check the box if you want to install updates immediately after the download is complete |
|
Install updates at next reboot |
Check the box if you want to install updates at next reboot |
|
Hide “Check for updates” item from the settings menu |
Check the box to hide the Check for updates option in the NetUP.tv Android client Settings menu |
|
Download updates automatically |
Check the box if you want to download updates automatically |
|
Use custom account replenishment notification |
Write a message for a customer who need to replenish the account. The following substitutions are available for this message: |
|
Use custom service plan expiration notification |
Write a message about the expiration of the service plan. The following substitutions are available for this message: |
|
Personnel password |
Enter a personnel password. This password is required to reset the STB activation and some apps can be configured to require password to launch |
|
Activate STB with login/password |
Check the box if you want to use the login and password instead of access card to activate an STB |
|
Scroll advertising messages |
Check the box to allow scrolling of advertising messages |
|
Display advertising message at the top of the screen |
Check the box if you want to display advertisements at the top of a screen |
|
Allowed applications |
|
|
All |
Select this option to allow the customers to launch all available applications |
|
List |
Create a list of applications that customers can use. Separate application names by comas. Add a "#" in front of every application that you want to require a personnel password to launch |
|
Two lists |
Create two lists of applications that customers can use: for all customers and for blocked customers. Separate application names by comas. Add a "#" in front of every application that you want to require a personnel password to launch |
|
|
Click Submit on the bottom of the page to save changes |
This page allows you to customize the menu that is displayed on the home page of the NetUP.tv Android client. All the menu items are shown as separate panels.
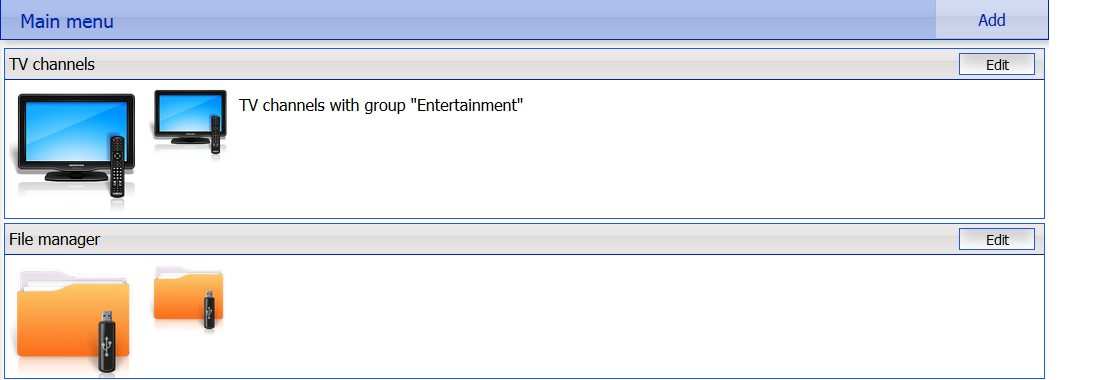
The following actions are available on the page:
1.Rearrange items in the menu
You can change the order of the menu items by dragging the items with the mouse. Hover the mouse over the top of one element's panel, click and hold the left mouse button until you move the element.
2.Add a menu item
Click Add, then in the opened window, fill in the fields and click Save.
–Item type – the item type, e.g. Settings, Movies, Radio etc.
–Item name – the item name for displaying in the menu.
–Page title – the item name for displaying on the page that this menu item opens.
–Use custom icons – the URL or image for the main menu (Large icon) and for the page that this menu item opens (Small icon).
–Media group – the media group which combines TV channels that will be available to the customer after selecting this item menu. This is only available for TV channels.
–URL – the web address for displaying on the page that this menu item opens. This is only available for the WebPortal
–Package name – the application name which will be run after selecting this item menu. This is only available for External application.
3.Edit settings of an item or delete it
Click Edit on an item panel. In the opened window make changes and click Save to apply them or click Delete to exclude the item from the menu.
This page contains a toolbar for customizing your info page that is displayed in the main menu of the NetUP.tv Android client.
The TinyMCE editor is used to configure the page.
|
|
Click Save in the upper right corner to apply the changes |
This page contains the list of communities entitled to make SNMP requests.
The following actions are available on the page:
1.Download MIB file
Click Download MIB-file to get the .txt file. The NetUP’s MIB file contains a template for the following information:
|
netupCpuTable |
containing information about every CPU (core) in the system |
|
|
netupCpuEntry |
an element that describes each row of the table and combines elements: |
|
|
|
netupCpuIndex |
the CPU number |
|
|
netupCpuLoad |
the CPU load level |
|
|
netupCpuTemp |
the CPU temperature |
|
netupStreamerTable |
containing information about every streamer in the system |
|
|
netupStreamerTableEntry |
an element that describes each row of the table and combines elements: |
|
|
|
adapterNumber |
the adapter number |
|
|
netupBER |
the bit error rate |
|
|
netupSNR |
the signal to noise ratio |
|
|
netupLOCK |
the signal lock status |
|
netupStorageTable |
containing information about every hard drive in the system |
|
|
netupStorageTable |
an element that describes each row of the table and combines elements: |
|
|
|
netupStorageIndex |
the storage number |
|
|
netupStorageDevice |
the path to the storage (for example, "/dev/sda1") |
|
|
netupStorageMountPoint |
the mounting point of the storage (for example, "/mnt/hdd") |
|
|
netupStorageFilesystem |
the file system of the storage |
|
|
netupStorageBlockSize |
the block size on the storage |
|
|
netupStorageFragmentSize |
the fragment size on the storage |
|
|
netupStorageSize |
the storage size |
|
|
netupStorageFree |
the free space on the storage |
|
For the system as a whole: |
|
|
netupMemPhisTotal |
the total memory size |
|
netupMemPhisFree |
the free memory size |
|
netupMemPhisBuffers |
the buffer size |
|
netupMemPhisCached |
the cache memory size |
|
netupMemSwapTotal |
the maximum size of the swap file |
|
netupMemSwapFree |
the free space within the swap file |
|
netupStbClients |
the number of connected STB clients |
|
netupPcClients |
the number of connected PC clients |
|
netupTotalClients |
the total number of connected clients |
|
|
To request all available parameters, download the MIB file, pass it to the SNMP daemon, and run the following command: snmpwalk -v2c -c netuptest 10.1.0.77 NETUP-MIB::netup |
2.Add an agent
Click Add agent, then in the opened window, fill in the fields and click Save.
3.Edit parameters of a community or delete it
Left-click on the community’s IP address. In the opened window make changes and click Save to apply them or click Delete to remove the community.
Here you can download the “NetUP.tv Administrator's Guide” in Russian or English.
Here you can Reboot and Shutdown the server. Whenever the server needs to be reloaded or shut down, this should be done exclusively by means of these controls; abnormal termination may lead to system failure.
–Timezone – selected timezone;
–Licence – license number and owner;
–Internet – Internet connection status;
–Server password – password for SSH and FTP connection;
–Status of adapters and system components – NetUP IPTV Core, Middleware, Billing, etc.;
–Connections between systems – connection presence.
|
|
Using the corresponding button, you can collect diagnostic information about the services to send it to technical support |
The page contains the list of backups – .tar.bz2 archives that contain the system settings.
|
|
The page is present only on IPTV Core servers |
The following actions are available on the page:
1.Create a backup manually
Click Create to save an additional copy of system settings.
|
|
Automatic backup is made every day |
2.Delete, download a backup or restore system settings
Left-click on an archive. In the opened window click one of the following buttons: Delete – remove the archive, Download – load the tar.bz2 archive, Restore backup – apply system settings from the archive.
|
|
Before restoring a backup, make sure that the backup was NOT created during the period when you used the firmware related to the another release. For more info, see the Firmware page (the System group) in the manager web interface. The release number is first two digits of the product version, for example, 2.0, 2.2, etc. |
|
|
How to restore and automatically download backups, read here: Backup copies |
This page displays the list of all network adapters installed on the system, including virtual. Each adapter has the individual panel in the page.
The adapters in the web interface are related to the network adapters on the front panel of NetUP streamer:

|
|
The network adapter №1 on the front panel of NetUP streamer is the eth0 in the web interface, №2 – eth1, №3 – eth2, №4 – eth3 |
The following actions are available on the page:
1.Create a VLAN (virtual adapter)
Click Add VLAN. In the opened window select the Network interface, that you want to use for creating a virtual one, write the VLAN ID and IP address/mask, then click Save.
|
|
The VLAN name will be composed of the physical interface name and the entered ID |
2.Connect to IPTV Core
Click Change Core IP, then in the opened window, write IP address and click Save to connect to IPTV Core. As result, in the IPTV Core web interface, on the Connections page, should appear information about the connection to this server.
|
|
Change Core IP button is only present on non IPTV Core servers |
3.Assign IP Address to Adapter
Click Add alias on an adapter panel. In the opened window, write IP address/mask and click Save.
|
|
The list of all IP addresses assigned to the adapter is displayed on the adapter panel in the Aliases column |
4.Display adapter load statistics in graphic
Click Statistics on an adapter panel to see the statistic.
5.Set the main interface
Left-click on the IP address (Inet adress) of an adapter. In the opened window check the Main interface box and click Save.
|
|
The default main interface is eth0 |
6.Edit an IP-address or delete it
Left-click on the IP address (Inet adress or Aliasses) you want to edit. In the opened window change the IP address and click Save. You cannot delete Main IP or the last remaining IP address of the adapter.
|
|
The address assigned for the main interface is used for the component’s interaction (see Connections) and thus is absolutely crucial for the system’s operation. It can never be deleted |
7.Change the IP addresses range served by the DHCP server
Left-click on the IP addresses range in the DHCP server column on the panel of an adapter. In the opened window specify the required range and, if necessary, add static addresses, then click Save to apply changes.
8.Stop or start DHCP server
Click UP / DOWN on the panel of an adapter. In the opened window click OK to switch the server.
|
|
The UP / DOWN button is also the DHCP server status indicator |
9.Delete a VLAN
Click Delete VLAN on the panel of an adapter. In the opened window click OK to delete the selected adapter.
This page displays User routing rules and System routing table.
The following actions are available on the page:
1.Add a user routing rule
Click Add rule, then in the opened window, write IP address/mask, Gateway, select Network interface and click Save.
|
|
Automatic backup is made every day |
2.Edit or delete a rule
Left-click on a rule. In the opened window make changes and click Save to apply them or click Delete to remove the rule.
3.Show or hide the system routing table
Click on the Show / Hide button.
|
|
The system routing table is needed for correct system operation |
Use this page to change the access password.
|
|
Server admin password is used for SSH and FTP access |
This page displays the list of the system services and their statuses (started or stopped).
The following actions are available on the page:
1.Start or stop a service
Left-click on a service name. In the opened window click Start or Stop to switch the service.
Use this page to set the server date and time, and select timezone. These features are only available for the IPTV Core.
The following actions are available on the page:
1.Set time manually
Click Set time, then in the opened window write Date and Time, then click Save.
2.Select timezone
Click Select. In the opened window, select timezone and click Save.
|
|
Set the correct timezone before uploading the license (see Licence), otherwise the system may work incorrectly |
3.Add an NTP server
Click Add. In the opened window write the address of an NTP server and click Save.
4.Delete an NTP server
Left-click on the address of the server you want to remove and click Delete in the opened window.
|
|
For each NTP server, you can see a synchronization status: Filed – the last sync attempt has failed; SYNC – the sync has been performed successfully; Reserved – this time server has not been used yet. |
This page displays information about uploaded licenses (components, numbers, expiration dates and restrictions). Use this page to upload new licenses.
|
|
Set the correct timezone before uploading the license (see Date and time) |
|
|
Make sure the new license is fully compatible with the old one before uploading it |