Briefly about the billing system
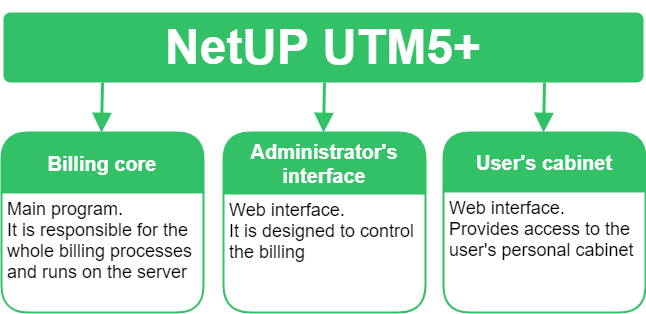
NetUP UTM 5+ is the automated billing system designed for accounting and tariffing of provider services. The billing allows to keep directories of users, tariffs and services, account for Internet traffic and generate reports.
Detailed billing structure is described in the corresponding section and is available for users who are responsible for system administration.
Basic system objects
User classes
In the billing users are divided into the following classes:
System users |
They have access to the administration of the billing system. An ordinary user cannot be a system user at the same time, and vice versa. |
Dealers |
They have access to some administrator functions that allow them to manage their related users. For example, they can add services and make payments. |
Users |
Clients, customers, service consumers whose payment is controlled by the UTM 5+ billing system. In the billing, you can create groups and join users in them. |
Card users |
A type of users with special properties. Such users are created in the billing automatically as a result of prepaid card activation. |
Account
Each user in the billing system can have one or several user accounts.
A User account is a system object that contains information about the user's financial status. All services that are provided to the user, both separate and as part of a tariff plan, are linked to the user's account through service and tariff links.
Account may get blocked, which suspends all services attached to it. There are three types of blocking in the UTM 5+:
-
An Administrative blocking is activated by an administrator if it is necessary to block the user's account manually.
-
A User blocking is activated by a user in the User Cabinet, for example, if the user does not plan to use the Internet for a certain period of time and wants to be free of charge for that period.
-
A System blocking is activated automatically in case the sum of the accounts balance and credit becomes negative or when there are not enough funds on the user account to charge for the periodic component of service costs, as well as when a quota is exceeded.
Additional parameters for each blocking type can be set in the Charge policy settings. For example, recalculate the periodic fee when blocking is activated.
|
If a user account is blocked, the Internet option will automatically change its value to Off. When the blocking is removed, this parameter changes its value to On only if the Auto enable internet option is checked. |

Services
A service is a system object that defines tariffing rules.
The services are connected to the user's account via service links. Service links can be created one by one or in groups as part of a tariff plan.
In the billing services are divided into two sorts and eight types.
Sorts of services:
Common service |
is created without templates and is not part of the tariff plan, and can also be connected an unlimited number of times. For example, it may be a one-time service “Equipment setup”. |
Tariff plan service |
is created according to one of templates and can only be used as part of a tariff plan. This sort of service differs from the common one because it has the following options:
Adding the service to a tariff plan you can modify the service parameters. Any changes apply only to this service and do not modify the template. |
Service types:
One-time service |
is intended for a single charge off the user’s account. |
Periodic service |
is intended for a periodic charges off the user’s account. |
IP traffic |
is intended for tariffing IP traffic. |
Hotspot service |
is intended for providing wireless access via Wi-Fi with time-based tariffing and user authentication via RADIUS protocol or via standard web-interface of the system. |
Dial-up service |
is intended for providing dial-up access with time-based tariffing. |
Telephony service |
is intended to tariff phone calls. |
IPTV service |
is intended to tariff IPTV services. |
Video on demand service |
is intended to tariff Video on demand (VoD) services. It allows to provide access to certain content when a user purchases it for a while. |
The service costs are specified excluding taxes.
Tax rates, including the value-added tax (VAT) and sales tax, are specified separately in the user account properties and considered in all charge-offs.
All types services, except for One-time services, have parameters of start date and end date of the service. The start date is the date when the service provision and fee charges start. The end date is the date when the providing of service stops, together with the charge-offs for the service. At this date the service is removed, if it is not attached to any service link.
Such types of services as IP traffic, Dial-up, Hotspot, Telephony and IPTV have a periodic cost component as one of their parameters. The corresponding charge-offs are made in the same way as for a periodic service, but in reports they are displayed as charges for services of corresponding types.
A Service templates are used to create services that are part of the tariff plans, and in case of automatic change of tariff plans at the time of closing the account period. The template is not a service, but a parent entity for the tariff plan services.
You can create one template for each type of service in advance, for example, a service template for the services with periodic charges, for the Internet traffic using a real IP address, and set the frequently used parameters for this type of service in the appropriate template. These parameters will be copied by default to the derived tariff plan services, once those are created.
Traffic classes
A Traffic class is a marker that determines to which traffic category it belongs. Classification of traffic is necessary to be able to charge it at different costs.
Traffic is checked against all classes in the decreasing order by ID until first match. If no match has been found, the traffic is attributed to the class with ID=0 (unclassified).
Traffic belongs to the class in the following cases:
-
traffic belongs to at least one subclass of that class;
-
traffic does not belong to any subclass of this class with the "Skip" option set;
-
traffic information came in the time range specified for the traffic class, if the time range is set.
A Traffic subclass is a set of attributes that determine whether a traffic class belongs to that class. Traffic is assigned to a subclass based on a set of attributes present in traffic data. The data contained in NetFlow packets (source and destination address and port) as well as the address of the NetFlow provider (IP router) can be used as attributes.
Traffic belongs to the subclass in the following cases:
-
sender and destination addresses belong to the corresponding networks set in the subclass parameters;
-
the rest of NetFlow record parameters is compatible with those stated in the subclass properties;
-
IP address of the NetFlow provider coincides with that set in the subclass properties, or none are set.
Accounting periods and time ranges
An Accounting period is a period of time to which various periodic activities are related, such as charge-off for periodic services.
Accounting periods are used for billing users at the same time, for example, from the first day of a month till the first day of the next month.
When an accounting period is closed, the following steps are performed:
-
recalculation of subscription fee and prepaid traffic (considering blockings);
-
transfer of the prepaid traffic left (if any) to the next accounting period;
-
charge-offs;
-
automatic change of tariff plan, if requested;
-
resetting balance to zero for those user accounts that have this option checked;
-
if Dynashape module is connected, the Delete bandwidth limit events for the IP addresses of service links subject to shaping, and execution of the corresponding firewall rules are sent;
-
automatic creation of a new accounting period.
The new period starts exactly at the end of the previous accounting period. The end time is set automatically depending on the type of period. The period type (i.e. its duration) as well as the number of charges-off per week remain unchanged. All service and tariff links referring to the previous accounting period are linked to the new period.
A Time range is a period or a combination of periods of time. Time ranges are used for services that are available only in certain periods of time, or services whose cost depends on time.
Coefficient scheme
A Coefficient scheme is a sequence of coefficients, applied to the periodic service fee. The scheme provides the possibility to change the service cost according to the set schedule.
For example, the cost of service in the first month is 50%, from the second to sixth month is 100%, the seventh month is 75%, and then all the time 100%. In this case, two coefficients should be included in the scheme: 0.50 for the first month and 0.75 for the seventh month. In those periods when the coefficients from the scheme are not valid, the cost of service is 100%.
To connect the scheme of coefficients to the service is possible while creating or editing the service.
|
If at least one service link refers to the service, another coefficient scheme cannot be connected to the service. |
It is possible to make changes in the coefficients scheme: add and delete coefficients, change their period of validity and values. The updated coefficient scheme will be used for new service links and will not affect any of existing service links.
Currencies
A Currency is the billing unit.
The billings operates with internal conditional units. The currencies are only used for payment processing and billing. When making payments, currencies are converted to internal units. On the other hand, when a bill is issued, the internal units are converted to some currency.
Each currency is associated with the rate, interest (artificial correction to the rate) and history of rate changes during the whole period of billing. The history of exchange rate since the system’s deployment is also available in order to perform financial operations post factum. It is possible to update the rate online.
Each user (a customer) is associated with some preferred currency for billing. By default, the associated user currency is determined by the value of the system parameter ISO code of the system currency. NetUP UTM 5+ provides an opportunity to change the currency assigned to the user to any other one registered in the billing at any time. As a result of the currency change, all bills will be displayed in the new currency, regardless of the date when they were generated by the system, before or after the currency change.
Tariff plans
A Tariff plan is a bundle of services provided as a package. Attaching the tariff plan to a user, you can activate the whole package or exclude some services, as well as adjust some service settings.
The tariff plan is attached to a user account via a tariff link and tariff plan services attached via service links. Attaching the tariff plan you must select an accounting period, at the end of which the plan can be prolonged for the next period or replaced by another compatible tariff plan.
Tariff plans are compatible if they have one-to-one correspondence between their services. This means that the new tariff has only one service corresponding to the service from the previous tariff. In this case, the billing can change the tariff plan and save useful information from service links (for example, IP addresses in IP traffic service) without any operator intervention.
To make your tariff plans compatible, add to them services that are created with the same service templates. You can modify parameters of the service created by the template while adding this service to the tariff plan. Modifying will not edit the template. Any changes will affect only the service you add.
For example, a user has tariff plan #1, which includes service A, and it is expected that the user will switch to tariff plan #2 from the beginning of the next accounting period. The tariff plan #2 includes service B. In order for the correct transfer of all parameters of the service A to the service B, it is necessary that both services are produced from a common template.
Incompatible tariff plans can also be switched, but services that have no match in the tariff plan of the next accounting period will be deleted.
Charge policies
A Charge policy is a set of rules that are used when charging a user account. These rules are applied when a customer for some reason didn’t receive the service for some part of the accounting period.
For example, when a service was attached to a user in the middle of an accounting period, so the user will receive the service only for the rest of the accounting period, or when a user uses voluntary blocking, because the user does not want to receive the services for a while.
In such cases, the charge policy permits a recalculation of the service cost and charging a smaller amount or a refund if a charge-off has already been made. The recalculation is made proportionally to the part of the accounting period when the service was provided or will be provided in fact.
|
The cost of a service is not only influenced by the cost that is set when creating the service, but is influenced by the service link properties. |
Besides the cost recalculation, the charge policy permits to recalculate the volume of provided services. For example, it is possible to recalculate the amount of prepaid traffic for the service that provides Internet access, or to recalculate the amount of free minutes for a telephony service.
Recalculation of the periodic part of the service cost and refunds are regulated by the following rules:

The time and date of the service link creation may not match the current time and date and may be set in the future or in the past. If the date and time of the service link creation is set in the past, the current date and time is used instead.
This means that Recalculated price = (Full price for accounting period) × l1/L, if the starting date has been set in the future.
Otherwise Recalculated price = (Full price for accounting period) × l2/L.
The same rules are used to recalculate the amount of prepaid traffic or prepaid calls duration.
Besides in the charge policy settings you can set the moment when a repay should be made:
-
on block expire;
-
on payment;
-
on charge period end;
-
on remove service link.
For example, if the user blocking was activated when the accounting period has not yet ended and the funds for services during this accounting period have already been charged-off in full, then it’s necessary to return part of the funds to the user.
There are three types of blocking in the UTM 5+:
-
An Administrative blocking is activated by an administrator if it is necessary to block the user's account manually.
-
A User blocking is activated by a user in the User Cabinet, for example, if the user does not plan to use the Internet for a certain period of time and wants to be free of charge for that period.
-
A System blocking is activated automatically in case the sum of the accounts balance and credit becomes negative or when there are not enough funds on the user account to charge for the periodic component of service costs, as well as when a quota is exceeded.
For each blocking type in the charge policy, you can set the following options:
-
do not charge periodic fee;
-
recalc periodic fee;
-
decrease prepaid traffic;
-
recalc prepaid telephony.
When recalculating the amount of prepaid traffic, prepaid calls or the periodic fee, it decreases corresponding to the part of the accounting period during which the account was blocked. Therefore if a user account is blocked and then is unblocked in the next accounting period, recalculation will take place twice.
Periodic fee charges for several services are done in an arbitrary order. If a charge-off leads to the system blocking of some user account, the rest charges are made according to the charge policy settings for the system blocking.
|
The periodic fee may be adjusted in the service link properties. |
Payments
There are several ways to make a payment:
-
automatic payment via e-payment systems;
-
automatic payment via any third-party software using the utm5_payment_tool utilityl;
-
manual payment by an administrator via the UTM 5+ interface.
To divide payments by types, the billing uses payment methods.
The methods are combined into a corresponding reference book and by default it contains: cash payment, wire transfer, card payment, credit. You can add additional methods to the reference book.
Cash payment |
for payments via utm5_payment_tool utility |
Wire transfer |
for payments via e-payment systems |
Credit |
for Promised payments, which users make by themselves in personal cabinets |
|
Promised payments are available to users if the properties of promised payments are configured in the billing. |
The amounts of Credit type payments are displayed in a separate column on the user's personal account page. For such payments, the obligatory parameter is the Expiration date on which they are undone.
|
The amount of credit is not added to the user's total balance, but allows not blocking his personal account before the payment expiration date, in case the sum of the credit and the user balance creates a positive balance. |
For example, a user has a negative balance – “-100 rubles”. The administrator gave this user a credit in the amount of 200 rubles for 3 days. In this case, the user has 3 days to recharge his balance, during which he will not be blocked, but will be able to use all already paid services and even connect some new services to the amount of 100 rubles. If the amount of services exceeds 100 rubles, the user's personal account will be blocked until his balance is positive or until a new credit is granted. If the user activates services during the credit period, the cost of services is charged from the balance. So the user will eventually pay the total amount for all services, but not the credit amount.
|
The administrator of UTM 5+ can manually change the credit account balance when editing the user's personal account, but cannot change the expiration date of the granted credit. |
Also in the billing it is possible to make payments that allow to top up user's balance temporarily. Such payments are called expiring payments. They are also required to have an expiration date, but all methods can be used except the Credit.
Expiring payments are summed up with the user's balance and displayed in the personal account before the payment expiration date. If the amount of charges for the specified period is less than the amount of the expiring payment, the unused balance of the payment will still be charged off from the user's account when the expiry date comes.
If other payments are received before the expiry date, the combustion of all payments will be postponed until the latest expiry date.
The billing has the special report for tracking expiring payments.
The UTM 5+ has an option of payment rollback. The administrator of UTM 5+ can make a payment rollback via the context menu in the payment report.
Nominally, the rollback is done by making a payment of special method (Rollback) having the opposite sum.
|
The rollback procedure is not applicable to the expiring or credit payments. |
Prepaid cards
The billing may work with prepaid cards intended for activation via web interface or via the utm5_tray application. A card may have either limited term of use, or an expiration date.
If the card is activated on the login page, a card user is generated by the system. User’s balance is set to the card balance value. User’s login is set to card_NUM, where card is the prefix of card user login and NUM is a number of the card.
If the card has a tariff plan attached to it, the services from this plan will be attached to the user’s personal account. If the card has limited term of use, its balance goes to the user’s account in a form of expiring payment with this term of expiration.
If the card is activated by an already existing user, the card’s balance is added to the user’s account, and the tariff plan associated with the card (if any) is ignored.
Documents
In the billing you can generate the following types of documents:
-
user info sheets;
-
contracts;
-
receipts;
-
invoices;
-
VAT invoices;
-
acceptance report;
-
detail invoice.
Documents are generated automatically from templates.
Generated documents except for contracts are not stored in system, and are rather generated immediately before use.
User contracts may be generated using a template or uploaded from a file. Each generated or uploaded contract is stored on User => Documents page.
Invoices may be created either automatically or manually. Manual invoices have no effect on the user’s account balance.
One-time services are billed as soon as these services are activated. If the user’s account has its Payment in advance option checked and the service’s charge method is set as At the start of the period, the invoices for the periodic services and for the periodic portion of special services’ price are issued at the beginning of an accounting period. Otherwise they are issued at the end of an accounting period.
Items in the automatic invoices are aggregated by tariff links (with the exception of telephony services, if any, which remain separated from the rest) and by accounting periods. Charges for the new services (those added during the current period) are also not aggregated and stay in a separate invoice, if Payment in advance is checked.
After having been generated from a template, an invoice may be edited for printing, but the changes can not be saved.
Invoices with negative VAT rate are hidden in the report.
System description
Detailed structure of the billing system
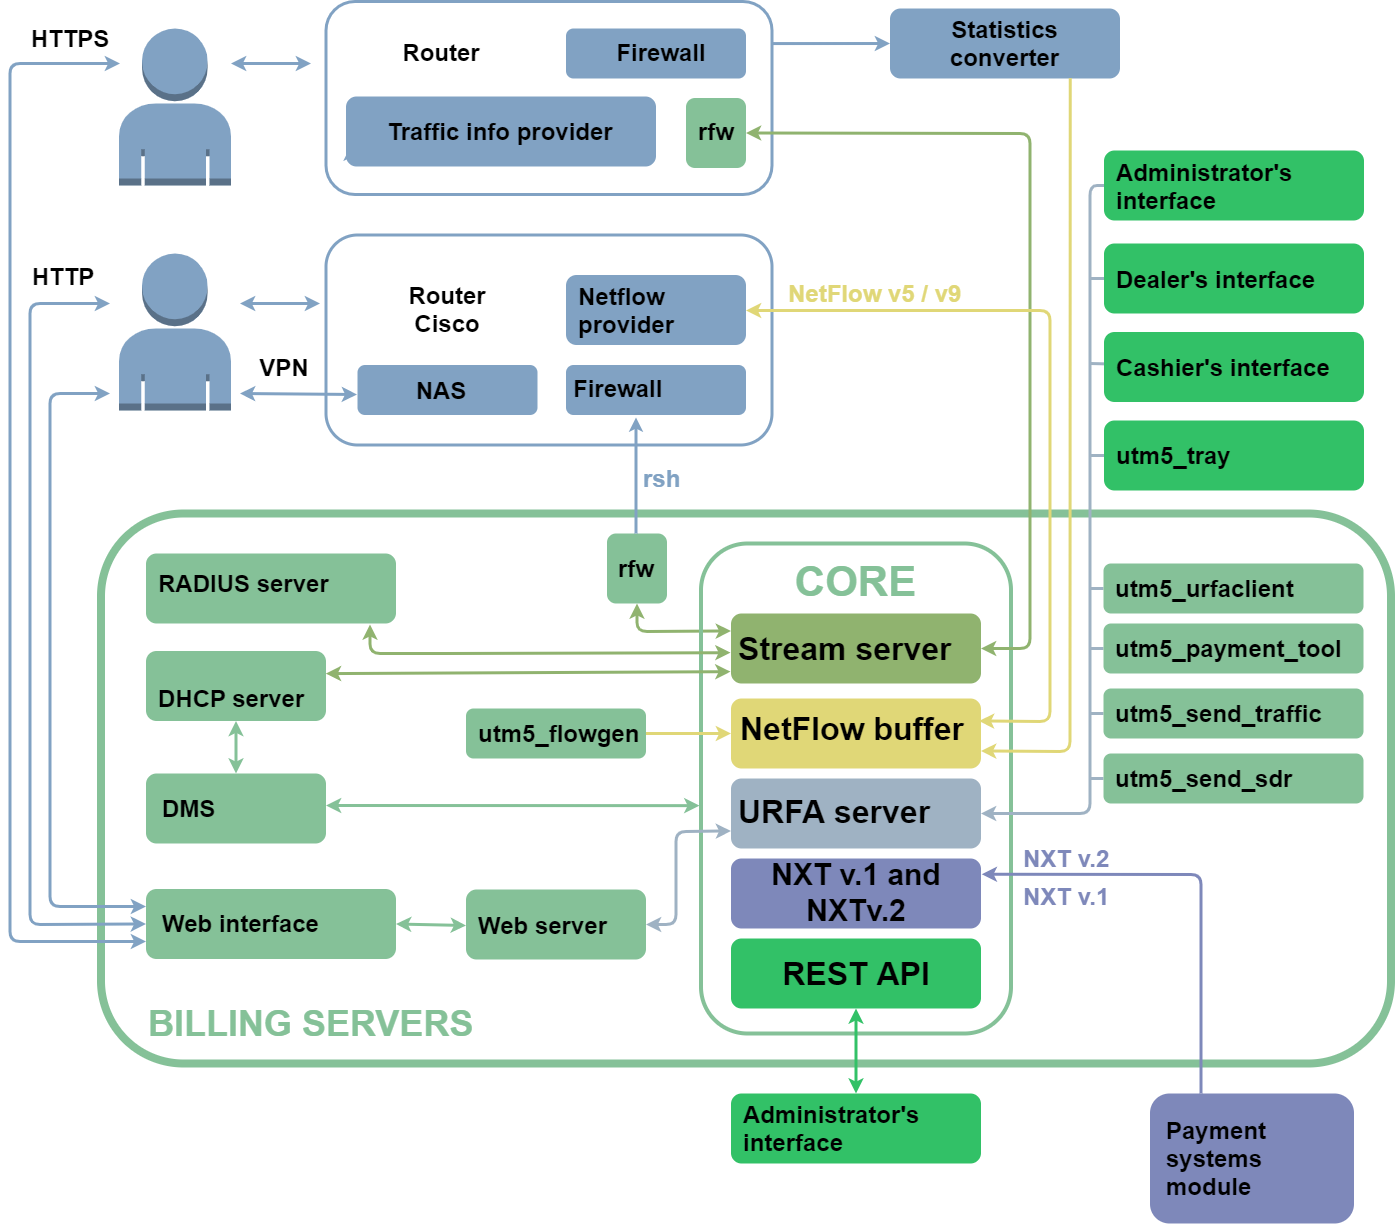
The Core is the main module responsible for the database access. The core provides access to it and processes incoming information according to the internal rules (such as tariffication, periodic write-offs). The core structure allows to use all provided resources evenly in case of high loads.
The billing core can interact with various routers and traffic information providers, as well as work over the NXT protocol with external applications. NXT (NetUP XML Transaction) is an application layer protocol that uses TCP as the transport protocol and SSL to encrypt data and authenticate the sender. A transaction is the basic data exchange unit. Each transaction may be addressed to one or more system components and includes a set of events intended for processing by the receiving component.
|
For more information on core components, see the Core section. |
Besides the core, the billing includes auxiliary utilities responsible for the work via the RADIUS protocol, import of log files, low-level operations via the URFA protocol, interaction with payment systems and user web interface operation maintenance. Read more about the utilities in the corresponding sections.
The URFA (UTM Remote Function Access) module provides access to the billing core. It authorizes users according to CHAP scheme and provides the work of a remote user. The protocol supports data transmission and function calls.
URFA checks up whether a certain user has access to the function called, and on positive check allows the user to start the data exchange. Otherwise the access is rejected.
Each session is given a 128-bit replication-free system ID number (SID). SID can be used repeatedly to gain access to the system. In case of error when the session is restored, the SID will be deleted and the user will have to enter his login and password once more. The SID is related to the user's IP address and is automatically deleted after a certain downtime. An option of session restore is available, which requires the system user’s rights.
System users
System users have negative user ID. By default, the billing has the following system users:
init |
is the top-level administrator |
web |
is the system account for the web interface |
radius |
is the system account for the RADIUS server |
rfw |
is the system account for the RFW daemon |
dhcp |
is the system account for the DHCP server |
collector |
is the system account for the Traffic collector daemon |
A system user has the following properties:
-
login and password;
-
subnet the user is allowed to login from;
-
list of system groups to which the user belongs.
The access rights of a system user are determined by the system group where the user belongs. If a system user is a member of more than one system group, that user has summary privileges for all groups that they belong to. All calls for forbidden operations are registered in the system core journal. By default, the billing has the following system groups:
Wheel |
administrators |
they are permitted all system functions |
Dealers |
dealers |
they can create users, assign services and make payments |
User’s rights
Depending on the class, a user has some list of permitted functions:
-
customers are permitted to execute the functions with a negative identifier,
-
dealers are permitted to execute the functions with identifiers from 0x70000000 to 0x7fffffffff inclusive,
-
all other functions are allowed only to administrators.
Only system users are allowed to communicate over Stream, NXTv1 and NXTv2 protocols.
Logging
If a system component needs to log a message, it goes to the logging module and sends it an event level and message text.
There are following event levels:
0 |
EMERG |
Fatal error, system operation is not possible |
1 |
ALERT |
Critical error that requires immediate action |
2 |
CRIT |
Critical error |
3 |
ERROR |
Uncritical errors |
4 |
Warn |
Warning |
5 |
Notice |
Information worth paying attention to |
6 |
Info |
General information |
7 |
Debug |
Debugging information |
8 |
Trace |
Additional debugging information |
9 |
Stats |
Statistics |
The logging module puts the text to the appropriate log stream. The selection of the stream depends on the module settings and the event level. The logging stream is associated with the file specified in the module settings. By default all streams are associated with the standard error stream. There are following log streams:
| Stream name | Levels included |
|---|---|
Critical |
from 0 to 2 |
Main |
from 0 to 3 + log_level |
Debugging |
all |
Some components may activate the built-in mechanism of log file rotation. At that, after logging an event the module checks file size against some specified threshold. If the file size exceeds the threshold, the file is closed and renamed to include a certain suffix. If the file quantity is limited, the suffix is " .0 “. If the file quantity is unlimited, the suffix is " .<timestamp> ", where <timestamp> is the Unix Time Stamp of file closing time. If a file with such suffix already exists, the suffix is incremented. After that the number of files is also checked and older files are removed if the number exceeds the limit.
Logging settings for each particular module are described in more detail later on.
Ways to integrate the billing system
The versatile nature of the billing system allows integrating it into existing or intended network infrastructure in various ways:
-
if you provide your clients with access to the Internet via a hardware router that supports traffic statistics collection, and you manage the routers remotely, then a server with a billing system can be installed either inside or outside the local network, e.g. at the head office accessible via the Internet;
-
if you provide your clients with access to the Internet via a software router (PC router), take the statistics from the router interface and process the data either on a local machine, or if you transmit and process them on a remote server, then the billing system can be installed either on the router itself and on a remote server;
-
if your clients connect to the Internet via dial-up access, then the access server can be either a Cisco router or a PC router with modems connected to it. Client authentication will be performed via the RADIUS protocol, and billing can be performed either by time of connection or by traffic volume;
-
if your clients connect to the Internet via Wi-Fi, you can use the Hotspot module, which in the billing is responsible for accounting and tariffing of wireless access services.
You can get more details about all modules and billing features from our managers, who will help you to figure out what modules should be used to perform your tasks.
External charges
UTM 5+ contains an integration module intended to work with Rentsoft system, which is a distributor of software and digital content.
The charges for the subscription are made along with the charges for the Internet services. Services provided by Rentsoft are not included in the list of UTM 5+ services. The corresponding charges, however, are registered and gathered in a Custom charges report. The invoices for these charges are issued immediately upon the charge-off.
For more details on the possible settings and parameters of the integration module, see: rentsoft.ru/provider/new/netup_netup300/
Installation and startup
Getting a license key
-
Pay the license.
-
Log in to your personal account on our website — www.utm-billing.com/customer.php. Go to the License keys section, fill in the Request form and click on Send.
-
When your request is processed, a list of modules available to you according to your license will appear in the section. Under the name of each module, click Activate, and then download the key – reg.sql file.
Use this key to activate the billing. Without activation, you will only be able to use the demo mode with restrictions.
|
If you purchase new modules, you must activate those modules and then download the updated license key. |
|
When the license expires, the UTM 5+ core will stop running. |
Software requirements
Operating system |
64-bit: |
Database server |
MySQL with InnoDB support is recommended. |
Local server time |
Must match the current date, otherwise the system may not work properly. |
|
The server should have disk space for log files and files with primary traffic data, the size of which depends on the load on the system and can reach significant values. |
Installation procedure
Step #1. Install the UTM 5+ package
Debian |
Run the command: |
CentOS 6 / 7 |
Run the command: |
The installer will create /netup/ directory to store program data, configuration and log files. It will also create the following startup scripts:
|
Step #2. Check and edit the core configuration file
Go to the /netup/utm5/ directory, open the utm5.cfg file and check the parameters which are responsible for database interaction.
|
For a detailed description of all parameters of the utm5.cfg file, see the corresponding section. |
If you already have a database, specify its parameters (type, name, login/password, encoding, etc.) in the configuration file so that the core will connect to it at the first launch.
If you do not have a database, then at the first launch of the core it will be automatically created with the parameters specified in the configuration file.
If you want to enable automatic updating of the database structure and indexes at every core launch, enable verify_database and verify_database_index parameters in the configuration file. By default, the first option is enabled and the second option is disabled.
|
The database user account used by the UTM 5+ core must have the rights to create and modify database tables. |
Step #3. Activate the license
After successfully installing the UTM 5+ package, and setting all the required configuration file parameters to appropriate values, copy the reg.sql (license key file) to the /netup/utm5/ directory
Step #4. Run the core
Start the billing core with the following command: /etc/init.d/utm5_core start
When the core is launched, the license will be automatically activated, and then the reg.sql file will be deleted. The core will connect to an existing database or create a new one, according to the parameters in the configuration file.
|
For CentOS only
Execute similar commands for other modules of the UTM 5+, if necessary. |
|
Follow these steps if you purchased a Telecom license. |
Step #5. Get ready to launch the user cabinet and connect payment systems.
To be able to install new payment systems and service requests from user cabinet, unpack the utm5_customer_portal.zip archive and run the install.sh file as root.
You can add the utm5_customer_portal to the autorun. To do that, use the command:
systemctl enable utm5-customer-portal.service
To start, you need to execute the following command:
systemctl start utm5-customer-portal.service
Step #6. Check and edit the customer portal configuration file
Go to the /netup/utm5/ directory, open the customer_portal_config.env file and check parameters.
How to launch the billing system and personal user account
|
Use this instruction if you do not have other sites on your server. |
|
If you already use UTM 5+, update your billing core first. |
Step #1. Install nginx on your server
Use the command:
sudo apt install nginx
Step #2. Edit the configuration file
Go to the directory: /etc/nginx/sites-enabled/default
Replace the content with:
server { listen 80 default_server; listen [::]:80 default_server; root /var/www/; index index.html; server_name utm; location / { try_files $uri $uri/ =404; } location /api/ { proxy_set_header Host $host; proxy_set_header X-Forwarded-Proto $scheme; proxy_set_header X-Real-IP $remote_addr; proxy_set_header X-Forwarded-For $proxy_add_x_forwarded_for; proxy_pass http://localhost:9080; } location /customer_api/ { proxy_set_header Host $host; proxy_set_header X-Forwarded-Proto $scheme; proxy_set_header X-Real-IP $remote_addr; proxy_set_header X-Forwarded-For $proxy_add_x_forwarded_for; proxy_pass http://localhost:8000; } }
Step #3. Unpack the utm5_http.zip archive to the /var/www/utm directory
Download the archive in your personal cabinet and run the following commands:
-
to run the billing web interface
cd /var/www/
 sudo mkdir admin
 cd admin
 sudo cp (путь к архиву) .
sudo unzip utm5_http.zip -
to run the web interface of the user cabinet
cd /var/www/
 sudo mkdir cabinet
 cd cabinet
 sudo cp (путь к архиву) .
 sudo unzip utm5_customer_http.zip
Step #4. Restart nginx
sudo service nginx stop
 sudo service nginx start
Step #5. Make sure that the web interface and the user cabinet are available
Enter <your server address>/admin in your browser, for example, 10.1.5.229/admin. If the browser displays a login page, you did everything correctly.
Enter <your server address>/cabinet in your browser, for example, 10.1.5.229/cabinet. If the browser displays a login page, you did everything correctly.
|
In the web interface for administrator go to Settings ⇒ Payment systems and activate the payment systems, which should be displayed in the user cabinet. To activate the payment system, select it from the list and set yes in the Enabled field. |
How to launch the billing system with Docker
|
Use this manual if you have Linux (Debian) installed on your server. |
Step #1. Install Docker and Docker-compose
Run the command:
apt install docker docker-compose -y
|
Read more about installation on the official website. |
Step #2. Create docker-compose.yml file.
Save to this file the following configuration:
version: '3' services: utm: image: netup/utm:latest restart: always ports: - '11758:11758' - '9080:9080' volumes: - './log:/netup/utm5/log' links: - utmdb utmdb: image: 'mysql:5.7' environment: MYSQL_ALLOW_EMPTY_PASSWORD: 'yes' ports: - "3306:3306" utm_customer_portal: image: netup/utm_customer_portal restart: always volumes: - "./log:/customer_portal/log" links: - utm - utmdb web: image: netup/utm_http restart: always ports: - '80:80' links: - utm - utm_customer_portal
Step #3. Run docker-compose
Run the command:
docker-compose up
Step #4. Connect to the billing using the web interface
Enter <your server address>/admin in your browser, for example, localhost/admin. If the browser displays a login page, you did everything correctly.
|
By default, the login and password is init and init. |
Step #5. Make sure the user cabinet is available
Enter <your server address>/cabinet in your browser, for example, localhost/cabinet. If the browser displays a login page, you did everything correctly.
|
In the web interface for administrator go to Settings ⇒ Payment systems and activate the payment systems, which should be displayed in the user cabinet. To activate the payment system, select it from the list and set yes in the Enabled field. |
System core
The Core is a separate multi-threaded process that works in user mode.
To configure the core operation you can use the configuration file and the web interface for administrator.
Parameters from the configuration file are used to initialize the core and system components, so changes in parameters take effect the next time the core is launched.
The parameters that can be configured in the web interface define the behavior of the core and its components after launch. You can change the values of these parameters at any time when the core is running and the changes will take effect as soon as they are made.
Main components of the core
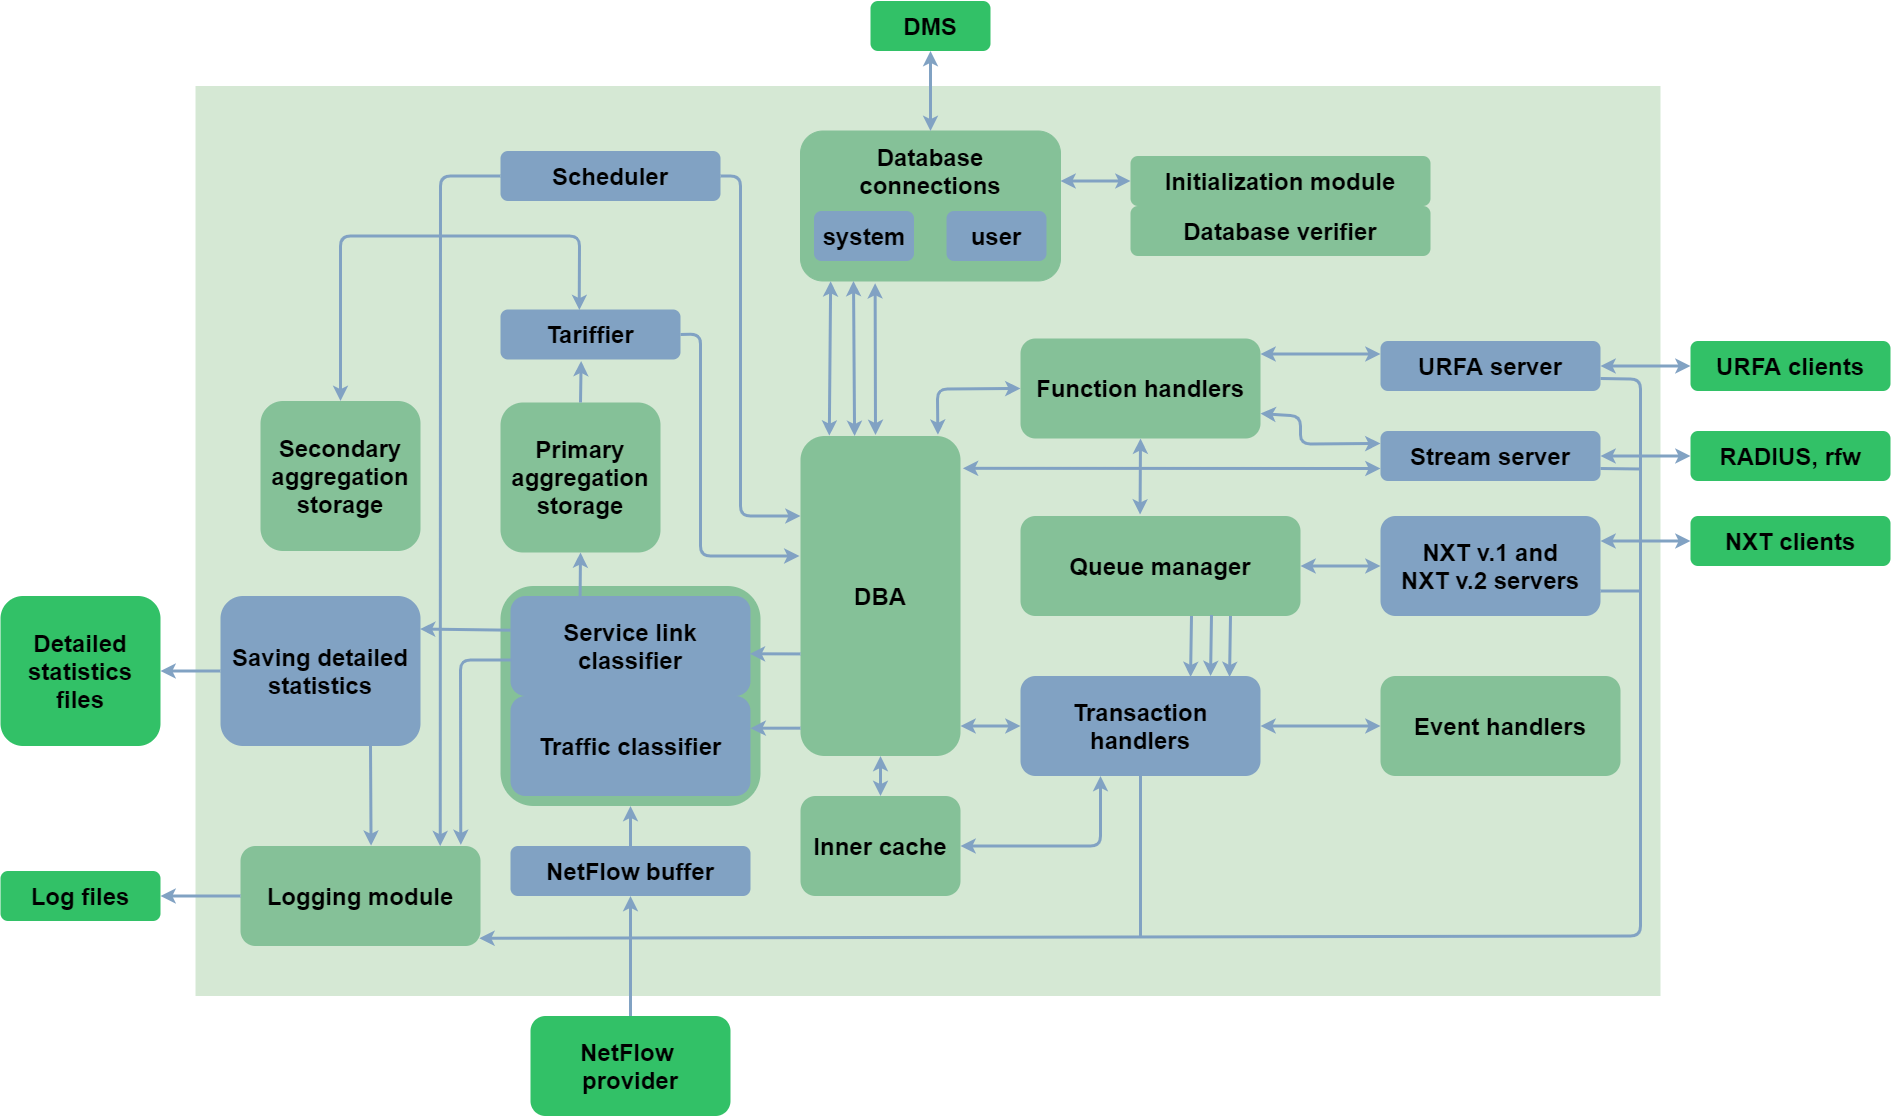
The URFA request handler (UTM Remote Function Access) is a server that invokes remote procedures.
It receives connections of clients and executes requested commands in the core. This component serves mainly as an organizer of the user and administrator interfaces.
The NetFlow buffer receives traffic data in NetFlow format version 5.7, 9, and 10 (IPFIX). Devices that do not support statistics delivery via these protocols must rely on some auxiliary utility to convert their output into compatible format.
The Traffic classifier sorts traffic by class according to the parameters specified in billing settings.
Traffic information for one customer, that hasn’t been tariffed, is stored in the primary store. After tariffication this information is extracted from the primary store and is placed to the secondary store. The customer's account is charged for the cost of the traffic stored in the secondary store when the cost of the traffic exceeds a certain amount, when it reaches the storage time limit, when the price of the traffic changes (e.g. when the traffic price depends on the amount consumed), when the core receives a SIGHUP signal and when an accounting period is being closed.
Tarifficator and classifiers are responsible for tariffication of all services, including IP traffic services. They convert the number of services provided by the operator into money equivalent, with all the dependencies specified by the billing administrator.
The Journaling module records all UTM 5+ events in log files, which allows administrators to diagnose and get information about failures.
The DBA (Database access) module converts internal data requests to external database requests.
|
As a database management system use MySQL. |
Data is received via NetFlow buffer and URFA request handler. Input data are read from the database when the system is launched.
|
Changes made directly in the database afterwards may cause uncontrolled behavior of the system. |
NetFlow data go to the business module where they are processed and all necessary charge-offs are calculated. At peak workloads NetFlow can be buffered to reduce possible losses. Raw NetFlow data are stored in files. A module that stores this data is created in a separate thread at startup and, if possible, with high priority.
Startup
The location of the UTM 5+ core executable file is /netup/utm5/bin/utm5_core
On the command line, you can specify the following parameters:
|
The path to the PID file |
|
The path to the configuration file |
|
Version number and parameters information |
There are three ways to run the utm5_core:
-
Direct start of the
/netup/utm5/bin/utm5_coreexecutable with necessary parameters. -
Start on watchdog with start parameter
/netup/utm5/bin/safe_utm5_core start
The script will restart utm5_core automatically on failure. -
Start via the automatic startup script (recommended)
/etc/init.d/utm5_core start
To stop the utm5_core and the watchdog script, execute
/etc/init.d/utm5_core stop
Configuration file
By default, the UTM 5+ core uses this configuration file – /netup/utm5/utm5.cfg
Config files have the following format: parameter=value.
A sequence of symbols before the equals sign is treated as parameter’s name, while the one after it stands for the parameter’s value.
Whitespaces count.
Empty lines are ignored.
A line starting with # is a comment.
Database related parameters
| Parameter | Possible values | Default | Description |
|---|---|---|---|
|
mysql |
mandatory parameter |
Database type |
|
string |
mandatory parameter |
Database name |
|
string |
localhost |
Database host address |
|
string |
current user’s login |
Database access login |
|
string |
empty string |
Database access password |
|
string |
/tmp/mysql.sock |
Path to a unix socket. |
|
string |
3306 |
Port number for database access |
|
number |
6 |
Number of database connections open simultaneously by the billing system core for user operations |
|
number |
4 |
Number of database connections open simultaneously by the billing system core for system operations |
|
integer number |
5 |
Number of database connection attempts in case of failure. Also, the number of repeated SQL requests in case of failure |
|
integer number |
2 |
Delay in seconds before repeated connection attempt or SQL query |
|
encoding specification string |
utf8 |
Database connection encoding |
|
enable, disable |
enable |
Verify database before starting the UTM 5+ core |
|
enable, disable |
disable |
If the database verification is enabled, also verify archived tables |
|
enable, disable |
disable |
Verify indexes before starting the UTM 5+ core |
URFA related parameters
| Parameter | Possible values | Default | Description |
|---|---|---|---|
|
IP address of the interface, or 0.0.0.0 |
server is disabled |
The IP address on which the port for receiving URFA requests will be listened to |
|
number from 1 to 65534 |
11758 |
The port that the URFA server will listen to |
Stream-related parameters
| Parameter | Possible values | Default | Description |
|---|---|---|---|
|
IP address of the interface, or 0.0.0.0 |
0.0.0.0 |
IP address of the server listening to Stream requests |
|
number |
12758 |
Port listening to Stream requests |
NXT-related parameters
| Parameter | Possible values | Default | Description |
|---|---|---|---|
|
IP address of the interface, or 0.0.0.0 |
0.0.0.0 |
IP address of the server listening to NXT v.1 |
|
number |
11777 |
Port listening to NXT v.1 |
|
IP address of the interface, or 0.0.0.0 |
0.0.0.0 |
IP address of the server listening to NXT v.2 |
|
number |
11778 |
Port listening to NXT v.2 |
|
IP address |
not set |
NetUP cluster core IP address |
|
number |
50500 |
Port that IPTV cluster core is listening to for incoming connections |
NetFlow buffer parameters
| Parameter | Possible values | Default | Description |
|---|---|---|---|
|
string |
0.0.0.0 |
IP address of the server listening to NetFlow |
|
string |
9997 |
Port listening to NetFlow |
|
integer number |
set by OS |
Size of the UDP socket buffer used to accept NetFlow |
Traffic counting parameters
| Parameter | Possible values | Default | Description |
|---|---|---|---|
|
path to file |
/netup/utm5/db/traffic.dat |
File to store traffic information when UTM 5+ core stops |
Document generation parameters
| Parameter | Possible values | Default | Description |
|---|---|---|---|
|
path to directory |
/netup/utm5/doc |
*.odt file storage directory |
|
path to directory |
/tmp |
Temporary files storage |
|
path to file |
/usr/bin/libreoffice |
LibreOffice executable path |
|
integer in bytes |
1,000,000 |
Maximum size of document template / contract file for upload |
Logging parameters
| Parameter | Possible values | Default | Description |
|---|---|---|---|
|
number |
1 |
Level of messages to be written to the main log file |
|
path to file |
standard error stream |
Main log file |
|
path to file |
standard error stream |
Debugging log file |
|
path to file |
standard error stream |
Critical log file |
|
path to file |
/netup/utm5/log/ve-rificator.sql |
Database verifier log file |
|
string |
not set |
Log entry prefix (when logging to syslog is enabled) |
|
yes, on, enable |
rotation off |
Enables log files rotation |
|
number |
unlimited |
Maximum number of log files to keep |
|
size in bytes |
10485760 |
Maximum size of log file |
|
path to file |
/var/run/utm5_core.pid |
PID file |
Stack parameters
| Parameter | Possible values | Default | Description |
|---|---|---|---|
|
size in bytes (not less than 65536) |
8388608 |
Business logic thread stack size |
|
size in bytes (not less than 65536) |
not set |
URFA server thread stack size |
Modules
Dynashape
The Dynashape module is intended to regulate channel bandwidth (shaping) depending on the time and volume of traffic consumed by a user. The system core composes the firewall rules according to the settings, and passes them for execution to the external software. The development of shaping control executables for the particular networking configuration to the administrator’s area of responsibility.
Scheme
Shaping may be set up separately for each IP traffic service. The shaping settings include the collection of bandwidth limitations and the associated parameters that determine the conditions to apply each limitation.
How to configure shaping for a service:
-
Select the service and set the main shaping parameters, including:
-
types of IP groups to which the shaping applies (VPN or non-VPN);
-
time range(s) when the shaping applies;
-
border values of traffic amount, on passing which the limitations will be applied sequentially;
-
bandwidth values for each time range and for each border value;
-
traffic classes to which the shaping applies.
-
-
In the case of shaping using RADIUS attributes, specify the RADIUS attributes that set the bandwidth on the same page. The dynamic adjustment of attributes depending on the allowed bandwidth is enabled by the use of variables (see Параметры RADIUS).
-
Set the firewall rules for the events Set bandwidth limit, Edit bandwidth limit and Delete bandwidth limit, for incoming and outgoing traffic, using the BANDWIDTH variable which on application is substituted with the allowed bandwidth value.
The limitations are applied during the selected time range(s) to the IP groups of selected kind(s) and to the selected traffic classes, according to the amount of traffic consumed by the given service link. On getting under the shaping conditions, or on changing those (i.e. on starting the time range for which the shaping is set, or when the traffic amount surpasses the given border), correspondingly, the Set bandwidth limit or Edit bandwidth limit event for incoming or outgoing traffic occurs. In addition, the respective RADIUS attributes are sent and their previous values (if any) removed. On running away from the shaping conditions (i.e. when the corresponding time range finishes, or when the traffic amount is nullified at the end of accounting period) the Delete bandwidth limit event is executed and the RADIUS attributes deleted.
When a new time range starts, the ensuing limitations are set within 5 minutes from the beginning of the said range. The limitations due to consumed traffic amount are set after the next aggregation, which happens at regular intervals defined by the raffic_agregation_interval parameter.
In case of shaping by external scripts the UTM 5+ core passes to them the given bandwidth value as is. On the contrary, in case of RADIUS attributes-driven shaping the input value is interpreted as Kbits/sec, and may be converted to other units as well as to derivative values, see RADIUS parameters.
If a NAS supports Change-of-Authorization (CoA) requests, UTM 5+ RADIUS can send a Change-of-Authorization (CoA) request to modify, apply or delete bandwith limitations. A CoA request contains attributes allowing session identification (User-Name, Framed-IP-Address, Called-Station-Id etc.) and the new RADIUS parameter values. DAC secret secret, if set, will also be included to the request.
CoA requests and responses are generated according to RFC 5176.
RADIUS parameters
The RADIUS attributes may include variables which get replaced with the respective values. These values are calculated from the bandwidth at given conditions.
| Variables | Description | Value (here W is the given bandwidth) |
|---|---|---|
|
Incoming bandwidth in bits/sec |
W*1024 |
|
Same, in Kbits/sec |
W |
|
Same, in Mbits/sec |
W/1024 |
|
Outgoing bandwidth in bits/sec |
W*1024 |
|
Same, in Kbits/sec |
W |
|
Same, in Mbits/sec |
W/1024 |
|
Incoming burst size in bytes |
1.5*(W*1024)/8 |
|
Incoming extended burst size in bytes |
1.5*2(W*1024)/8 |
|
Outgoing burst size in bytes |
1.5*(W*1024)/8 |
|
Outgoing extended burst size in bytes |
1.5*2*(W*1024)/8 |
IP telephony
The IP telephony module is intended for processing authorization requests and consumed services accounting for voice gateways, gatekeepers and voice proxy servers. It supports both traditional and IP telephony. The data to be accounted for may be based either on UTM 5+ RADIUS server requests (see Services ⇒ RADIUS) or on CDR files parsed by the utm5_send_cdr utility (see Utilities ⇒ Text files import).
| Term | Explanation |
|---|---|
IP telephony |
is a general term denoting voice transmission over networks via IP |
PSTN |
is a Public Switched Telephone Network. This notion includes local and national telephone networks. |
Caller ID |
is a phone number of a caller. ANI is Automatic Number Identification. |
VoIP gateway |
is a device with an IP port and also (if required) ports to connect to PSTN. Usually the device is used as a gateway between PSTN and IP network. Cisco router 3620 with the NM-2V + VIC2FXO module may serve as an example of a device of this type. |
H.323 |
is a standard offered by the International Telecommunications Union (ITU-T) describing principles of IP telephony networks. The standard describes the protocols associated with IP telephony equipment registration (RAS – Registration, Admission and Status), call setting-up (H.225.0, H.245), voice transmission, user authorization, etc. |
H.323 gatekeeper |
is responsible for registration of terminal equipment (gateways, client devices), access rights control, distribution of numbers. Almost all gatekeepers can process authorization and transmit statistics on telephone calls via RADIUS protocol. |
Codecs |
are the sound compression algorithms on the transmission side and decompression on the receiving side. Generally are used to minimize network traffic. That's why codecs are usually characterized by the bandwidth required for voice transmission using this codec. Uncompressed voice transmission takes 64 Kb per second. Codecs with high compression ratio require powerful computing resources. That's why encoding of a large number of voice flows requires usage of special microprocessors (DSP, digital signal processor). |
IVR (Interactive Voice Response) |
is Interactive Voice Response. Represents a technology of voice menu and is widely used for authorization of PSTN users to call via IP telephony. |
Workflow description
RADIUS requests concerned with telephony are recognized by the system based on the cisco-h323-conf-id attribute. If it is missing, the request is interpreted as related to dialup service.
To register a caller, a gateway sends to the RADIUS server a registration request containing the Calling-ID (31) and caller’s login, but no Called-ID (30). The RADIUS server in turn searches for the telephony service link which is identified by the login in its properties. If the link in question is not found or the corresponding account appears to be blocked, the registration is denied. Otherwise, an affirmative response is sent, which may also contain the user’s phone number if it is set in the service link properties.
To authorize a call, a gateway or a voice gateway sends to the RADIUS server a registration request containing the Calling-ID (31) together with Called-ID (30). The RADIUS server in turn searches for the telephony service link which is identified by the login in its properties. If the link is not found, or the account is blocked, or the call parameters do not match those of any direction covered by the service, or the current time is not covered by the service, the registration is denied. Otherwise, an affirmative response is sent, which also contains the maximum duration of a connection. The maximum duration is calculated either as the time left till the end of time range covered by the service (unless the service provides round-the-clock coverage), or as the time till the account’s balance runs out given its current balance and the current connection price per minute (which may also be time-dependent), whichever of these happens sooner.
To account for a call, a gateway or a voice gateway sends to the RADIUS server an Accounting-Start request containing the Calling-ID (31), Called-ID (30) and probably the starting time. If the starting time is not provided, the arrival time of the Accounting-Start request is assumed instead. The RADIUS server in turn searches for the telephony service link which is identified by the login in its properties. If the link is not found, the request is ignored. Otherwise the connection price per minute is determined, which may depend on the telephone direction and current time. If the call parameters do not match those of any direction covered by the service, or the current time is not covered by the service, the call is accounted for by zero price. When a call finishes, an Accounting-Stop request is sent containing the Calling-ID (31), Called-ID (30), and probably the call duration and/or its finishing time. Then the RADIUS server accounts for the call considering its duration and the price per minute. If the call duration is not provided, the difference between the finishing time and starting time is assumed instead. If the finishing time is not provided, the arrival time of the Aссounting-Stop request is assumed instead. If the price per minute is time-dependent and does change during the time span in question, the call is split into parts of constant price and accounted for in parts. The charge-off information is passed to the UTM 5+ core.
The calls lacking an Accounting-Stop request may be either ignored or considered finished by timeout based on Interim-Update requests and accounted for accordingly, depending on the RADIUS server settings.
If the gateway does not support the Accounting-Request communication with the RADIUS server, it may dump the phone call information to text files to be parsed later by the utm5_send_cdr utility (see Utilities ⇒ Text files import). This utility parses log files, retrieves individual calls and sends those to the UTM 5+ core using URFA.
Network organization schemes
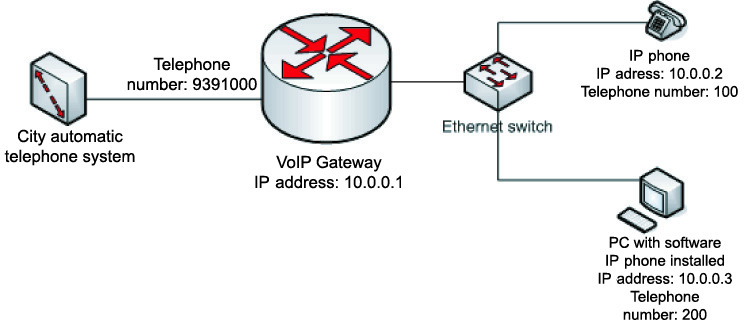
A VoIP gateway connecting PSTN to an IP network organizes voice traffic conversion from IP network to PSTN. Thus, a user with an IP phone or a PC with a software phone installed (Microsoft NetMeeting, OpenPhone etc.) may give a call to a subscriber of PSTN.
Similarly a subscriber of PSTN may call a network user. For that it is required to dial the gateway phone number in PSTN (9391000 on the scheme) and then, after authorization (if the mechanism is enabled on the gateway) dial an internal number of an IP network user (numbers 100 and 200 on the scheme).
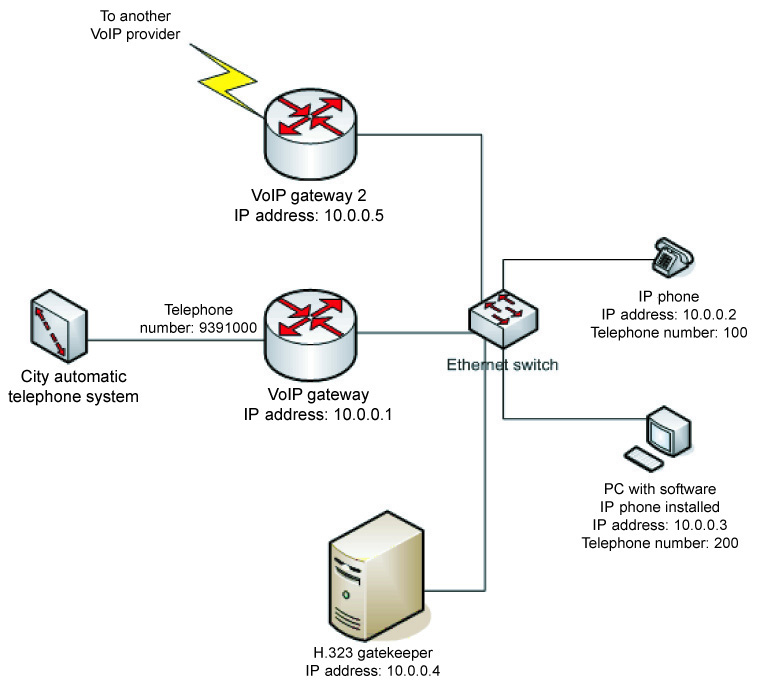
In the scheme containing the H.323 gatekeeper, all devices should register on the gatekeeper. At that, authorization may be processed via RADIUS protocol by using the common Access-Request scheme.
As a result the gatekeeper has a table with IP addresses and numbers of all network devices. All calls begin with addressing to the gatekeeper for conversion of dialed numbers to IP addresses. For that the gatekeeper requests of the RADIUS server to authorize the call and pass the filled in attributes Called-Station-Id (30) (dialed number) and Calling-Station-Id (31) (a number of a calling subscriber). At that the RADIUS server checks a user balance, tariff plan for a called direction and, if all is OK, gives the Access-Accept packet in which it may set the maximum connection duration for the user calling to the certain direction. Usually this information is set in the h323-credit-time, vendor 9 (Cisco).
In case authorization is successful (and after all parameters are coordinated) the connection between a called and a calling station is established. At that the gatekeeper sends a packet (Accounting-Start) containing parameters for the established connection to the RADIUS server.
In case both stations are in the same network the connection is being established directly. If the called station is in another network then the connection is established via one of the gateways. Another variant is also possible, when a user communicates with the gatekeeper only. In this case the gatekeeper acts as a proxy server and real IP addresses of the stations are hidden. This scheme may be applied if the direct line between the stations is worse (e.g., serious IP packets loss or a delay) than between the gatekeeper and both of the stations.
When the connection is finished the gatekeeper sends a packet containing information about the call to the RADIUS server. In the packet it specifies the connection duration, a cause of the connection break and other parameters. Using these data the RADIUS server rates the session, charges the user and puts a record in a log file.
Authorization of PSTN users may be done using IVR as follows:
-
A user of PSTN dials a local number of IP telephony access. The call is accepted by an IP telephony gateway (e.g., Cisco 3640 with E1 module) connected to the line.
-
The gateway loads an audio file (usually of the .au type) with an invitation record and plays it to the user. Usually it prompts the user to enter a number and a PIN code of a prepaid telephone card.
-
After a special digit combination is entered, the authorization is being processed on the R-ADIUS server. At that, the card number and PIN code are usually recorded to the attributes 1
(User-Name)and 2(Password). -
In case of successful authorization the RADIUS server sends an
Access-Acceptpacket with the user balance. For that the attributesh323-credit-amountandh323-currency с vendor=9 (Cisco)are used. IP telephony gateway loads appropriate voice files and in this way informs the user of his balance and invites to enter a telephone number. Note that usually IP telephony is profitable for remote calls (national and international calls). -
After the number is entered it is processed through second authorization on the RADIUS server. At that, an attribute
Called-Station-Id (30)containing the dialed number is transmitted additionally. Depending on the balance and connection cost per minute, the RADIUS server calculates the maximum available session duration and sends the value in theAccess-Acceptpacket attributeh323-credit-time. If theCalled-Station-Id (30)attribute is missing, the R-ADIUS server returnsh323-return-code (9,103)attribute with the following meaning:-
0 – means that the user is active;
-
1 – means that the user does not exist;
-
2 – means that the user is blocked.
-
-
After the affirmative reply is received from the RADIUS server, the IP telephony gateway establishes connection with the called user. The connection will break if the session duration exceeds the maximum calculated in the previous step.
-
On establishing the connection an
Accounting-Startpacket is sent on the RADIUS server. On breaking, theAccounting-Stoppacket is sent.
Automatic registration of users
UTM5 has two options for activating the prepaid Internet cards and receiving the dial-up service: guest access and conventional access with automatic registration of users. After registration the user enters the system with one’s own access parameters. After registration the user enters the system with one’s own access parameters. In the second case the user enters card number and a pin code as a login and password for dial-up connection, and then is automatically registered and gets access to the Internet right at once.
For automatic registration of users using the options above, you have to generate the tariff plan and connect the dial-up service to the user with the corresponding connection cost.
On creating the tariff plan you have to generate the prepaid cards pool and bind it to the tariff plan.
Guest access
If you use guest access you have to generate a user with a login and a password known beforehand. For example, login guest and password guest.
These settings should allow the guest access only to the web-site to activate the Internet-card. The session time can be also restricted, say, to 600 seconds.
It is necessary to create a Dialup access service with pool GUEST, maximum connection timeout of 600 seconds, and connection cost of 0 c.u. (currency units) per hour.
Then you have to generate a pool of IP addresses with login GUEST and certain-range addresses, e.g., 172.16.0.0/16, on the router or in UTM 5+. The router settings should allow this range of users to get access only to the DNS and to the web server to activate the card. For the safety sake it is better to arrange an isolated DNS server, not connected to the Internet and containing only the records, which the user will need to access the registration web server.
On login the registration web server the user selects the Automatic registration of user menu item and enters the data from the Internet-card. If the data is entered correctly and the card was not activated or blocked in the past, a new card user will be generated in UTM 5+ automatically, and the user will receive the login and password info for connection in dial-up mode. By selecting the Login to UTM menu item and entering the login and the password received after the registration the user may get access to his personal office and account statistics.
Access with automatic registration
The immediate access with the prepaid cards requires RADIUS server additional tuning. In RADIUS server configuration file /netup/utm5/radius5.cfg define the option radius_card_autoadd=yes
Restart the server. RADIUS server will automatically register the user in UTM 5+ at his first attempt to get access on prepaid card.
In order to receive access the user should enter the card number as login and its pin code as a password on every connection. If the user connects with this card at a first time RADIUS server will register him automatically and connect him to the Internet right at once. On every new connection the user would have to enter the card number as a login and the PIN code as a password. When the card expires (balance turns red), the user has to activate a new card.
This kind of automatic registration is possible on authorization using PAP protocol only. This method is used by Windows by default for modem connections and requires no additional settings. However, sometimes the users' configuration should be changed to let them be registered automatically.
If access settings for the user automatic registration are correct the following records should appear in the RADIUS server log file on the first connection:
|
Captive Portal
This module provides the possibility to register new users in the system and make the first payment for the connected services via web-interface.
To connect the Captive Portal:
-
Unpack the corresponding archive to a separate directory on a web server.
-
Check and, if necessary, change the connection parameters to the database, payment system and the billing core in the configuration file – /app/etc/config/app.xml
-
In the tariffs.xml configuration file, specify ID, name and cost of each tariff that should be available to users on Captive Portal. By default, you can offer three tariff plans for users to choose from.
Create tariff plans in advance.
By default the module's web interface is available at the following address: your.server/captive-portal/, where your.server is the name of your UTM 5+ server.
This link opens a registration page where a users has to enter the details: email, name and password. Once the details have been entered, the user should click the Next button to go to the page with available tariff plans.
When the tariff plan has been chosen, the user should click the Next button once more. As result, the user will see the info message about redirecting to the Payment Express to pay the fee. To make the payment, the user should click Register and proceed. After that a page for credit card data entry will be opened and user registration data will be transferred to the UTM 5+ database.
The user can make a payment:
-
from user’s personal cabinet, if acquiring systems are connected;
-
by entering the payment details.
Users can see the payment details in the personal cabinet.
If for some reason the payment process has not been completed, the user can log on to your.server/cabinet using the email and password specified at the registration.
After payment, the module will work in the standard way (see Hotspot).
Hotspot
The Hotspot module is intended to provide Internet access paid by the hour. User authorization is performed using RADIUS protocol or via the user Web interface.
When using web interface for authorization, after entering card number and PIN, the page will update periodically to keep the server aware that the service is still being provided. If the refresh does not happen in due time because the user has closed the authorization page, the session expires. When the session is either expired or explicitly closed by the user selecting Close in the menu, the Internet access is blocked and the user is charged for the session’s duration. The expiration may also occur due to running out of money.
To set the lifetime of a hotspot session, go to the Settings ⇒ Systems ⇒ Other in the web interface and specify the amount of seconds for Hotspot session timeout from the moment of last refresh.
To use the hotspot module, add a tariff plan containing the hotspot service. You can set different cost of the service for different time ranges, as well as create a list of allowed networks to login from, and the number of simultaneous sessions for the given login.
To use the hotspot module along with prepaid cards, it is necessary to create a pool of cards and connect them to the tariff plan containing the hotspot service. After getting a card, a user should first register it in the Auto register user section of the web interface and obtain a login and password. They are subsequently used for authorization on the Enter (hotspot) page.
If you need billing on traffic for hotspot users, use hotspot service together with IP traffic service. Check the Dynamic IP address allocation option in the properties of both services. User authorization on the UTM 5+ web interface would require the login and password stored in the properties of the hotspot service link.
Integration with IPTV
This module allows to integrate billing with NetUP IPTV system. Due to this module UTM 5+ gets an opportunity to add services of watching TV channels and charge users for using these services. It is also possible to create service links for services of this type and, based on them, manage access to watching TV channels (deactivate access if the personal account is blocked, grant access if it’s paid for).
It is possible to integrate UTM 5+ with IPTV systems of other companies. In this case, the interaction can be done through RFW events and third-party scripts.
The integration module interacts with IPTV middleware. In order to let the module connect to NetUP IPTV Core, the DNS server on UTM 5+ server should be able to resolve IPTV domain names. All the other billing systems interacting with the IPTV cluster core must be disabled.
NetUP IPTV system uses access cards for user authorization. The card is a mandatory condition to access IPTV services. The integration module allows to create access cards and generate activation codes.
Client's TV channel access is managed by interacting with the NetUP IPTV Middleware system. When UTM 5+ needs to grant access to media content, e.g. when an IPTV service is attached to user’s personal account, it sends a request to IPTV middleware to grant access to certain media content to access card owner for an unlimited period of time. When it needs to prevent a user from accessing the content (e.g. when user switches tariff plan), UTM 5+ requests from IPTV middleware to set access end time for user’s access card to that media content to current time, which means that the content becomes no longer available.
|
To connect the module you need a Telecom license. |
To connect a NetUP IPTV, follow these steps:
-
In the UTM 5+ configuration file, set the values for the NetUP IPTV Core connection parameters:
-
iptv_cluster_host– is the IP address of the NetUP IPTV Core, -
iptv_cluster_port– is the port which the NetUP IPTV Core is listening to for billing system connections (by default it is 50500).For proper operation the When UTM 5+ server must resolve
db.iptvto the IPTV cluster core IP address.
-
-
Open IPTV administrator's web interface and go to the Services page. Find the NetUP IPTV Billing service there. If the service is running, left-click on its name to open a dialog window and click Yes to stop the service.
-
After that go to the Connections page and left-click the IP address next to the NetUP IPTV Billing connection name. In the opened window, click Auto detect to reset the information about the billing system.
-
Launch the UTM 5+ and go to the Connections page in the IPTV administrator's web interface to make sure the NetUP IPTV Billing is connected and the IP address matches the server on which the billing is running.
If the When UTM 5+ core was running while the NetUP IPTV Core connection setup, restart it after finishing the setup process.
You can see the example of creating a NetUP IPTV service and connecting it to the user in the Quick Start section.
Document templates
Basically, a template is an *.odt document that may contain variables E.g. user name, account balance, etc). During the generation of the document, the variables will be replaced with the corresponding values. For a complete list of variables, see Templates variables.
|
If LibreOffice package is installed on a server with UTM 5+, documents are generated in .pdf format, if not installed – in .odt format. |
See Quick Start for an example of working with a document template and how to use an alternative document number.
Depending on the template type, it may include variables from the following groups:
| Template | Groups of variables |
|---|---|
Invoice |
|
User memo |
|
Print receipt |
|
Contract |
|
Call details |
|
For a description of variables and iterated variables, see below.
Template variables
Template variables are split into several groups:
Read more about each Group below.
-
Document
| Name | Type | Description |
|---|---|---|
|
int32 |
Number of a document |
|
string |
An alternative document number |
|
int32 |
Date of document creation |
-
User
| Name | Type | Description |
|---|---|---|
|
int32 |
User ID |
|
string |
User full name |
|
string |
User login |
|
string |
User password |
|
string |
Actual address |
|
string |
Legal address |
|
string |
Home phone number |
|
string |
Work phone number |
|
string |
Mobile number |
|
string |
User ITIN |
|
string |
Reg. code |
|
string |
ICQ |
|
string |
Web page |
|
string |
User district |
|
string |
Building |
|
string |
Entrance |
|
string |
Floor |
|
string |
Flat number |
|
string |
Personal manager |
|
int32 |
Basic account ID |
|
string |
Passport |
|
string |
|
|
string |
Comments |
|
string |
Bank account |
|
string |
Bank name |
|
string |
Bank city |
|
string |
BIN |
|
string |
Bank corr. account number |
|
string |
Currency short name |
|
string |
Currency full name |
|
int32 |
Currency code. Is used by IP telephony module |
|
string |
Additional user parameter with ID {param_id} |
|
string |
Additional contact e-mail with ID {contact_id} |
|
string |
Additional contact full name with ID {contact_id} |
|
string |
Additional contact short name with ID {contact_id} |
|
string |
Additional contact position with ID {contact_id} |
|
string |
Additional contact description with ID {contact_id} |
|
string |
Additional contact phone number with ID {contact_id} |
-
Account
| Name | Type | Description |
|---|---|---|
|
int32 |
Account ID |
|
string |
External account ID |
|
double |
Balance |
|
double |
Loan |
|
double |
VAT rate, % |
|
double |
Sale tax rate, % |
|
string |
IPTV access card number |
-
Provider
| Name | Type | Description |
|---|---|---|
|
string |
Provider full name |
|
string |
Provider short name |
|
string |
Legal address |
|
string |
Actual address |
|
string |
ITIN |
|
string |
Industrial Enterprise Code |
|
string |
CEO |
|
string |
CEO short name |
|
string |
Accountant name |
|
string |
Accountant short name |
|
string |
Bank account |
|
string |
Bank name |
|
string |
Bank city |
|
string |
BIN |
|
string |
Bank corr. account number |
-
Contract
| Name | Type | Description |
|---|---|---|
|
int32 |
Contract number |
|
string |
Contract name |
|
int32 |
Date of the first contract |
|
int32 |
Contract ID with serial number {contract_id} |
|
string |
Name of the contract with the serial number {contract_id} |
|
int32 |
Creation date of the contract with the serial number {contract_id} |
|
int32 |
User connection date (displayed in unixtime format) |
|
string |
User connection date (displayed in dd.mm.yyyy format) |
-
Payment
| Name | Type | Description |
|---|---|---|
|
int32 |
Payment transaction ID |
|
double |
Amount in currency |
|
double |
Amount in system currency |
|
int32 |
Payment date |
|
int32 |
Date when payment is made |
|
int32 |
Burn date |
|
string |
Payment document number |
|
string |
Comment for user |
|
string |
Comment for an admin |
|
string |
Payment hash |
|
double |
Currency rate |
|
string |
Currency short name |
|
string |
Currency full name |
|
int32 |
Currency code. Is used by IP telephony module |
-
Invoice
| Name | Type | Description |
|---|---|---|
|
double |
Amount without tax |
|
double |
Amount with tax |
|
int32 |
Number of rows in the account |
|
int32 |
Start date of the period |
|
int32 |
End date of the period |
|
double |
Balance at the time of billing |
|
double |
Debt |
|
double |
Payment amount without tax |
|
double |
Payment amount with tax |
|
int32 |
Date |
-
Call details
| Name | Type | Description |
|---|---|---|
|
double |
Amount of charges for periodic services |
|
double |
Telephony service charges |
|
double |
Amount of charges for other services |
|
double |
Amount of charges for local calls |
|
double |
Number of local calls |
|
double |
Total duration of local calls |
|
double |
Similarly for innerzone calls |
|
double |
|
|
double |
|
|
double |
Similarly for intercity calls |
|
double |
|
|
double |
|
|
double |
Similarly for international calls |
|
double |
|
|
double |
-
IPTV service links
| Name | Type | Description |
|---|---|---|
|
int32 |
IPTV access card number |
|
string |
Access card activation code, part 1. Activation code consists of six parts. For each part there is a corresponding variable with a different number at the end of it's name (.part2, .part3, etc.) |
Iterating variables
Iterating variables are groups of variables, which are replaced by an array of values. They should be placed in a table row in a document template. In this case the number of rows in the table is automatically increased to hold all the values that are returned.
Iterating variables also are split into several groups:
|
Connected tariff plans table iterators Iterators of service link parameters for dialup service |
-
IP group table iterators
| Name | Type | Description |
|---|---|---|
|
string |
Login of IP group |
|
string |
Password of IP group |
|
string |
MAC address |
|
string |
IP address |
|
string |
Subnet mask |
|
string |
Gateway |
|
IP group table iterators only include non dynamically created IP groups that have a non empty Login field and a non zero IP address |
-
Connected tariff plans table iterators
| Name | Type | Description |
|---|---|---|
|
string |
Tariff name |
|
double |
Cost |
|
int32 |
Account ID |
-
Bill iterators
| Name | Type | Description |
|---|---|---|
|
int32 |
Entry index, starting with one |
|
string |
Entry name |
|
double |
Entry price |
|
double |
Entry quantity |
|
double |
Amount with tax |
|
double |
Amount without tax |
|
double |
Tax amount |
|
double |
Tax rate, % |
|
string |
Unit name (returns replacement key) |
|
string |
Unit code (returns replacement key) |
|
double |
Alternative price |
|
double |
Alternative quantity |
|
string |
Alternative unit name (returns replacement key) |
|
string |
Alternative unit code (returns replacement key) |
-
Call details iterators
| Name | Type | Description |
|---|---|---|
|
int32 |
Call ID |
|
string |
Zone name |
|
string |
Direction name |
|
int32 |
Call date |
|
string |
Calling number |
|
string |
Called number |
|
string |
Called prefix |
|
int32 |
Call duration |
|
string |
Call type (returns replacement key) |
|
double |
Call cost |
-
Iterators of service link parameters for dialup service
| Name | Type | Description |
|---|---|---|
|
string |
Login |
|
string |
Password |
|
string |
CID parameter value |
|
string |
CSID parameter value |
-
Iterators of service link parameters for hotspot service
| Name | Type | Description |
|---|---|---|
|
string |
Login |
|
string |
Password |
-
Iterators of service link parameters for telephony service
| Name | Type | Description |
|---|---|---|
|
string |
Login |
|
string |
Password |
|
string |
Phone number |
|
string |
Incoming trunk |
|
string |
Outgoing trunk |
|
string |
PBX ID parameter value |
|
string |
CID parameter value |
Variable modifiers
Variable modifiers modify the values returned for variables.
| Name | Argument type | Result type | Description |
|---|---|---|---|
|
string |
string |
Replaces with a value from the replacements list if the variable and the key match |
|
string |
string |
Replaces matching part of the variable with the value from the replacements list |
|
int32 |
string |
Date format DD/MM/YYYY |
|
int32 |
string |
Date format “DD” Month YYYY |
|
int32 |
string |
Time format MM.DD HH:MM |
|
int32 |
string |
Duration format HH:MM:SS |
|
double |
string |
Sum to string |
When you are creating a custom field in LibreOffice, go to the Insert ⇒ Field ⇒ More fields to apply a modifier. On the Variables tab, select the variable and in theName field specify the name of the modifier after the function name, dividing them by two dots, for example tariff.cost..sum_to_string
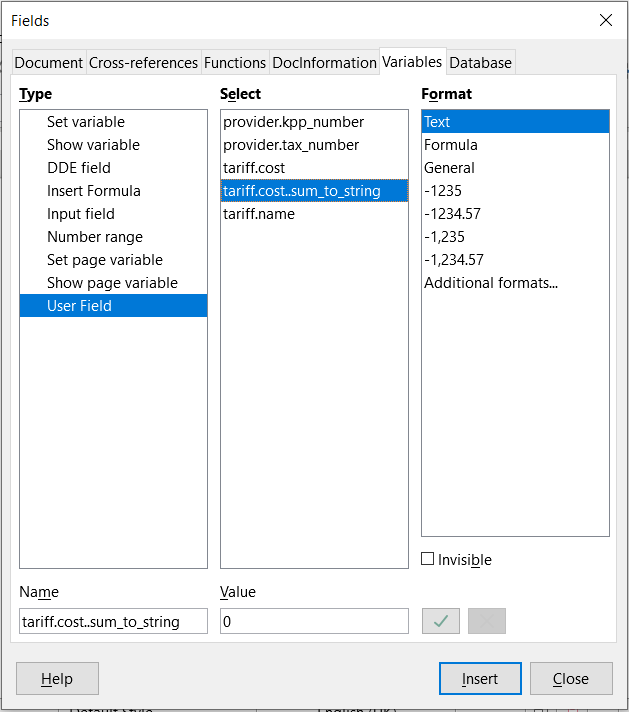
After that you can use the modified variable in the template. :experimental:
Servers
RADIUS
The RADIUS server interacts with the UTM 5+ core via the Stream protocol, and with access servers (hereinafter – NAS) via the RADIUS protocol according to the following standards: RFC 2865, 2866 and 5176.
The Remote Authentication Dial In User Service (RADIUS) protocol provides authorization, authentication, and accounting between the NAS and the Authorization Server (RADIUS server).
|
One instance of UTM 5+ core may work with only one RADIUS server. |
If the NAS interacts via the RADIUS protocol, it does not keep the user base. To connect the user, the NAS sends an Access-Request to the RADIUS server.
If the RADIUS server permits a connection, it responds with an Access-Accept, otherwise it send an Access-Reject to the NAS. If the RADIUS server needs more information, it sends an Access-Challenge request to the NAS.

If the NAS is configured to send connection information, after establishing the connection, the RADIUS server sends an Accounting-Request that contains information about starting the session. Depending on the configuration, the NAS may also send additional periodical Accounting-Request containing current status info on the connection.
When a connection is broken, NAS must send a summarizing Accounting-Request, given that some Accounting-Request for this connection have already been sent before.
On receiving an Accounting-Request, the RADIUS server creates, changes or deletes an object associated with the connection. Depending on the request contents, some additional actions may be performed to maintain the delivered information on the connection.
After successfully handled an Accounting-Request, the RADIUS server sends to NAS a confirmation(Accounting-Response).
On failure, no response is sent.
Packets from an unknown (not registered) NAS are ignored.
RADIUS service and NAS exchange RADIUS packets via UDP. To receive Access-Requests, the RADIUS server usually uses port 1812 and port 1813 to receive Accounting-Requests.
Generally a RADIUS packet contains the following fields:

-
Code– is an one-byte field used to identify the RADIUS packet type. The RADIUS server supports RADIUS packets with the following codes:Type Name The RADIUS-server receives / sends 1
Access-Request
received
2
Access-Accept
sent
3
Access-Reject
sent
4
Accounting-Request
received
5
Accounting-Response
sent
11
Access-Challenge
sent
-
Identifier– is a one-byte field intended to relate the request to the response.
Duplicate requests with the same ID coming from the same NAS shortly after each other are ignored. -
Length– is a two-bytes field containing packet size. -
Authenticator– for a request, it is some unique sequence used together with the md5 of the secret word common for the RADIUS and NAS for reversible encoding of the user’s password;
for a response, it is md5 of Code, Identifier, Length, Authenticator, and Attributes fields together with the secret word.
The common secret word must be considerably hard to break. It is strongly not recommended to leave it blank. The RADIUS server uses the sender address of the RADIUS packet to derive the common secret word. -
Attributes– is a variable-length field containing the list of RADIUS attributes.
|
Starting from version 5.3-004 UTM5 supports tagged RADIUS attributes |
Each RADIUS attribute contains specific information on a request or a response.

Generally, a RADIUS attribute looks as follows:
-
Type– is a number describing the attribute type.
For a description of the RADIUS attribute types, see here. -
Length– is the summary length of the Type, Length, and Value fields. -
Value– is the type-specific information. Depending on the type, may contain the following fields:text
from 1 to 253 bytes of UTF-8 text, zero byte forbidden
string
from 1 to 253 bytes of binary info
address
is a 32-bit data interpreted as an address
integer
is a 32-bit data interpreted as unsigned integer
time
is a 32-bit data interpreted as time in seconds since 00:00:00, January 1, 1970 UTC.
Some of the attributes may be included in a packet more than once. In this case their interpretation depends on the attribute type. Order of attributes is important.
Additional attributes set in NAS, services and service links settings are also included in the packet. Attributes set in NAS settings are added first, then go the attributes from the services settings and then the attributes from the service link settings. The UTM 5+ allows to perform certain actions when adding an attribute like replace or remove an attribute added earlier. That is, the attributes from service link settings have the highest priority.
From this point on, the RADIUS attributes are referred by common name followed by the typeID in parentheses. For example, User-Name (1).
There is a certain attribute type Vendor-specific (26) designed to store extended vendor-specific data.

These data are interpreted as follows:
-
Vendor-Id– is a number describing the organization that defines this attribute (for more details see RFC 1700); -
Vendor-Type– is a number that described the attribute meaning; -
Vendor-Length– is the summary length of the Vendor-Type, Vendor-Length and Data fields; -
Data– contains the actual data.
From this point on, the vendor-specific attributes are referred by common name followed by the semicolon-separated Vendor-Id and Vendor-Type in parentheses. For example, Cisco-AVPair (9;1).
DM and CoA requests
If it is needed to change the session parameters or break it, the RADIUS server sends a request according to the 5176 standard. The RADIUS service sends a separate request to change parameters or break each session.
The Disconnect Message (DM) and Change of Authorization (CoA) requests are the same format and are sent by default to UDP port 3799. The port number can be changed in the NAS settings.
DM requests are used if the user's personal account balance becomes negative. The following attributes might be used to identify a session:
|
is a user name, associated with one or more sessions |
|
is a port used by session that needs to be terminated |
|
is an IPv4 address associated with the session |
|
is one or more vendor-specific attributes |
|
is the called party identifier |
|
is the calling party identifier |
|
is an ID that let’s one clearly identify a session on a NAS |
NAS replies with a Disconnect-ACK in case it was able to identify and terminate the session, otherwise it replies with a Disconnect-NAK.
CoA requests are used for changing shaping parameters for current session. These parameters are most likely to be changed at a certain time or after reaching a certain traffic limit.
In case NAS supports CoA requests and a corresponding flag is checked in the administrator’s interface, if one of these happens, the RADIUS server will send a CoA request to NAS.
Like a DM request, CoA request contains attributes required for identifying a session and the new values of RADIUS parameters that need to be updated. If NAS is able to identify session and update RADIUS parameters it replies with a CoA-ACK, otherwise it replies with a CoA-NAK.
Work flow of the RADIUS server
-
Connects to the billing core.
-
Retrieves from the billing core the info on events to await.
-
Interacts with NAS.
-
Sends the resulting data to the billing core.
On startup the RADIUS server connects to the UTM 5+ core, authorizes according to its configuration file parameters, and establishes a Stream connection.
Once a connection is set, the UTM 5+ core passes to the RADIUS server the description of the needed objects in the corresponding events.
The RADIUS server keeps the Stream connection to the core. Upon creating, changing, or deleting system objects related to the RADIUS server functionality, the UTM 5+ core sends the corresponding event over Stream in order to inform RADIUS.
On reception of certain events, the RADIUS server creates, modifies or deletes its inner records related to the following objects:
-
IP groups;
-
NAS;
-
Accounts;
-
Time ranges;
-
IP traffic, hotspot, and telephony services;
-
IP traffic, hotspot, and telephony service links;
-
Telephone zones;
-
Telephone directions;
-
IP pools.
Authorization and accounting
On receiving an Access-Request the RADIUS server performs the user authentication procedure and defines the service credential to which the login received in the authorization request belongs.
One of the following methods can be used for authentication: PAP, CHAP, MS-CHAP v1, MS-CHAP v2, EAP-MD5, EAP-TTLS, Digest.
|
The Digest authentication is implemented according to tools.ietf.org/id/draft-sterman-aaa-sip-00.txt, rather than the corresponding RFC |
The authorization request must contain the User-Name (1) attribute. Part of the value of User-Name (1) to the character : is written to the Callback_prefix parameter. Login is considered without prefix. All letters contained in the login are cast to lower case. If the User-Name (1) is not specified, the server ignores Access-Request and does not perform subsequent actions.
If authentication fails or requires unsupported method, an Access-Reject is sent to NAS.
If the guest_pool_name parameter is set in the configuration file of the RADIUS server, the guest users may be authorized as well.
The following actions depend on the service link type.
For an IP traffic service link:
-
If the
radius_auth_vapparameter is set in the configuration file of the RADIUS server, the account referred in the given service link is checked for blocking. -
The given IP group is checked for presence of free IP addresses.
-
If the IP group parameter Allowed CID is not empty, the
Calling-Station-Id (31)value is checked against it as a regular expression. -
If the
radius_nas_port_vpn, parameter is set in the configuration file of the RADIUS server, theNAS-Port-Type (61)is checked for exact correspondence with the value of at least oneradius_nas_port_ vpn.
Failure of any of these checks result in sending an Access-Reject packet and skipping the rest of actions.
If the checks are successful, an Access-Accept packet is sent with the following attributes:
|
set to 2 |
|
set to 0xFFFF FFFF |
|
set to 0 |
|
set to 1 |
|
set to the first free IP address in the given IP group. The IP address is marked busy for the time span defined by the parameter |
|
set to the value of |
For a dial-up service link:
-
If
Callback Allowedis not set, the check returns a negative result ifCallback_prefixis present. IfRingdown Allowedis not set, the check returns a negative result whenCallback_prefixis absent. -
If
Allowed CIDparameter has a non-empty value, the correspondence of the value ofCalling-Station-Id (31)to the regular expression specified in the value of this parameter is checked. -
If
Allowed CSIDparameter has a non-empty value, the correspondence ofCalled-Station-Id (30)value to the regular expression set in the value of this parameter is checked. -
The amount of connections established for this service link is compared to the maximum number of simultaneous connections set in the service properties.
-
If the
blocked_pool_nameparameter is not set in the configuration file of the RADIUS server, the absence of a valid personal account blocking is checked. -
Maximum connection time is calculated from the account balance and the service link parameters. The check will sucessfully pas if the max connection time is greater than 0 and the current time is in the set bounds and if the current account balance is enough for at least one second of connection.
-
If a registered IP pool is set in the service properties, it is checked for presence of free addresses. If there are no free addresses, the check won't pass.
-
If the
radius_nas_port_vpnparameter is set in the configuration file of the RADIUS server, theNAS-Port-Type (61)value is checked to match one of its values.
Failure of any of these checks result in sending an Access-Reject packet and skipping the rest of actions.
If the checks are successful, an Access-Accept packet is sent.
If the user is blocked and the blocked_pool_name parameter is set in the configuration file of the RADIUS server, the IP address will be issued from the pool intended for blocked users, which is defined by this parameter.
|
When user’s account is unblocked, a DM (disconnect message) will be sent, so the session will terminate and the user will need to reconnect. |
If the user is not registered and the guest_pool_name parameter is set in the configuration file of the RADIUS server, the IP address will be issued from the pool intended for guest users, which is defined by this parameter.
If the dial-up service parameter Pool name is set to some registered IP pool, the following attributes are returned:
|
set to 2 |
|
set to 0xFFFF FFFF |
|
set to 0 |
|
set to 1 |
|
set to the free IP address from the given IP group. The IP address is marked busy for the time span defined by the parameter |
|
set to the maximum session time |
If the dial-up service parameter Pool name is set to some registered IP pool, the following attributes are returned:
|
set to 2 |
|
set to 1500 |
|
set to 0 |
|
set to 1 |
|
set to the maximum session time |
|
set to |
Besides that, if the Callback_prefix is set, the following attributes are added:
|
set to the value of the callback number, if the radius_callback_avpair_enable parameter is not set in the configuration file of the RADIUS server |
|
set to the Callback login, if the radius_callback_avpair_enable parameter is not set in the configuration file of the RADIUS server |
|
set to |
The issued IP address is marked busy for the time span defined by the parameter radius_ippool_timeout from the configuration file of the RADIUS server
For any type of service, the NAS attributes set for the service link are included in the Access-Accept response.
Accounting-Requests are used by RADIUS server to determine if an IP address is occupied, charge for hotspot, dial-up or telephony services, charge for consumed traffic and dynamically create, modify or remove IP groups.
Accounting-Request must contain the following attributes:
-
Acct-Status-Type (40) -
Acct-Session-Id (44) -
Framed-IP-Address (8)
If any of these attributes is missing, the request is ignored.
Type of the request is defined by the Acct-Status-Type (40) attribute.
The following request types are recognized by RADIUS:
| Acct-Status-Type | Name | Comments |
|---|---|---|
(1) |
|
announces the start of the session |
(2) |
|
announces the end of the session |
(3) |
|
provides intermediate data of the established connection |
On receiving a Start packet:
-
An object describing the session is created and the core is informed over Stream. The
Acct-Session-Id (44)parameter contains the object ID. -
If the login set in
User-Name (1)belongs to some IP group or a dial-up service link, the last IP address of this IP group or the service link is marked as busy for an unspecified time. The IP address is marked as busy for the time specified in theradius_ippool_timeoutparameter, if this parameter is set. When theinterim_update_intervalis set, the IP address will be released in the triple time interval set for this parameter if noInterim-Updaterequests have been received for the session. -
IP address associated with the session is marked busy.
On receiving a Stop packet:
-
If the login set in
User-Name (1)corresponds to some IP traffic or hotspot service link, the session is tariffed based on the time set inAcct-Session-Time (46). The information about a needed charge is sent to the core via Stream protocol in a corresponding event. -
The object describing the session with the identifier specified in
Acct-Session-Id (44)attribute is removed. The information about this object deletion is sent to the core via Stream protocol in a corresponding event. -
IP address is marked as unused.
On receiving an Interim-Update packet:
-
The object describing the session with the identifier specified in
Acct-Session-Id (44)attribute is modified. -
If the login set in
User-Name (1)belong to some IP group or dial-up service link, the Interim-Update session control is on andinterim_update_intervalparameter is set, the IP address will be released only if during the triple time interval specified in this parameter the session has not received Interim-Update requests.
There are certain properties of processing accounting requests. For an incoming Stop or Interim-Update requests with a session ID that doesn’t match any open session ID, a new session will be created. The RADIUS server may cache the list of closed sessions to avoid creating new sessions when receiving a Stop or an Interim-Update requests for an already closed session. This feature is turned off by default. To involve the closed session cache, you have to set the values for two parameters in the configuration file:
-
use_closed_sessions_cache=on -
Closed_sessions_cache_size=<number>is the cache size (the number of closed sessions to store information of).
When the closed sessions cache is involved, if a session status changes to closed, it’s Acct-Session-Id данной сессии помещается в кеш закрытых сессий. При поступлении запроса Stop или Interim-Update производится поиск Acct-Session-Id is added to the cache. If the Acct-Session-Id fount in the request is present in the cache, this request won’t pass to UTM5 core. When a Start is received, the session identifier is removed from the cache.
|
When the number of entries reaches the cache size limit, the oldest entry is removed and the new one is added. The larger the size of the cache, the less probability of creating a re-session by |
|
When RADIUS server stops, all the information about closed sessions is lost. |
Traffic Tariffication
If the access server does not support exporting statistics via NetFlow, information about the traffic consumed can be obtained via Stop or Interim-Update requests. To use this mechanism you should assign an arbitrary value to the radius_do_accounting parameter (for billing by Stop requests) or radius_do_interim_accounting parameter (for billing by requests of both types).
When receiving a Stop or Interim-Update request, RADIUS server will create two records with traffic information, which will then be accounted in the billing core in a standard way.
In the first record with traffic information, the IP address of the access server will be specified as the sender address, and the IP address of the user used in this session as the destination address. The number of consumed bytes is taken from the Acct-Input-Octets (42) and Acct-Input-Gigawords (52) attributes contained in the Stop or Interim-Update request. In the second record with traffic information, the IP address of the access server will be specified as the destination address and the IP address of the user used in this session as the sender address. The number of bytes is taken from the Acct-Output-Octets (43) or Acct-Output-Gigawords (53) attributes.
The created records are sent to the UTM 5+ core over Stream.
If the interim_update_interval parameter ia set, it is assumed that the NAS should send Interim-Update requests for each open session at this interval. If there are no new requests within the triple period or if a Stop request is received, the session is closed and the associated IP addresses are released.
The default value for this parameter is not set and the session will only end when a Stop request is received. If the NAS supports sending the Interim-Update requests, it is recommended to define a value for this parameter to avoid "hanging" sessions.
utm5_radius daemon
The location of the RADIUS executable file is /netup/utm5/bin/utm5_radius. On the command line, you can specify the following parameters:
|
The path to the PID file |
|
The path to the configuration file |
|
Version number and parameter information |
There are 3 ways to run the utm5_radius:
-
Direct start of the
/netup/utm5/bin/utm5_radiusbinary with the required parameters. -
Start on watchdog with start parameter
/netup/utm5/bin/safe_utm5_radius start
The script will restart utm5_radius automatically on failure. -
Start via the automatic startup script (recommended):
/etc/init.d/utm5_radius start
In this case the watchdog script will run. To stop the utm5_radius and the script, execute:
/etc/init.d/utm5_radius stop
Configuration file
By default, the RADIUS server uses this configuration file – /netup/utm5/radius5.cfg.
Config files have the following format: parameter=value.
A sequence of symbols before the equals sign is treated as parameter’s name, while the one after it stands for the parameter’s value.
Whitespaces count.
Empty lines are ignored.
A line starting with # is a comment.
| Parameter | Possible values | Default | Description |
|---|---|---|---|
|
IP address |
mandatory parameter |
IP address of the host on which the UTM 5+ core is running |
|
from 1 to 65534 |
mandatory parameter |
The port where the UTM 5+ core listens to Stream ( |
|
string |
radius |
User login to access the billing core |
|
string |
radius |
User password to access the billing core |
|
file name |
/var/run/utm5_radius.pid |
PID file |
|
number |
30 |
Duration of repeated attempts to connect to the core (in seconds) |
|
IP address of the interface, or 0.0.0.0 |
0.0.0.0 |
Host address for receiving Accounting-Requests |
|
number from 1 to 65534 |
1813 |
Port for receiving Accounting-Request |
|
IP address of the interface, or 0.0.0.0 |
0.0.0.0 |
Host address to receive access verification requests (Access-Request) |
|
from 1 to 65534 |
1812 |
Port for receiving Access-Requests |
|
enable |
key generation is not performed |
Includes generation of 128-bit MPPE keys used for authorization via |
|
1 |
authorization is enabled |
If this value is set, blocked users whose logins are specified in the traffic service link are not allowed to authorize |
|
time in seconds |
30 |
Time in which the IP address will be marked as busy after |
|
time in seconds |
until the Stop packet arrives |
Time in which the IP address will be marked as busy after |
|
yes or enable |
not set |
When this option is enabled, RADIUS-server will accept and successfully authorize requests without |
|
enable, on, yes |
not set |
When this option is enabled for telephone calls, authentication is performed not by the |
|
integer number |
not set (no check) |
If set, the |
|
integer number |
not set (no check) |
If set, the |
|
integer number |
not set (no check) |
If set, the |
|
integer number |
not set (no check) |
If set, the |
|
any |
not set (numbers not sent) |
If set, the Access-Accept request for telephony users will have the |
|
any |
not set (numbers not sent) |
If set, the Access-Accept request for telephony users will have the |
|
string |
not set |
Sets zero cost for Accounting-Request having the |
|
time in seconds >60 |
not set (standard mechanism is used) |
Enables advanced session control mechanism based on Interim-U-pdate packets. The value is passed via the |
|
integer number |
86400 |
Value of the |
|
any |
not set |
Enables sending of the |
|
enable, on, true |
not set |
Enables substitution of login with the |
|
enable, on, true |
not set |
Enables substitution of login with the |
|
string |
not set |
Name of the IP pool to provide addresses for blocked users (in case those are entitled to some limited Internet access) |
|
string |
not set |
Name of the IP pool to provide addresses for guest users (in case those are entitled to some limited Internet access) |
|
yes, no |
not set |
Enables providing IP addresses from a random pool (if there are several with similar name). By default the addresses are issued from each pool in turn until it runs out; the pools follow in the order of addition |
|
yes, on, enable |
not set |
Enables recognizing of registration request by the condition |
|
string |
not set |
Path to the certificate file when using EAP-TTLS |
|
string |
not set |
Path to the private key file when using EAP-TTLS |
|
integer number |
86400 |
Maximum duration (in seconds) of a VoIP session |
|
integer number |
5 |
PoD response timeout after manual drop of the session |
|
any |
not set |
Incoming trunk format: |
|
any |
not set |
Outgoing trunk format: |
|
any |
not set |
Call id format: |
|
yes, on, enable |
not set |
Override service type in the incoming request. Set service type “framed” |
|
IP address of the interface, or 0.0.0.0 |
0.0.0.0 |
Host to accept requests for connection parameters modification (incoming RADIUS server request) |
|
string |
USD |
Currency code. Is used by IP telephony module |
|
yes, on, enable |
not set |
Store information about recently closed sessions in cache |
|
integer number |
0 |
Size of closed sessions cache Measured by the number of sessions about which information is stored |
|
yes, on, enable |
not set |
Make RADIUS server return |
| Logging parameters | Possible values | Default | Description |
|---|---|---|---|
|
number from 0 to 3 |
1 |
Level of messages to be written to the main log file |
|
file name |
standard error stream |
Main log file |
|
file name |
standard error stream |
Debugging log file |
|
file name |
standard error stream |
Critical log file |
|
yes, on, enable |
rotation off |
Enables log files rotation |
|
size in bytes |
10485760 |
Maximum size of log file |
|
string |
not set |
Log entry prefix (when logging to syslog is enabled) |
Dynamic IP Address allocation
To tariff traffic in case when a user is dynamically assigned an IP address, a scheme of dynamic binding of an IP address to an IP traffic service link is introduced in UTM 5+.
The IP traffic service or dial-up/hotspot service link bound to the user’s account must have its Dynamic IP addresses option switched on.
If the Accounting-Start request has been received with the User-Name (1) attribute, which contains the login specified in the properties of the service link with the switched on Dynamic IP Addresses option, and the Framed-IP-Address (8) attribute, which contains a non-zero IP address, the UTM 5+ core sends an event to link this IP address to the user’s account. The event contains the account details and the issued IP address. The event handler calls the function that performs all the necessary validations and the linking itself (if applicable).
Control flow of the said function goes as follows:
-
search for the IP traffic service link having its Dynamic IP addresses option on and bound to the given account. If not found, skip the rest;
-
search for the IP group to which the given IP address belongs. If found, remove the group;
-
Create an IP group with the given IP for address and 255.255.255.255 for mask (leave default values for the rest of parameters). Other IP group parameters are assigned default values;
-
the IP group is connected to the service link found on step 1.
When creating or removing IP group, the system performs the following actions:
-
if the Internet for the personal account that the IP group belongs to is On, It changes to Off before creating or removing an IP group, After the IP group has been created or deleted the Internet status changes back to On.
-
Besides that a couple of Internet access enable events might be generated for the personal account if the Internet status was Off.
|
We do NOT recommended using dynamic IP address allocation if the address pool overlaps with the static IP addresses that are already associated with IP traffic service links. |
DHCP
The DHCP allows you to associate a static IP address or a dynamic address pool with a MAC address, switch or a certain switch port. It receives messages and processes them according to RFC 2132.
|
The DCHP only allows to assign IPv4 addresses. |
The server uses data from the database, communicates with the UTM 5+ Core via the Stream protocol and is able to receive messages about changes in the database and the need to update certain information.
By default the server works in not authoritative mode That can be set up in the configuration file (is_authoritative parameter).
Entities
The DHCP uses the following entities:
-
Switch type - an entity that contains a certain switch type parameters. Those parameters are:
Name
a string containing the name of the switch.
Uniqueness is not mandatory, but is recommendedSupported volumes
the number of ports for this switch type.
May be several numbers, separated by commasDHCP option 82 parameters
description of DHCP option 82 parameters, used by this switch type for composing DHCP requests:
Remote ID
is the ID of the switch, acting as a DHCP relay, which the request came from
Port
is the port number of the switch, acting as a DHCP relay, which the request came from
VLAN ID
is the VLAN ID, if there is one
These parameters have properties like parameter type (string/binary), disposition, offset and length. These properties are used to read those parameters from the option 82 of a DHCP request.
-
Switch - an entity that contains a certain switch parameters.
Name
is the name of the switch.
One may use simple names that can help identifying a particular switch.
Uniqueness is not mandatory, but is recommendedActual address
is the actual address where one can find this switch
Type
is the internal Switch type ID, which contains the parameters for this switch type
Remote ID
is the Remote ID parameter of the DHCP option 82. It is used for composing a DHCP request.
The parameter type and its length are set in the corresponding Switch typePorts count
the number of ports for this switch type.
The possible values of this parameter are specified in the device profileAccess parameters
are IP, login and password for the switch
These parameters may be used in the firewall rules (see RFW section), which have to do with sending commands to the router. For example, when you need to turn off a switch port to prevent the user from using Internet, when the user has run into debt.
These parameters are associated with the following variables:
USW_IP, USW_LOGIN, USW_PASS, USW_REMOTE_ID, USW_ID, USW_PORT, UVLAN, SWITCH_IP, SWITCH_PORT
See more here.You can also add other DHCP options in the switch properties. These options and their values will be included in the DHCP response if a DHCP client includes those options in the DHCP request.
-
DHCP pool- an entity that contains an IP pool parameters such as standard DHCP options that are used to form the DHCP response when providing an IP address from this IP pool. The mandatory options are: gateway, mask, DNS server 1, the lease time in seconds (lease time less than 3600 seconds is not recommended). Default value is 86400 seconds (24 hours).
The nonmandatory options are: DNS server 2, NTP server, Domain.
You can add extra DHCP options to the DHCP pool properties. These options and their values will be included in the DHCP response if a DHCP client includes those options in the DHCP request.
The Gateway and Mask parameters are used to identify which DHCP pool does an IP address belong to.
IP address ranges are also a part of a DHCP pool properties. Every IP address range is defined by the first and the last IP address.
Besides that there’s a Block action type for every DHCP pool. This parameter determines how a DHCP request from a blocked user is processed. It allows one to provide IP addresses from this pool only to blocked users, provide IP addresses from this pool despite of user being or not being blocked, or to ignore requests coming from blocked users. Available options: Use blocked and Ignore requestIf certain DHCP options are specified in a DHCP request, the DHCP response will include those options if their values are set in the database. If no options are specified in a DHCP request, the DHCP response will include all the options whose values are set in the database.
-
IP group is a description of a network and its parameters, associated with an IP traffic service link. The IP traffic is identified for the following tariffing and IP addresses are provided based on the IP group settings. An IP group defines the link between a static IP address or a dynamic IP address pool and the following parameters:
-
MAC address
-
Internal switch ID
-
Switch port
-
VLAN ID
-
You need to set a static IP address or a dynamic IP pool It is also necessary to specify the values of the parameters described above, to which an IP address or a pool of dynamic addresses should be assigned.
|
The static IP address ranges shouldn’t cross the dynamic IP address ranges. |
Port and VLAN ID are DHCP option 82 parameters. The DHCP reads them according to the Switch type chosen for the current switch.
After adding an IP traffic service link and adding an IP group containing parameters defining a link with an IP address, a record of correspondence of a static IP address or a dynamic pool and those parameters will appear in the database.
Processing a DHCP request
When receiving a DHCP request, the server compares the parameters of the request with the IP group’s parameters from the database. The parameters priority is as follows: MAC address ⇒ Switch ID ⇒ Port ⇒ VLAN ID. The database is sorted descending by these parameters and then the search is performed. Each database record contains parameters for a single IP group.
The DHCP server only compares database records that contain one of the following sets of parameters:
-
MAC address
-
MAC address and Switch ID
-
MAC address, Switch ID and Port
-
MAC address, Switch ID, Port and VLAN ID
-
Switch ID
-
Switch ID and Port
-
Switch ID, Port and VLAN ID
MAC address is compared first (if it is set in the database) Then the DHCP server reads the option 82 parameters (if it is present in the DHCP request), based on the appropriate Switch type parameters for the switch specified in the database record that is currently being checked. If the parameters were read correctly, UTM5 DHCP server compares those parameters with the corresponding parameters present in the database. If one of the parameters is not present in the DHCP request, it is ignored for the comparison. The comparison is considered to be successful if there are DHCP request parameters that match the corresponding parameters from the database and there are no corresponding parameters that do not match.
After providing an IP address, the DHCP server adds a record, containing the IP address lease start date and the lease time (lease time is set in the DHCP pool properties) to the database. The lease term is set in the properties of the DHCP pool.
Configuration file
By default, the RADIUS server uses this configuration file – /netup/utm5/dhcpd5.cfg
The configuration file have the following format: parameter=value.
A sequence of symbols before the equals sign is treated as parameter’s name, while the one after it stands for the parameter’s value. Whitespaces count. Empty lines are ignored. A line starting with # is a comment.
| Parameter | Possible values | Default | Description |
|---|---|---|---|
|
mysql, postgres |
mysql |
UTM 5+ database type |
|
string |
UTM5 |
UTM 5+ database name |
|
IP-address/hostname |
localhost |
UTM 5+ database host name |
|
string |
root |
Login to access the UTM 5+ database |
|
string |
not set |
Password use to access the UTM 5+ database |
|
path to file |
/var/run/mysqld/ mysqld.sock |
MySQL only. The path to the database socket file. This parameter is used if the database_host parameter is not set or has a “localhost” value |
|
from 1 to 65534 |
3306 |
MySQL only. The database server port |
|
encoding specification string |
utf8 |
MySQL only. Database connection encoding |
|
IP address |
127.0.0.1 |
UTM 5+ core host IP address |
|
from 1 to 65534 |
12758 |
The port where the UTM 5+ core listens to Stream ( |
|
string |
dhcp |
User login to access the billing core |
|
string |
dhcp |
User password to access the billing core |
|
time in seconds |
1800 |
Minimum time after lease expiration that the IP address, assigned by the DHCP may still be used |
|
time in seconds |
86400 |
Remaining lease time check rate |
|
<interface name>,<IP-address> pairs of parameters. Add multiple interfaces each at new string: interface=<interface name>,<IP address> etc. |
not set |
List of interfaces, accepting DHCP requests and corresponding IP addresses. If the name of the interface is eth0, there are two possible cases: 1) IP address is set (e.g. 10.0.0.1) - the server accepts only unicast requests to address 10.0.0.1:67 2) IP address is set to 0.0.0.0 - the server receives broadcast requests, that come to eth0 (in Linux socket options SO_BROADCAST and SO_BINDTODEVICE are used) |
|
yes, on, enable |
disabled |
DHCP server mode: authoritative or not authoritative |
|
yes, on, enable |
disabled |
Load leases log at DHCP startup. The default value should be good for most systems |
|
from 0 to 3 |
1 |
Determines the level of the messages that get to the main message stream |
|
path to file |
standard error stream |
Main log file |
|
path to file |
standard error stream |
Debugging log file |
|
path to file |
standard error stream |
Critical log file |
|
number |
unlimited |
Maximum number of log files to keep |
|
size in bytes |
10485760 |
Maximum size of log file |
|
number |
1 |
The ICMP request retries limit (see use_ping) |
|
yes, on, enable |
rotation off |
Enables log files rotation |
|
IP address |
Server IP address |
The IP address of the next server participating in the download |
|
yes, on, enable |
disabled |
If an existing lease is found when trying to give an IP address to a client, send an ICMP request to that IP address to find out the actual status of the client |
|
yes, on, enable |
disabled |
Renew lease for a particular MAC address in case the DHCP option 82 parameters can’t be matched |
RFW
RFW is a daemon that executes the commands issued by the UTM 5+ core. RFW is intended for controlling the external software, including firewalls, routers, shapers, etc.
Workflow description:
-
Connects to the billing core.
-
Receive commands from it;
-
Execute commands locally or remotely.
On startup the RFW authorizes in the system using the parameters given in its configuration file. For successful authorization the RFW must be registered in the list of firewalls (see Admin interface: Firewall list). The amount of RFWs in the system is unlimited.
RFW establishes permanent connection with the core using the Stream protocol and awaits for commands issued by the core on some events. Commands for particular events are assigned in the administrator’s interface on Settings: Firewall rules.
The commands are executed either on the same server where RFW is running (if the firewall type is set to Local), either remotely over rsh, if it was set to Cisco (rsh).
If the RFW is not connected to the core, the commands are cached for 24 hours. On reconnection of RFW to the core some commands may be executed according to the given synchronization parameters (see ); if the reconnection was without any flags, all cached rules will be sent to the affector. Also, an arbitrary command may be assigned for execution on RFW startup by the firewall_flush_cmd parameter.
Firewall rules
A firewall rule is an object that contains the command’s template and defines the conditions to execute the command.
The set of registered firewall rules may be found at Settings: Firewall rules page of the administrator’s interface.
Firewall rules ready for execution are passed to the RFW.
Firewall rules have the following parameters:
-
Applicability domain (to which users it is applicable);
-
Initiating event (the event that causes the rule to execute);
-
Place to apply (RFW to which the rule is passed and the corresponding firewall where it is actually executed);
-
Template (the command proper).
The command templates may include variables which are substituted with their values on sending the command to RFW.
Applicability domain is a property that defines accounts to which the rule is applicable. If All users option is checked, the rule is applicable to all accounts in the system. Otherwise the subset of interest may be defined by user ID, by group, or by the tariff plan. combined by default with logical OR, though an alternative option of using logical AND is also available.
|
Selection by tariff plan covers the accounts having (among others) some tariff links with this tariff plan set as current. The rules applicable to service links or IP groups will be applied to all service links or IP groups related to these accounts, including those which by themselves are connected with different tariff plans. |
Initiating event (one or more) is selected from the list.
Place to apply – selects the firewall to use from the list of existing firewalls, or probably selects all of them.
Command template is a string probably containing variables which are substituted with their values on sending the command to the RFW.
When executing locally, an RFW calls the command as follows:
[sudo_path ][firewall_path ]arg1[ arg2[ arg3…]],
where the optional parameters sudo_path and firewall_path are taken from the config file, and the rest is the command template where variables are already substituted with their values. Therefore the case when neither sudo_path nor firewall_path set requires the command template to start with the name of some external executable file.
When executed over rsh, the command is sent as is, i.e. just the template with substituted variable values.
Variables
You can use variables from the table below in the command templates. If you use a variable in the command that cannot be applied to the selected event, the default value will be used instead.
The list of events:
| Parameter | Default | Applicability domain | Description |
|---|---|---|---|
|
empty string |
All events excluding closing detailed statistics file and the logfile |
User ID |
|
empty string |
Semicolon-delimited list of IDs of groups which the user belongs to |
|
|
empty string |
User login |
|
|
empty string |
All events excluding closing detailed statistics file, closing logfile and User deleted |
E-mail address set in the user’s properties |
|
0 |
Account ID |
|
|
0 |
User ID plus |
|
|
empty string |
Full name of a user |
|
|
empty string |
User mobile phone number |
|
|
empty string |
User work phone number |
|
|
empty string |
User home phone number |
|
|
empty string |
Firewall name set in the Remote switch field in the user properties |
|
|
empty string |
Port set in the user’s properties |
|
|
0 |
All events excluding closing detailed statistics file, closing logfile, Add user, Edit user and Balance events |
Service link ID |
|
empty string |
Internet events Add/Edit/Delete dialup service link, hotspot enabled, hotspot disabled, Set bandwidth limit (incoming), Edit bandwidth limit (incoming), Delete bandwidth limit (incoming), Set bandwidth limit (outgoing), Edit bandwidth limit (outgoing) and Delete bandwidth limit (outgoing) |
Login set in the properties of a service link or an IP group |
|
0.0.0.0 |
Internet events, hotspot enabled, hotspot disabled, Set bandwidth limit (incoming), Edit bandwidth limit (incoming), Delete bandwidth limit (incoming), Set bandwidth limit (outgoing), Edit bandwidth limit (outgoing) and Delete bandwidth limit (outgoing) |
User network address set in the IP group properties under IP |
|
255.255.255.255 |
Dot-separated network mask (for example, 255.255.255.0). |
|
|
0.0.0.0 |
Dot-separated inverted network mask (for example, 0.255.255.255). Used for Cisco routers |
|
|
32 |
Binary network mask (for example, 32 means 255.255.255.255) |
|
|
empty string |
Internet events, Set bandwidth limit (incoming), Edit bandwidth limit (incoming), Delete bandwidth limit (incoming), Set bandwidth limit (outgoing), Edit bandwidth limit (outgoing) and Delete bandwidth limit (outgoing) |
MAC address set in the IP group properties |
|
0 |
Add/ Edit/Delete dialup service link, Open session, Close session, Add/Edit/Delete IP traffic service link, Add/Edit/Delete telephony service link, Add/Edit/Delete tech parameter Add/Edit/Delete IPTV service link |
Service ID; |
|
empty string |
Add/Edit/Delete dialup service link, hotspot enabled and hotspot disabled |
Hotspot or dialup service password |
|
empty string |
Add/Edit/Delete dialup service link |
Dialup service link flags: |
|
empty string |
CID parameter value for a dial-up service link |
|
|
empty string |
CSID parameter value for a dial-up service link |
|
|
empty string |
Blocking events |
Semicolon-separated list of parameters of dial-up service links related to the given account in a form |
|
-1 |
Blocking type |
|
|
empty string |
Semicolon-separated list of service link |
|
|
empty string |
External account ID |
|
|
0 |
Balance events |
Account balance |
|
0 |
Add tech parameter, Modify tech parameter and Delete tech parameter |
Tech parameter type: |
|
0 |
Tech parameter ID |
|
|
empty string |
Tech parameter value |
|
|
empty string |
Tech parameter password |
|
|
-1 |
Tech parameter type ID: |
|
|
0 |
Open session, Close session, Add tech parameter, Modify tech parameter and Delete tech parameter |
Service type |
|
0 |
Add / Edit / Delete IP traffic service link / Video on demand |
Tariff link ID |
|
0 |
Accounting period ID |
|
|
0 |
Staring date of a service link |
|
|
0 |
Ending date of a service link |
|
|
0 |
IP group ID of a service link |
|
|
empty string |
Add/Edit/Delete IPTV service link |
The contents of Custom options field in IPTV service parameters |
|
empty string |
Blocking events, Add IP traffic link, Edit IP traffic link and Delete IP traffic link |
Semicolon separated list of IP groups in a form |
|
0 |
Hotspot enabled, hotspot disabled |
Remaining time of service for hotspot |
|
empty string |
Add telephony link, Edit telephony link, Delete telephony link and Blocking events |
Semicolon-separated list of telephone numbers in a form |
|
empty string |
Open session иClose session |
PBX ID; |
|
0.0.0.0 |
NAS IP address |
|
|
empty string |
Session ID (string) |
|
|
0 |
Session status |
|
|
empty string |
Calling staton ID |
|
|
empty string |
Called staton ID |
|
|
0.0.0.0 |
IP address set in the |
|
|
0 |
Set bandwidth limit (incoming), Edit bandwidth (incoming), Delete bandwidth limit (incoming), Set bandwidth limit (outgoing), Edit bandwidth limit (outgoing) and Delete bandwidth limit (outgoing) |
Currently permitted bandwidth |
|
empty string |
Detailed statistics file closed and Log file closed |
Path to the log file or statistics file |
|
0 |
Making payment |
Payment amount |
|
0 |
Payment method ID |
|
|
empty string |
User log events |
Action ID |
|
empty string |
User log changes comments |
|
|
empty string |
ID of a user who initiated the changes |
|
|
empty string |
HotSpot user registration |
User personal cabinet password |
|
empty string |
User mobile phone number |
|
|
empty string |
User card existence time limit. When registering again before the end of the period the existence time is updated |
|
|
empty string |
Internet events |
Switch IP address in IP group properties |
|
empty string |
Switch login in IP group properties |
|
|
empty string |
Switch password in IP group properties |
|
|
empty string |
Switch Remote ID in IP group properties |
|
|
empty string |
Switch ID in IP group properties |
|
|
empty string |
Switch port in IP group properties |
|
|
empty string |
VLAN in IP group properties |
Events
The list of events that may trigger a command:
Turn Internet on |
executes for each IP group in every IP traffic service link related to the given account when the Internet status for this account is changed to On |
Turn Internet off |
executes twice for each IP group in every IP traffic service link related to the given account when the Internet status for this account is changed to Off |
Adding users |
executes for the user being added to the system via the administrator’s interface or automatically |
User modified |
executes for the user whose data has been changed |
Removing a user |
executes for the user which is being deleted |
Blocking events Block type changed |
executes for an account on changing its blocking state (that is, on blocking or unblocking) |
Balance events |
executes for an account when its balance passes by the threshold defined by the system parameter |
Session opened |
executes for a service link on |
Session closed |
executes for a service link on |
Dialup link added |
executes for a dial-up service link on its creation |
Dialup link modified |
executes for a dial-up service link on changing its parameters |
Dialup link deleted |
executes for a dial-up service link on its removal |
IP traffic link added |
executes for an IP traffic service link on its creation |
IP traffic link modified |
executes for an IP traffic service link on changing its parameters |
IP traffic link deleted |
executes for an IP traffic service link on its removal |
Telephony service link added |
executes for a telephony service link on its creation |
Telephony service link modified |
executes for a telephony service link on changing its parameters |
Telephony service link deleted |
executes for a telephony service link on its removal |
Hotspot enabled |
executes for a hotspot service link on user’s authorization |
Hotspot disabled |
executes for a hotspot service link on user’s logout or session stopping |
Add hotspot user |
executes for a hotspot user being added to the system via the web interface |
Tech parameters events Tech parameter added |
executes for a service link on creation of a technical parameter (see ) related to it |
Tech parameter modified |
executes for a service link on changing a technical parameter related to it |
Tech parameter deleted |
executes for a service link on removal of a technical parameter related to it |
Set bandwidth limit (incoming) |
executes for each IP group on changing the shaping conditions imposed on the given service link for the incoming channel |
Edit bandwidth limit (incoming) |
executes for each IP group on changing the shaping conditions imposed on the given service link for the incoming channel (say, when the amount of traffic passes over the border limits) |
Delete bandwidth limit (incoming) |
executes for each IP group on leaving the shaping conditions imposed on the given service link for the incoming channel (say, when the amount of traffic is zeroed at the end of accounting period) |
Set bandwidth limit (outgoing) |
executes for each IP group on approaching the shaping conditions imposed on the given service link for the outgoing channel (say, when the amount of traffic reaches the lower border limit) |
Edit bandwidth limit (outgoing) |
executes for each IP group on changing the shaping conditions imposed on the given service link for the outgoing channel |
Delete bandwidth limit (outgoing) |
executes for each IP group on leaving the shaping conditions imposed on the given service link for the outgoing channel |
Raw traffic file closed |
executes for the detailed statistics file on its closing |
Log file closed |
executes for the log file on its closing |
Making payment |
executes when a payment is made |
New DHCP lease |
executes on new IP address allocation (DHCP lease is offered) |
DHCP lease update |
executes when a DHCP lease is updated |
DHCP lease expire |
executes when a DHCP lease expires |
IPTV link added |
executes on IPTV service link creation |
IPTV link modified |
executes on IPTV service link modification |
IPTV link deleted |
executes on IPTV service link deletion |
VoD link added |
executes on VoD service link creation |
VoD link modified |
executes on VoD service link modification |
VoD link deleted |
executes on VoD service link deletion |
Store user log |
executes for any User log events |
Firewall
The Firewall is a system object used to identify an affector, a commutator, or a NetFlow provider.
The Settings: Firewalls page of the administrator’s interface lists the registered firewalls and contains the interface for adding, modifying or deleting them.
Each firewall has the following parameters:
ID |
is assigned automatically |
Type |
is Local to execute the commands locally, or Remotte Cisco to execute them remotely over rsh. Must conform to the |
Name |
is a unique name to identify the RFW. Must conform to the |
IP |
is an IP address of NetFlow provider to be set in the properties of an IP group |
Login |
is a login to use as |
Comments |
is an arbitrary comment |
The utm5_rfw settings
The utm5_rfw executable file is called /netup/utm5/bin/utm5_rfw. On the command line, you can specify the following parameters:
|
The path to the configuration file |
|
Synchronize firewall rules on startup (only commands associated with this RFW are executed, and only on this RFW) |
|
Deprecated, superseded with -s enable |
|
Deprecated, superseded with -s enable |
|
Version number and parameter information |
The following options for utm5_rfw startup on unix systems are available:
-
Direct start of the
/netup/utm5/bin/utm5_rfwexecutable with necessary parameters. -
Start on
watchdogwithstartparameter:/netup/utm5/bin/safe_utm5_rfw start
In this case the-fcommand line parameter is effectively passed to the executable. The script will restartutm5_rfwautomatically on failure; -
Start via the automatic startup script (recommended).
/etc/init.d/utm5_rfw start
To stop the utm5_rfw and the watchdog script, execute:
/etc/init.d/utm5_rfw stop
To start an RFW on a remote machine, it is essential that its config file parameters core_host and core_port conform to the address and port used by the core for Stream protocol connections.
Several RFWs may run on the same machine simultaneously, given that they have separate config and PID files.
Configuration file
By default, the RFW uses this configuration file – /netup/utm5/rfw5.cfg.
The configuration file have the following format: parameter=value.
A sequence of symbols before the equals sign is treated as parameter’s name, while the one after it stands for the parameter’s value. Whitespaces count. Empty lines are ignored. A line starting with # is a comment.
| Parameter | Possible values | Default | Description |
|---|---|---|---|
|
mysql, postgres |
mysql |
UTM 5+ database type |
|
string |
mandatory parameter |
Name of the RFW by which it is known to the UTM 5+ core. The same value should be specified in the Name field when adding the firewall to the list of firewalls |
|
IP address |
mandatory parameter |
IP address of the host on which the UTM 5+ core is running |
|
number from 1 to 65534 |
mandatory parameter |
The port where the UTM 5+ core listens to Stream ( |
|
string |
mandatory parameter |
Login to access the UTM 5+ core |
|
string |
mandatory parameter |
User password to access the billing core |
|
local, cisco |
local |
Firewall type. Must conform to the Type parameter of the corresponding firewall. If set to |
|
see below |
not set |
Syncronization flags |
|
|||
|
executable file name |
not set |
Name of the sudo executable file |
|
executable file name |
empty string |
Name of the executable file controlling the external software |
|
executable file name |
empty string |
Script running on connection and reconnection to the core |
|
yes, enable, true |
commands execute in parallel |
If the value is set, the rules are executed sequentially, i.e. each rule is executed only after the previous one. When using the |
|
|||
|
IP address |
mandatory parameter |
IP address to send the rsh commands to |
| Logging parameters | Possible values | Default | Description |
|---|---|---|---|
|
number from 0 to 3 |
1 |
Level of messages to be written to the main log file |
|
file name |
standard error stream |
Main log file |
|
file name |
standard error stream |
Debugging log file |
|
file name |
standard error stream |
Critical log file |
|
yes, on, enable |
rotation off |
Enables log files rotation |
|
number |
unlimited |
Maximum number of log files to keep |
|
size in bytes |
10485760 |
Maximum size of log file |
|
file name |
/var/run/utm5_rfw.pid |
PID file |
|
string |
not set |
Log entry prefix (when logging to syslog is enabled) |
|
The |
Synchronization of rules
On automatic startup of RFW some rules may be executed in order to reinstall the configuration of the external software.
Only the rules related to the given RFW may be executed, and only on this RFW itself. The set of rules to execute is defined by the flags (listed below).
The flags may be passed either via the config file parameter sync_flags or via the command line parameter -s, the latter having higher priority. When several flags used simultaneously, they must be joined into a colon-separated string. Available flags include:
|
enable executes the rules related to the Internet on event |
|
disable executes Internet off |
|
users executes User added for all users |
|
executes IP traffic link added for all such links |
|
executes Dialup link added for all such links |
|
executes Block type changed for all accounts |
|
executes Set bandwidth limit for all IP groups |
UTM 5+ Traffic collector
This module gathers the IP traffic data in NetFlow format, converts it to internal UTM 5+ format and classifies it. Using additional traffic collectors decreases the UTM 5+ core server load and allows you to correctly process information from NetFlow providers from subnetworks with crossing address spaces. The executable file utm5_traffic_collector is located in /netup/utm5/bin.
In standard UTM 5+ configuration a single System traffic collector is available. Go to the Settings group, Traffic collectors page of the administrator’s interface for the traffic collector and UTM 5+ core interaction settings.
By default, the UTM 5+ Traffic Collector on UNIX systems uses this configuration file – /netup/utm5/utm5_traffic_collector.cfg.
The configuration file have the following format: parameter=value.
A sequence of symbols before the equals sign is treated as parameter’s name, while the one after it stands for the parameter’s value. Whitespaces count. Empty lines are ignored. A line starting with # is a comment.
| Parameter | Possible values | Default | Description |
|---|---|---|---|
|
IP address |
127.0.0.1 |
IP address of the UTM 5+ core host |
|
from 1 to 65534 |
12758 |
The port where the UTM 5+ core listens to Stream ( |
|
string |
collector |
Login to access the UTM 5+ core Is set on the System users page of the administrator’s interface |
|
string |
collector |
Password to access the UTM 5+ core Is set on the System users page of the administrator’s interface |
|
string |
traffic_collector |
A unique traffic collector name. Is set on the Traffic collectors page of the administrator’s interface |
|
string |
0.0.0.0 |
IP address of the server listening to NetFlow |
|
string |
9997 |
Port listening to NetFlow |
|
integer number |
set by OS |
Size of the UDP socket buffer used to accept NetFlow |
|
from 0 to 3 |
1 |
Defines the level of messages that fall into the message stream |
|
path to file |
standard error stream |
Main log file |
|
path to file |
standard error stream |
Debugging log file |
|
path to file |
standard error stream |
Critical log file |
|
yes, on, enable |
rotation off |
Enables log files rotation |
|
number |
unlimited |
Maximum number of log files to keep |
|
size in bytes |
10485760 |
Maximum size of log file |
|
path to file |
/var/run/utm5_traffic_collector.pid |
Traffic collector PID file path |
Utilities
Urfaclient
The urfaclient is intended for the unified access to the UTM 5+ core data structures via RPC interface (URFA).
The Urfaclient consists of:
-
the liburfaclient.so library, which provides interaction between the utility and the billing core;
-
utm5_urfaclient utility that actually performs the requested actions;
-
schemes describing input and output parameters of the involved URFA functions;
-
Specific URFA scripts for any particular action or a sequence thereof.
Output of the executed URFA functions is directed to stdout.
|
The Urfaclient provides direct interface for low-level operations which (unlike those performed via the control center or the web interface) |
Scheme
The api.xml scheme contains descriptions of the input and output parameters of functions in the form of XML tags; sequences of actions depending on the value of these parameters.
Path to api.xml may be passed via the command line key -api. By default: it is /-netup/utm5/xml/api.xml.
Expression value is either the value of a variable, or the output value of a built-in function, or a constant, if neither a variable nor a function with such name exist.
Variables are actually arrays of strings. When array index is not specified, zeroth element is assumed by default.
Interpretation of variables is context-dependent. For example, an integer tag implies parsing of string on return and serialization on assignment.
All variables belong to the global scope, so care must be taken to avoid name conflict.
The built-in system functions are:
-
now()returns string representation of current time in unix format; -
max_time()returns string representation of maximum possible time in UTM 5+ in unix format (2000000000, year 2033); -
size(varname)returns the length of thevar_namearray.
| Permissible tags: | Description |
|---|---|
|
A root tag. |
|
Describes a function. |
|
Contains description of the function’s input parameters. |
|
The same as input, only for output parameters of a function. |
|
May reside either in input or in output. Contains 32-bit signed integer. |
|
It is similar to the integer but contains description of integer character parameters with the length of 64 bits (int64_t). |
|
It is similar to the integer but contains a description of floating point parameters (double). |
|
It is similar to the integer but contains a description of string parameters. |
|
It is similar to the integer but contains a description of IPv4 address type parameters (for example, |
|
Provides conditional operator in a sequence of parameters depending on the variable value. |
|
Provides loop operation. |
|
Causes exit with a non-zero error code. |
Script
URFA script describes a sequence of URFA function calls, loops and conditional operators in a form of XML tags. Each action correspond to one file called <action_name.xml>.
Name of the directory containing URFA scripts may be passed via the command line key -x. The default value is /netup/utm5/xml/. For example, the add_user action by default uses the file /ne-tup/utm5/xml/add_user.xml.
URFA script must conform to the scheme.
| Permissible tags: | Description |
|---|---|
|
A root tag. |
|
Performs a call to a URFA function defined in an api file. |
|
Must have the name attribute with variable name. |
|
The tag of arithmetic addition. |
|
The tag of arithmetic subtraction. |
|
The tag of arithmetic multiplication. |
|
The tag of arithmetic division. |
|
The tag of string concatenation. |
|
Provides conditional operator in a sequence of parameters depending on the variable value. |
|
Provides loop operation. |
|
Must have the text attribute. |
|
Must have the var attribute. |
|
Sets the variable value. |
|
Causes exit with a non-zero error code. |
|
shifts the name array one step to the left, removing the first element. Usage not recommended. |
|
Interrupts the innermost for tag execution and continues from the following line. |
|
Removes the whole array name, or its single element with index array_index, in case if the attribute is given, otherwise the whole array is removed. In this case the subsequent elements are shifted left by one. |
Data files
Data file describes an array or several arrays of data to be used as input parameter(s) in a function. Data file should be passed to urfaclient via the command line key -datafile.
| Permissible tags: | Description |
|---|---|
|
A root tag. |
|
An array of arbitrary dimensions. |
|
An array element, which itself may or may not be an array. |
Utility usage
Utility usage is done from the command line with the parameters. Launch the Urfaclient with the following command:/netup/utm5/bin/utm5_urfaclient
Each command line parameter consists of the space-separated key-value pair, with the exception of the ‑help, -debug, -u, and -dealer keys which require no value.
Most of parameters have their counterparts in the config file. The complete list of command line keys and config file parameters is given below.
Besides that, some action-specific parameters are possible. Depending on the nature of the action, they may or may not be mandatory.
All string values must be passed in UTF-8 encoding. Order of parameters is not important.
Configuration file
By default, the Urfaclient uses this configuration file /netup/utm5/utm5_urfaclient.cfg.
Config files have the following format: parameter=value.
A sequence of symbols before the equals sign is treated as parameter’s name, while the one after it stands for the parameter’s value. Whitespaces count. Empty lines are ignored. A line starting with # is a comment.
All parameters may be passed to the program via the command line as well. The command line parameters have priority over those given in the config file and in the data file (if any).
The list of available parameters and command line keys is given below.
| Key | Parameter | Default | Description |
|---|---|---|---|
|
|
127.0.0.1 |
IP address of the host on which the UTM 5+ core is running |
|
|
11758 |
The port where the UTM 5+ core listens to URFA (urfa_bind_port parameter in the configuration file of the core) |
|
|
init |
Login to access the UTM 5+ core |
|
|
init |
Password to access the UTM 5+ core |
|
|
/netup/utm5/xml/ |
The name of the directory that contains the schema and URFA scripts |
|
|
/-netup/utm5/xml/api.xml. |
Path to schema file |
|
|
not set |
If the value is "yes", only user functions can be called, otherwise only system functions can be called. |
|
|
not set |
If the value is "yes", only dealer functions can be called |
|
|
not set |
If this parameter is specified, the user session is restored by the key specified as the parameter value. The login and password of the system user must be specified in the configuration file or in the command line |
|
|
127.0.0.1 |
When restoring a session by key, the value of this parameter determines the IP address from which the session to be restored was initialized |
|
|
not set |
Action name (mandatory parameter) |
|
|
/netup/utm5/utm5_urfaclient.cfg |
The path to the configuration file |
|
|
not set |
Displays help on parameters of the called script, if it exists |
|
|
not set |
Enables additional debugging output, including the inner variables’ values |
|
|
not set |
Name of data file |
|
|
not set |
Value of the function input parameter called |
Usage example
Sample URFA scripts are located at /netup/utm5/xml. There are also a scheme (api.xml) and data file examples: search_users_new_data.xml and teldata.xml.
Utility usage example:
utm5_urfaclient -a link_tariff_with_services -user_id 5
 -account_id 5 -discount_period_id 2 -tariff_current 1
 -ip_address 10.4.5.7 -iptraffic_login test4
 -iptraffic_password 123
In this example a link_tariff_with_services.xml script is called, which attaches certain tariff plan to a specified user account, together with attachment of all services having their Attach by default flag set.
The resulting output is directed to STDOUT.
Importing from text files
utm5_send_traffic should be employed to import traffic info in case if the said info contains neither sender nor destination address, but provides the data on traffic quantity, its class, and the login of the IP traffic service link to which the traffic belongs. If the option of providing traffic data via NetFlow is available, it should be used instead.
utm5_send_cdr should be used to import the info on phone calls in case if the provider of the said info does not support the RADIUS Accounting-Request. If the option of sending the phone calls info via the RADIUS Accounting-Request is available, it should be used instead.
File parsing
In case of parsing a traffic info file the following actions are performed:
-
A connection is established to the UTM 5+ core using URFA protocol.
-
The file is read line by line, and each line parsed according to standard format.
-
Data from each string are stored in the internal format.
-
Data structures in the internal format are passed to by calling the URFA function 0x5511.
-
utm5_send_traffic stops.
The traffic data file should contain the data in the following format:
-
Each string must be formatted like:
<LOGIN><BYTES><TCLASS><IP>LOGINis the login of the IP traffic service link to which the traffic belongs
BYTESis the traffic amount in bytes (should not exceed 2GB)
TCLASSis the number of traffic class registered in UTM 5+ to which this traffic belongs
IPis an IP address specified for this traffic in traffic reports grouped by IP. May contain arbitrary value.
-
The file should contain neither strings containing any other information, nor information in a different format.
In case of parsing a phone calls info file the following actions are performed:
-
A connection is established to the UTM 5+ core using URFA protocol.
-
The file is read line by line, and each line parsed according to standard format.
-
Data from each string are stored in the internal format.
-
Data structures in the internal format are passed to the UTM 5+ core by calling the URFA function 0x10310.
-
utm5_send_cdr stops.
The phone calls data file should contain the data in the following format:
-
Each record of a phone call must be on a separate line.
-
No record may span more than one line.
-
Each record must conform to the format specified in the configuration file. The format should conform the common telephony call record requirements.
-
The file should contain neither strings containing any other information, nor information in a different format.
Each single record must meet the following requirements:
-
To contain text data on one call.
-
To contain several fields: The following fields are mandatory:
-
Calling party ID (telephone number);
-
Called party ID (telephone number);
-
Call length in seconds;
-
Call date and time, if the call is going to be recorded under date different from current;
-
-
The following optional fields may also appear:
-
Incoming trunk;
-
Outgoing trunk;
-
PBX ID;
-
Unique call ID (optional).
-
If the call date format is not specified in the configuration file, the following is assumed by default:
<hh>:<mm>:<ss>.<mls><tmz><wdd><mth><dt><yyyy>
| Field | Number of symbols | Description |
|---|---|---|
|
2 |
hours |
|
2 |
minutes |
|
2 |
seconds |
|
3 |
milliseconds |
|
3 |
time zone |
|
3 |
weekday |
|
3 |
month |
|
2 |
date |
|
4 |
year |
For example, 00:35:05.000 UTC Tue Jul 19 2016.
Milliseconds and day of week are ignored.
The field delimiter symbol is set in the configuration file and is the same for the whole parsing file.
Utilities usage
Utilities are started as follows:
/Netup/utm5/bin/utm5_send_traffic
and
/netup/utm5/bin/utm5_send_cdr
The acceptable command line parameters for both utilities are:
|
The path to the configuration file. |
|
Path to the data file to be imported. “ - ” denotes STDIN. |
|
Version number and parameter information |
Configuration files
The utilities use the following configuration files: utm5_send_traffic.cfg and utm5_send_cdr.cfg, which located on UNIX systems in the /netup/utm5/ directory, and at UTM 5+ on Windows, in the installation directory (by default C:\Program Files\NetUP\UTM5\).
The configuration file have the following format: parameter=value.
A sequence of symbols before the equals sign is treated as parameter’s name, while the one after it stands for the parameter’s value. Whitespaces count. Empty lines are ignored. A line starting with # is a comment.
Below is the list of possible parameters.
Parameters of connection to the UTM 5+ core (present in both files):
| Parameter | Possible values | Default | Description |
|---|---|---|---|
|
IP address |
127.0.0.1 |
IP address of the host on which the UTM 5+ core is running |
|
number from 1 to 65534 |
11758 |
The port where the UTM 5+ core listens to URFA (urfa_bind_port parameter in the configuration file of the core) |
|
string |
init |
Login to access the UTM 5+ core |
|
string |
init |
Password to access the UTM 5+ core |
Parameters for parsing phone call info files (found only in utm5_send_cdr.cfg):
| Parameter | Possible values | Default | Description |
|---|---|---|---|
|
integer number |
0 |
Number of position containing the calling number |
|
integer number |
1 |
Number of position containing the called number |
|
integer number |
2 |
Number of position containing the call duration |
|
format string |
default format |
Call duration format. |
|
IP address of the interface, or 0.0.0.0 |
0.0.0.0 |
Host address to receive access verification requests (Access-Request) |
|
integer number |
not set |
Number of position containing the time of the call (if stored separately from date) |
|
format string |
not set |
Call start time format. |
|
integer number |
not set |
Number of position containing the user name (if it is included) |
|
integer number |
not set |
Number of position containing the incoming trunk (if present) |
|
integer number |
not set |
Number of position containing the outgoing trunk (if present) |
|
integer number |
not set |
Number of position containing the PBX ID (if present) |
|
string |
space |
Field delimiter symbol |
|
string |
empty string |
Field enclosing symbol |
Date format string may include specifiers, see the full list below.
|
four-digit year (1970…) |
|
two-digit year (00..99) |
|
month with leading zeros (01…12) |
|
month without leading zeros (1..12) |
|
hour with leading zeros (00..23) |
|
hour without leading zeros(0..23) |
|
day of the month with leading zeros (01..31) |
|
day of the month without leading zeros (1..31) |
|
minutes with leading zeros (00..59) |
|
minutes without leading zeros (0..59) |
|
seconds with leading zeros (00..60) |
|
seconds without leading zeros (0..60) |
|
three-letter month name (Jan..Dec) |
|
time in unix timestamp format |
|
time zone identifier (for example, GMT) – valid only for Linux |
|
any symbol |
| Logging parameters | Possible values | Default | Description |
|---|---|---|---|
|
number from 0 to 3 |
1 |
Level of messages to be written to the log file (unless -d option is set) |
|
file name |
standard error stream |
Main log file |
|
file name |
standard error stream |
Debugging log file |
|
file name |
standard error stream |
Critical log file |
Export of statistics
To emulate activity of users and export statistics via NetFlow v.5 protocol there is a utility called utm5_flowgen, which is installed to: /netup/utm5/bin/utm5_flowgen
It may accept the following command line parameters:
|
IP address of the host to send generated NetFlow packets to. |
|
Port to send generated NetFlow packets to. |
|
Number of NetFlow records. Default value is 65535. |
|
NetFlow protocol version. Supports versions 5 and 9 |
|
Name of a file which will be used as the source of data for sending. |
|
NetFlow packets send rate |
|
Sender IP address in the NetFlow record |
|
Destination IP address in the NetFlow record |
|
Traffic source port in the NetFlow record |
|
Traffic destination port in the NetFlow record |
|
Traffic source AS in the NetFlow record |
|
Traffic destination AS in the NetFlow record |
|
Incoming traffic index in the NetFlow record |
|
Outgoing traffic index in the NetFlow record |
|
Number of transmitted bytes in the NetFlow record |
|
Number of transmitted packets in the NetFlow record |
|
TOS in the NetFlow record |
|
TCP flags in the NetFlow record |
|
Protocol ID in the NetFlow record. E.g. 6=TCP, 17=UDP, etc. |
|
Next router IP address in the NetFlow record |
|
Use a *.utm file as a source for the detailed NetFlow statistics |
The following example command generates one NetFlow packet describing 1048576 bytes of traffic transmitted from 10.0.0.1 to 10.0.0.2:
/netup/utm5/bin/utm5_flowgen -c 1 -s 10.0.0.1 -d 10.0.0.2 -b 1048576
For emulation of user activity and export of statistics via RADIUS protocol there is a utility called utm5_radgen which is installed to
/netup/utm5/bin/utm5_radgen.
It may accept the following command line parameters:
|
Port for generated RADUIS packets to be sent to |
|
IP address for generated RADIUS packets to be sent to |
|
Secret word for communicating with RADIUS server |
|
RADIUS packet code. Default value is |
|
RADIUS packet ID. |
|
User password in public form. The value is sent with attribute ID equal to 2 (Password) |
|
Attribute values |
|
Binary attribute values in HEX ASCII |
|
Quick mode: don’t wait for reply |
|
Name of a file to read the authenticator from. |
|
Display utility version |
It is possible to set multiple attributes in a string of the following format:
vendor_id:attr_id:is_digit:value
Fields are separated by colons. In the first field the vendor identifier is set. Default value is 0.
The second field contains attribute identifier.
The third field is used to set data type, i.e. numeric or char. If the value is 0 then the data is transmitted as a character string. If the value is 1 then values are transmitted as digits (integer).
The 4th field is used for transmission of the value itself.
Usage examples:
-
To send an authorization request (
Access-request) run the following command:value/netup/utm5/bin/utm5_radgen -h 127.0.0.1 -p 1812 -s secret -u password -a 0:1:0:username
A RADIUS authorization packet will be generated for a username user with password. -
To send a request for accounting (
Accounting-Request) run the command:/netup/utm5/bin/utm5_radgen -h 127.0.0.1 -p 1813 -s secret -a 0:1:0:username -a 0:40:1:1 -a 0:44:0:sessionid1 -c 4
A RADIUS packet will be generated with the accounting request for a username user, and it will be indicated that the session was opened (start). Session Identifier is sessionid1. -
To send a request for accounting (
Accounting-Request) run the command:/netup/utm5/bin/utm5_radgen -h 127.0.0.1 -p 1813 -s secret -a 0:1:0:username -a 0:32:0:localhost -a 0:40:1:2 -a 0:44:0:sessionid1 -a 0:46:1:100 -c 4
A RADIUS packet will be generated with the accounting request for a username user, and it will be indicated that the session was closed (stop). Session Identifier is sessionid1. Session duration (Acct-Session-Time) – 100 seconds.
Traffic reports
The get_nf_direct utility is designed to form detailed traffic reports based on the saved raw information.
The executable file is called /netup/utm5/bin/get_nf_direct.
It may accept the following command line parameters:
|
Path to directory containing the primary traffic information files |
|
Name of file with primary traffic information |
|
Account ID for the report |
|
Traffic source ID for the report |
|
Traffic destination ID for the report |
|
Source port for the report |
|
Destination port for the report |
|
Traffic class for the report |
|
Time (Unix timestamp) to create the report since |
|
Time (Unix timestamp) to create the report till. If not set, current time is used |
|
Maximum number of lines in the report. |
|
Represent extended statistics |
|
CSV format output |
|
Version number and parameter information |
Making payments
The utm5_payment_tool utility is intended for making payments to a customer's personal account using third party software. The utility is called from the command line with the specified parameters. The utilities are started as follows:
/netup/utm5/bin/utm5_payment_tool
Each command line parameter consists of the space-separated key-value pair. The complete list of command line keys and config file parameters is given below.
All string values must be passed in UTF-8 encoding. Order of parameters is not important.
By default, the utm5_payment_tool uses this configuration file – /netup/utm5/utm5_payment_tool.cfg.
Parameter values in the configuration file for this utility have higher priority than those specified in the command line.
Config files have the following format: parameter=value.
A sequence of symbols before the equals sign is treated as parameter’s name, while the one after it stands for the parameter’s value.
Whitespaces count.
Empty lines are ignored.
A line starting with # is a comment.
| Key | Parameter | Default | Description |
|---|---|---|---|
|
|
127.0.0.1 |
IP address of the UTM 5+ core host |
|
|
11758 |
The port where the UTM 5+ core listens to URFA |
|
|
init |
Login to access the UTM 5+ core |
|
|
init |
Password to access the UTM 5+ core |
|
|
empty string |
Comment for a customer |
|
|
empty string |
Comment for an admin |
|
|
810 (RUR) |
Payment currency ID (three-digit numeric code) |
|
|
0 (payment in cash) |
Payment method ID For a full list of available methods, see the reference in the admin interface |
|
|
no |
Open the Internet after making a payment: yes / no |
|
|
not set |
Personal account number |
|
|
not set |
External Payment ID |
|
|
0.0 |
Payment amount |
Checking database structure
The db_archiver utility is used when updating UTM 5+. It allows you to compare the current DB structure with the one needed by the updated the billing core. Besides, the utility allows archiving the tables that are meant to be archived.
The executable file is /netup/utm5/bin/db_archiver.
It may accept the following command line parameters:
|
Archive tables that are meant to be archived |
|
UTM 5+ configuration file path. |
|
Write the difference between the current DB structure and the DB structure, required by the new UTM 5+ core to the log file |
|
Update only those columns that have changed since the previous release and are marked for update by NetUP |
|
Update all columns whose format is different from the format, required by the new version of the UTM 5+ core |
|
Update the structure of tables meant for archiving |
|
Update indexes |
|
Do not consider a primary key without a default value as a change in structure |
|
Verify archived tables |
|
Temporarily prevent the UTM 5+ core from writing to the DB. This is required when archiving tables without stopping the core. Use this option together with -a when the core is running |
|
Turn off confirmations and minimize the output to log file. This may be useful when running this utility on a schedule |
|
Update the DB structure. This parameter is used together with the following parameters -e, -f, -g and -i. E.g. -uef |
|
Write the new DB structure description of the new version of UTM 5+ into the log file |
|
Login for communicating with the UTM 5+ core via the URFA protocol |
|
Password required for communicating with the UTM 5+ core via the URFA protocol. Both login and password may be required if for some reason they differ from the ones in the billing core configuration file |
|
Show this help |
E-mail notifications
The UTM 5+ may send automatic e-mail messages to the users (or rather those of them who has valid e-mail addresses entered in their user info) for a number of reasons.
The messages are sent via SMTP server set by the smtp_relay parameter. The SMTP server must be set up correctly and must send every incoming message within 1 second. Longer delays in email processing may drastically reduce the billing performance. It is recommended to use the local SMTP server.
Possible types of e-mail messages include:
-
Invoices are sent when either an invoice is issued to a user having the Send invoices by email parameter checked, or when the Send by email context menu item is hit in the report on invoices.
Message subject is set by the invoice_subject system parameter. Message text is set by invoice_text, while the invoice itself is contained in an attachment as an HTML file. The invoice is generated on the basis of the Invoice document template. -
Payment notifications are sent on the event of a payment being made, if the corresponding parameter is checked in the payment’s properties.
Message subject is Payment notification. Message text is composed from the template stored in the payment_notification_message system parameter. -
Balance notifications are sent when the user’s balance (not considering the credit) crosses the borders defined by the notification_borders system parameter, if the latest is set.
Message subject is defined by the notification_message_subject system parameter. Message text is composed from the template stored in the notification_message system parameter.
Test cases
|
All the test cases are executed correctly only when UTM 5+ works with the demo-license. |
Traffic transmission
The test case is designed to check the correct functioning of the NetUP UTM 5+ billing system on your server. The main point of the check is to upload five users to the database and emulate the work of these users within three months. The necessary data for starting the test case are included with the billing system.
|
Stop services that are critical to changing the date on the server. |
-
Stop the
utm5_core. -
Set the date on the server to 00 hours 00 minutes on April 1, 2003.
date 0304010000 -
Execute commands to upload data to the database:
mysqladmin drop UTM5
 mysqladmin create UTM5
 mysql UTM5 < UTM5_MYSQL_kp.sql
mysql -f UTM5 < UTM5_MYSQL_update.sql -
Edit the
kp.plfile. Specify the port on which the core of the billing system accepts NetFlow packets, and the path to theutm5_flowgenutility that generates NetFlow packets (usually/netup/utm5/bin/utm5_flowgen). -
Run the
utm5_core. -
Run the
kp.plprogram with the command:perl kp.pl
While the program is running, the date on the server will change from April 1, 2003 to July 1, 2003. This will emulate the work of test users for three months: April, May, June 2003.
If the billing system works correctly, the values you get after working with the kp.pl program should match those specified in the tables.
After completing the test case, set the correct date on the server.
First month (April, 2003)
| cli1 | cli2 | cli3 | cli4 | cli5 | |
|---|---|---|---|---|---|
Volume per day, MB |
0.5 |
2 |
4 |
10 |
40 |
Amount of days |
30 |
30 |
30 |
30 |
30 |
Volume per month, MB |
15 |
60 |
120 |
300 |
1200 |
Cost per unit of excess |
0.2 |
0.2 |
0.2 |
0.15 |
0.15 |
Prepaid, MB |
50 |
50 |
50 |
500 |
500 |
Cost of excess |
0 |
2 |
14 |
0 |
105 |
Periodic fee |
3 |
3 |
3 |
100 |
100 |
Rest |
-3 |
-5 |
-17 |
-100 |
-205 |
Second month (May, 2003)
| cli1 | cli2 | cli3 | cli4 | cli5 | |
|---|---|---|---|---|---|
Volume per day, MB |
1 |
2.5 |
5 |
20 |
50 |
Amount of days |
31 |
31 |
31 |
31 |
31 |
Volume per month, MB |
31 |
77.5 |
155 |
620 |
1550 |
Cost per unit of excess |
0.2 |
0.2 |
0.2 |
0.15 |
0.15 |
Prepaid, MB |
50 |
50 |
50 |
500 |
500 |
Cost of excess |
0 |
5.5 |
21 |
18 |
157.5 |
Periodic fee |
3 |
3 |
3 |
100 |
100 |
Rest |
-6 |
-13.5 |
-41 |
-218 |
-462.5 |
Third month (June, 2003)
| cli1 | cli2 | cli3 | cli4 | cli5 | |
|---|---|---|---|---|---|
Volume per day, MB |
1.5 |
3 |
6 |
30 |
60 |
Amount of days |
30 |
30 |
30 |
30 |
30 |
Volume per month, MB |
45 |
90 |
180 |
900 |
1800 |
Cost per unit of excess |
0.2 |
0.2 |
0.2 |
0.15 |
0.15 |
Prepaid, MB |
50 |
50 |
50 |
500 |
500 |
Cost of excess |
0 |
8 |
26 |
60 |
195 |
Periodic fee |
3 |
3 |
3 |
100 |
100 |
Rest |
-6 |
-13.5 |
-41 |
-218 |
-462.5 |
TOTAL rest |
-9 |
-24.5 |
-70 |
-378 |
-757.5 |
Dial-up access
The test case is designed to check the correct functioning of the NetUP UTM 5+ billing system on your server. The main point of the check is to upload three users to the database and emulate the work of these users within three months. The necessary data for starting the test case are included with the billing system.
|
Stop services that are critical to changing the date on the server. |
-
Stop the
utm5_core. -
Set the date on the server to 00 hours 00 minutes on April 1, 2003.
date 0304010000 -
Execute commands to upload data to the database:
mysqladmin drop UTM5
 mysqladmin create UTM5
 mysql UTM5 < UTM5_MYSQL_kp.sql
mysql -f UTM5 < UTM5_MYSQL_update.sql -
Edit the
kp_dialup.plfile. Specify on which port theutm5_radiusprocess receivesRadius Accountingpackets, and the path to theutm5_radgenutility, which generates RADIUS packets (usually/netup/utm5/bin/utm5_radgen). -
Run the
utm5_coreandutm5_radius. -
Run the
kp_dialup.plprogram with the command:perl kp_dialup.pl
While the program is running, the date on the server will change from April 1, 2003 to July 1, 2003. This will emulate the work of test users for three months: April, May, June 2003.
If the billing system works correctly, the values you get after working with the kp_dialup.pl program should match those specified in the tables.
After completing the test case, set the correct date on the server.
First month (April, 2003). Amount of days – 30.
| dialup1 | dialup2 | dialup3 | ||||
|---|---|---|---|---|---|---|
8:00 AM - 7:59 PM |
8:00 PM - 7:59 AM |
8:00 AM - 7:59 PM |
8:00 PM - 7:59 AM |
8:00 AM - 7:59 PM |
8:00 PM - 7:59 AM |
|
Duration per day, hour |
0.1 |
0.1 |
0.2 |
0.2 |
0.3 |
0.3 |
Volume per month, hour |
3 |
3 |
6 |
6 |
9 |
9 |
Cost, conventional units per hour |
1 |
2 |
1 |
2 |
1 |
2 |
Cost, conventional units |
3 |
6 |
6 |
12 |
9 |
18 |
Periodic fee |
10 |
10 |
10 |
|||
Rest |
-19 |
-28 |
-37 |
|||
Second month (May, 2003). Amount of days – 31.
| dialup1 | dialup2 | dialup3 | ||||
|---|---|---|---|---|---|---|
8:00 AM - 7:59 PM |
8:00 PM - 7:59 AM |
8:00 AM - 7:59 PM |
8:00 PM - 7:59 AM |
8:00 AM - 7:59 PM |
8:00 PM - 7:59 AM |
|
Duration per day, hour |
0.1 |
0.1 |
0.2 |
0.2 |
0.3 |
0.3 |
Volume per month, hour |
3.1 |
3.1 |
6.2 |
6.2 |
9.3 |
9.3 |
Cost, conventional units per hour |
1 |
2 |
1 |
2 |
1 |
2 |
Cost, conventional units |
3.1 |
6.2 |
6.2 |
12.4 |
9.3 |
18.6 |
Periodic fee |
10 |
10 |
10 |
|||
Rest |
-19.3 |
-28.6 |
-37.9 |
|||
Third month (June, 2003). Amount of days – 30.
| dialup1 | dialup2 | dialup3 | ||||
|---|---|---|---|---|---|---|
8:00 AM - 7:59 PM |
8:00 PM - 7:59 AM |
8:00 AM - 7:59 PM |
8:00 PM - 7:59 AM |
8:00 AM - 7:59 PM |
8:00 PM - 7:59 AM |
|
Duration per day, hour |
0.1 |
0.1 |
0.2 |
0.2 |
0.3 |
0.3 |
Volume per month, hour |
3 |
3 |
6 |
6 |
9 |
9 |
Cost, conventional units per hour |
1 |
2 |
1 |
2 |
1 |
2 |
Cost, conventional units |
3 |
6 |
6 |
12 |
9 |
18 |
Periodic fee |
10 |
10 |
10 |
|||
Rest |
-19 |
-28 |
-37 |
|||
TOTAL rest |
-57.3 |
-84.6 |
-111.9 |
|||
Telephony
-
Run commands to load a database with data for the test case:
mysql UTM5 < /netup/utm5/tests/UTM5_tel_kp_clean.sql
mysql -f UTM5 < /netup/utm5/UTM5_MYSQL_update.sql /dev/null 2>&1 -
Run the RADIUS server and the billing system core.
-
To download test data from a CDR file, execute the command:
/netup/utm5/bin/utm5_send_cdr -c /netup/utm5/utm5_send_cdr.cfg -s /netup/utm5/tests/src.cdrAs a result, telephone calls from two test users in July 2005 will be uploaded and tariffed in the database.
-
Connect to the core via the administrator interface.
The system should have two test customers, telephone directions and tariff plans according to the time of day and days of week.
Telephony directions
| Zone | Prefix (code) |
|---|---|
Moscow (1) |
7095 |
Saint Petersburg (2) |
7812 |
МТС (mobile) (3) |
7910, 7915, 7916, 7917 |
Chelyabinsk (4) |
7351 |
Tyumen (5) |
7345 |
Italy (6) |
81039 |
France (7) |
81033 |
Sudan (8) |
810249 |
Tariff plans
Tariff #1:
-
free period – 5 seconds,
-
starting period – 60 seconds,
-
tariff step in the starting period – 10 seconds,
-
tariff step in the next period – 1 second,
-
tariff unit size – 60 seconds,
-
periodic fee – 10 conventional units
Cost of calls at the tariff #1 (conventional units):
| Zone | Working days | Weekend | |
|---|---|---|---|
12:00 AM - 9:00 AM |
9:00 AM - 11:59:59 PM |
||
Moscow (1) |
0.1 |
0.2 |
0.1 |
Saint Petersburg (2) |
0.2 |
0.4 |
0.3 |
МТС (mobile) (3) |
0.2 |
0.3 |
0.2 |
Chelyabinsk (4) |
0.4 |
0.6 |
0.4 |
Tyumen (5) |
0.5 |
0.8 |
0.6 |
Italy (6) |
1 |
1.3 |
1.1 |
France (7) |
1.2 |
1.6 |
1.2 |
Sudan (8) |
2.1 |
2.9 |
2.5 |
Tariff #2:
-
free period – 0 seconds,
-
starting period – 60 seconds,
-
tariff step in the starting period – 10 seconds,
-
tariff step in the next period – 1 second,
-
tariff unit size – 60 seconds,
-
periodic fee – 5 conventional units
Cost of calls at the tariff #2 (conventional units):
| Zone | Working days | Weekend | |
|---|---|---|---|
12:00 AM - 9:00 AM |
9:00 AM - 11:59:59 PM |
||
Moscow (1) |
0.08 |
0.15 |
0.08 |
Saint Petersburg (2) |
0.15 |
0.22 |
0.2 |
МТС (mobile) (3) |
0.2 |
0.3 |
0.2 |
Chelyabinsk (4) |
0.35 |
0.5 |
0.4 |
Tyumen (5) |
0.4 |
0.7 |
0.4 |
Italy (6) |
1.2 |
1.5 |
1.2 |
France (7) |
1.5 |
1.9 |
1.5 |
Sudan (8) |
2.4 |
3.1 |
2.3 |
Test phone calls, customer #1
| Date | Zone | Duration | Duration (round-off) | Cost per minute |
Cost |
|---|---|---|---|---|---|
01.07.05 |
Saint Petersburg (2) |
730 |
730 |
0.4 |
4.867 |
01.07.05 |
МТС (mobile) (3) |
4200 |
4200 |
0.3 |
21 |
01.07.05 |
Chelyabinsk (4) |
174 |
174 |
0.6 |
1.74 |
02.07.05 |
Tyumen (5) |
724 |
724 |
0.6 |
7.24 |
03.07.05 |
Italy (6) |
601 |
601 |
1.1 |
11.018 |
04.07.05 |
France (7) |
3714 |
3714 |
1.6 |
99.04 |
05.07.05 |
Sudan (8) |
24 |
30 |
2.9 |
1.45 |
06.07.05 |
Moscow (1) |
64 |
64 |
0.1 |
0.107 |
07.07.05 |
France (7) |
7201 |
7201 |
1.6 |
192.027 |
08.07.05 |
МТС (mobile) (3) |
1925 |
1925 |
0.3 |
9.625 |
09.07.05 |
Chelyabinsk (4) |
721 |
721 |
0.4 |
4.807 |
10.07.05 |
Chelyabinsk (4) |
9 |
10 |
0.4 |
0.067 |
11.07.05 |
Italy (6) |
1372 |
1372 |
1 |
22.867 |
12.07.05 |
Chelyabinsk (4) |
84 |
84 |
0.6 |
0.84 |
13.07.05 |
Sudan (8) |
193 |
193 |
2.1 |
6.755 |
14.07.05 |
France (7) |
420 |
420 |
1.6 |
11.2 |
15.07.05 |
Chelyabinsk (4) |
2352 |
2352 |
0.6 |
23.52 |
16.07.05 |
Italy (6) |
54 |
60 |
1.1 |
1.1 |
17.07.05 |
Moscow (1) |
23 |
30 |
0.1 |
0.05 |
18.07.05 |
Moscow (1) |
1325 |
1325 |
0.2 |
4.417 |
19.07.05 |
Tyumen (5) |
1271 |
1271 |
0.8 |
16.947 |
20.07.05 |
Saint Petersburg (2) |
721 |
721 |
0.2 |
2.403 |
21.07.05 |
Italy (6) |
13 |
20 |
1 |
0.333 |
22.07.05 |
Moscow (1) |
82 |
82 |
0.2 |
0.273 |
23.07.05 |
Saint Petersburg (2) |
3 |
3 |
0 |
0 |
24.07.05 |
Sudan (8) |
3125 |
3125 |
2.5 |
130.208 |
25.07.05 |
Sudan (8) |
1099 |
1099 |
2.9 |
53.118 |
26.07.05 |
Saint Petersburg (2) |
1221 |
1221 |
0.4 |
8.14 |
27.07.05 |
Moscow (1) |
70 |
70 |
0.2 |
0.233 |
28.07.05 |
Saint Petersburg (2) |
132 |
132 |
0.4 |
0.88 |
29.07.05 |
Moscow (1) |
1925 |
1925 |
0.2 |
6.417 |
30.07.05 |
Italy (6) |
134 |
134 |
1.1 |
2.457 |
31.07.05 |
Moscow (1) |
85 |
85 |
0.1 |
0.142 |
TOTAL: |
Italy (6) |
2174 |
2187 |
37.775 |
|
Chelyabinsk (4) |
3340 |
3341 |
30.973 |
||
Moscow (1) |
3574 |
3581 |
11.638 |
||
МТС (mobile) (3) |
6125 |
6125 |
30.625 |
||
Tyumen (5) |
1995 |
1995 |
24.187 |
||
Sudan (8) |
4441 |
4447 |
191.531 |
||
Saint Petersburg (2) |
2807 |
2807 |
16.29 |
||
France (7) |
11335 |
11335 |
302.267 |
||
35791 |
35818 |
645.287 |
Test phone calls, customer #2
| Date | Zone | Duration | Duration (round-off) | Cost per minute |
Cost |
|---|---|---|---|---|---|
01.07.05 |
Moscow (1) |
19 |
20 |
0.08 |
0.027 |
02.07.05 |
France (7) |
71 |
71 |
1.5 |
1.775 |
03.07.05 |
Moscow (1) |
1234 |
1234 |
0.08 |
1.645 |
04.07.05 |
Italy (6) |
939 |
939 |
1.2 |
18.78 |
05.07.05 |
Moscow (1) |
15 |
20 |
0.08 |
0.027 |
06.07.05 |
Saint Petersburg (2) |
43 |
50 |
0.22 |
0.183 |
07.07.05 |
Sudan (8) |
18 |
20 |
3.1 |
1.033 |
08.07.05 |
Saint Petersburg (2) |
20 |
20 |
0.22 |
0.073 |
09.07.05 |
Moscow (1) |
81 |
81 |
0.08 |
0.108 |
10.07.05 |
Tyumen (5) |
345 |
345 |
0.4 |
2.3 |
11.07.05 |
Italy (6) |
607 |
607 |
1.2 |
12.14 |
12.07.05 |
Chelyabinsk (4) |
4521 |
4521 |
0.35 |
26.373 |
13.07.05 |
Saint Petersburg (2) |
92 |
92 |
0.22 |
0.337 |
14.07.05 |
МТС (mobile) (3) |
165 |
165 |
0.3 |
0.825 |
15.07.05 |
Moscow (1) |
13 |
20 |
0.15 |
0.05 |
16.07.05 |
Moscow (1) |
441 |
441 |
0.08 |
0.588 |
17.07.05 |
Saint Petersburg (2) |
1002 |
1002 |
0.2 |
3.34 |
18.07.05 |
Italy (6) |
1935 |
1935 |
1.5 |
48.375 |
19.07.05 |
Moscow (1) |
11741 |
11741 |
0.15 |
29.353 |
20.07.05 |
Moscow (1) |
4232 |
4232 |
0.15 |
10.58 |
21.07.05 |
Chelyabinsk (4) |
261 |
261 |
0.5 |
2.175 |
22.07.05 |
Tyumen (5) |
594 |
594 |
0.4 |
3.96 |
23.07.05 |
Italy (6) |
334 |
334 |
1.2 |
6.68 |
24.07.05 |
France (7) |
955 |
955 |
1.5 |
23.875 |
25.07.05 |
Tyumen (5) |
1245 |
1245 |
0.7 |
14.525 |
26.07.05 |
Moscow (1) |
6977 |
6977 |
0.15 |
17.443 |
27.07.05 |
Moscow (1) |
1316 |
1316 |
0.15 |
3.29 |
28.07.05 |
Saint Petersburg (2) |
2892 |
877 |
0.15 |
2.193 |
28.07.05 |
Saint Petersburg (2) |
2892 |
2015 |
0.22 |
7.388 |
29.07.05 |
Italy (6) |
775 |
775 |
1.5 |
19.375 |
30.07.05 |
МТС (mobile) (3) |
231 |
231 |
0.2 |
0.77 |
31.07.05 |
Moscow (1) |
492 |
492 |
0.08 |
0.656 |
TOTAL: |
Chelyabinsk (4) |
4782 |
4782 |
28.548 |
|
Italy (6) |
4590 |
4590 |
105.35 |
||
МТС (mobile) (3) |
396 |
396 |
1.595 |
||
Moscow (1) |
26561 |
26574 |
63.766 |
||
Tyumen (5) |
2184 |
2184 |
20.785 |
||
Sudan (8) |
18 |
20 |
1.033 |
||
Saint Petersburg (2) |
6941 |
4056 |
13.515 |
||
France (7) |
1026 |
1026 |
25.65 |
||
46498 |
43628 |
260.241 |
System maintenance
Database backup
This is normally done with the standard tools specific to the particular kind of DB server. To prevent possible loss of data, it is recommended to make backup copies of the database regularly (say, monthly). Besides regular backups, it is also advisable to make an extra copy before any low-level operation on the database, like archiving of tables, direct manual intervention, debugging of urfaclient scripts, etc.
The backup copy may be either brief or full. The latter one contains all tables, while the former one omits the charge-off tables.
Creating a full copy may take a long time due to the large size of tables with charge-offs. For this procedure it is recommended to stop the UTM 5+ core. Otherwise prolonged blocking of tables may lead to core crash.
For large projects, where the tables are especially huge and yet it is critical to keep downtime low, we recommend the use of a slave DB server, which makes it possible to create a backup copy without shutting down the billing.
Database integrity verification
Once the UTM 5+ core is started, it fills the system cache and verifies the database. The revealed inconsistencies in the cached data are resolved automatically. However, the original data in the database remain corrupted and have to be fixed manually. To do that, one may use the verifier log file.
The location of the said file is given by the log_file_v-erificator system parameter (by default, /netup/log/verificator.log). For each item it contains:
-
Description of the inconsistency, including its level (ERROR or WARNING);
-
Supposed way to resolve the issue;
-
SQL command (if required) equivalent to the automatic fix applied to the cached data:
-- WARNING slink 4876 exists only in dtagg_periodic + — SQL DESC check slink exists and delete dtagg_periodic entry for deleted slink
 UPDATE dtagg_periodic SET is_closed=1 WHERE slink_id=4876;
|
The objects listed in |
Before fixing the errors, it is recommended to stop the UTM 5+ core and back up the database (at least the tables involved in the fix).
In the trivial case all fixes may be applied by simply feeding the verifier log file into MySQL: mysql UTM5 < /netup/utm5/log/verificator.log
However, some SQL queries in the log file are commented out, since they imply some (probably undesired) loss of data. When dealing with such queries, one has to check every individual issue separately.
Archiving of tables
Some of the fastest-growing data tables may be archived in order to reduce the overhead expenses on insert operations. An archiving implies that the table in question is renamed into an archive table, while an empty table with the original name and structure is created to store the incoming data. Archiving may be done periodically. The limitations are listed below.
Currently the following tables are being archived:
| Table | Type | Data field name |
|---|---|---|
|
1 |
|
|
2 |
|
|
3 |
|
|
4 |
|
|
5 |
|
|
6 |
|
|
7 |
|
|
8 |
|
|
9 |
|
|
10 |
|
|
11 |
|
|
12 |
In order to archive these tables:
-
Use the administrator’s interface to connect to UTM 5+
-
Go to the Settings ⇒ Systems ⇒ Archive DB page.
-
Click
 in the upper part of the page.
You can do archiving once in 28 days. If the button is not active, this means that less than 28 days passed since the last archive was created.
If you need to archive more often than the administrator interface allows, use the db_archiver utility (see db_archiver)
Administrator’s interface
General info
|
The web interface is under development, so the section contains only those pages that are already available. |
On the web interface pages you can see the following icons:
|
|
|
|
Besides, you can see function buttons there, for example or ![]()
Click on an icon or button to open the corresponding dialog window and perform the required action.
|
Examples of actions such as adding a new user or connecting a service to a user, as well as a description of dialog windows, see the Quick start section. |
The web interface menu is located at the top of the window. It displays names of the groups. Each group combines several pages:
Main |
|
Tariffication |
|
Reference book |
|
Reports |
|
Inventory |
|
Settings |
|
The main page of web interface is Users.
Users
The page displays the list of users ( customers). User IDs are colored: red indicates that user accounts are blocked, green indicates that user accounts are not blocked, yellow indicates that some accounts are blocked and some are not.
There are buttons in front of each user:
 ⇒ make a promised payment,
 ⇒ make a payment to a user account,
![]() ⇒ download a user memo,
⇒ download a user memo,
![]() ⇒ delete a user.
⇒ delete a user.
Click on the button, in the window that opens fill in the necessary fields and confirm the corresponding action.
Click on a user data line to expand the panel that contains detailed information about the user.
There are sections in the panel: User, Tariffication and Reports. Each section combines several tabs. Go to one of them, change the user data and click Save.
The User section combines following tabs:
Main |
User ID, basic account, login, name, password and Payment in advance option. |
Additional parameters |
Settings for IPTV connection: Lifestream user id / email, iptvportal login / password, Megogo user email. |
Contacts |
Full address, phone, email, etc. |
Additional contacts |
For example, contacts of a manager or an accountant. |
Personal |
Bank account, passport details, ITIN, bank, checkpoint, connection date and personal manager. |
Groups |
ID and name of the groups the user is included in. |
Other |
Profile of documents, router, port, currency. |
Documents |
Documents ID, template ID, date of creation, name, path and type. |
Additional info |
Date and time of user creation, date and time of last modification of user data. |
The Tariffication section combines following tabs:
Accounts |
ID and balance of user's personal accounts, credit amount and type of blocking. |
Services |
ID, name and type of the service, in tarrif this service or not and its cost, service link ID and accounting period ID. |
Tariff links |
Tlink ID, ID of current and next tariff plan, accounting period. |
Technical parameters |
Custom parameters associated with the user's personal account. Their values may be used in the commands for controlling the external software, which are sent by as a response to certain events. |
IPTV activation codes |
The list of activation codes for an access card assigned to the selected personal account. |
Reports are divided into three groups:
Payments |
Payments, internal transfer, expiring payments, other charges and documents (invoice, VAT invoice, acceptance report and detail report). |
Services |
General, services, custom charges report, traffic, detailed traffic, telephony, telephony directions report. |
Other |
Blockings, user change log, sessions and DHCP lease. |
Set the parameters for the filter and click  to see a report.
|
Helpful links: Basic system objects ⇒ User classes |
System users
A system user has the following settings:
-
ID.
-
Login and Password to enter the billing.
-
IPv4 and IPv6 subnets from which the user is allowed access.
-
Groups to which the user belongs.
Any changes to the list of groups take effect only after the next UTM 5+ core restart.
-
API Token
Click ![]() on the user data line. In the opened window you can see all the parameters of the user and modify them if necessary.
on the user data line. In the opened window you can see all the parameters of the user and modify them if necessary.
|
Helpful links: Basic system objects ⇒ User classes |
Accounts
Click on an account data line to expand the panel that contains detailed information about the account. There are three tabs in the panel:
Main |
Account ID, credit, balance, VAT, external ID and sale tax rate. |
||
IPTV settings |
IPTV access card, Irdeto IPTV access card, Irdeto IPTV STB. |
||
State settings |
Unlimited mode (all charges-offs should be made at zero cost), Internet, type and date of blocking.
|
|
Helpful links: Basic system objects ⇒ Account |
Card pools
The page contains a list of payment card pools. Users can activate payment cards to top up their balance.
A pool has the following parameters: ID, Card count in the pool, how many cards are Activated, when the pool was Created and Updated.
You can add new card pools to the billing and edit existing ones.
|
Note that you can not remove the created pools, but you can clear the pool of expired cards by clicking on the corresponding button. |
|
Helpful links: Basic system objects ⇒ Prepaid cards |
Groups
The page contains the list of groups to which users can be included. You can merge users into groups to perform group operations, such as enabling or disabling the Internet, changing the tariff plan or charge policy for all users in the group.
You can create new groups to the billing and delete them. When adding a group, you need to specify the ID and Name for it.
Click ![]() next to one of the existing groups to see the list of users included in it.
next to one of the existing groups to see the list of users included in it.
To remove a user from the group, find the user in the list and click on ![]()
IP groups
This page contains the list of IP groups defined within service links of IP traffic services.
Telephone numbers
This page contains the list of telephone numbers defined within telephony service links.
Services / Tariffs
The Services / Tariffs page combines following tabs:
Read more about each tab below.
Services
The tab contains the list of one-time and periodic services which can be added to customers without tariff plan.
|
You can delete only the service that is not used. |
The services have main and special parameters:
Main |
|
||||||||
One-time service |
|
||||||||
Periodic service |
|
||||||||
IP traffic service |
|
||||||||
Hotspot service |
|
||||||||
Dial-up service |
|
||||||||
Telephony service |
|
||||||||
IPTV service |
|
||||||||
Video on demand service |
|
|
For more information on service assignment see Basic system objects ⇒ Services. |
|
Helpful links: Basic system objects ⇒ Services |
Service templates
The tab contains the list of templates, based on which you can add services to tariff plans.
|
You can delete only the service template that is not used. |
The template has the same parameters as the service of the corresponding type (see the previous section), as well as the following options:
-
Attach by default option means to activate the service automatically when creating a tariff link.
-
Allow multiple linking means allow this service to be activated more than once.
Tariff plans
A tariff plan has the following settings:
-
ID is assigned automatically.
-
Tariff name.
-
Comment.
-
Created on, Last modified on are the dates of creation and the last modification of the tariff plan.
-
Created by, Modified by are the names of the system users responsible for the tariff plan creation and its last modification, correspondingly.
-
The Zero balance at the accounting period end option. If it is enabled, the balance of the personal account associated with such tariff will be reset at the end of the accounting period.
-
Services included in the tariff plan.
|
Only the services created from the template can be included in the tariff plan. |
|
A tariff plan may not contain multiple services originating in the same template. |
Services in tariffs
The tab contains the list of services included in the tariff plans.
Above the list are ![]() ⇒ search service in the list, and opposite services are
⇒ search service in the list, and opposite services are ![]() ⇒ edit and
⇒ edit and ![]() ⇒ delete.
⇒ delete.
|
Helpful links: Basic system objects ⇒ Tariff plans |
Telephony settings
The Telephony settings page combines following tabs:
Read more about each tab below.
Telephone zones
The Telephone zone is a set of telephone destinations combined for easy billing of telephone calls.
A telephone zone has the following settings:
-
ID is assigned automatically.
-
Full name.
-
Type: local, innerzone, intercity and international coverage.
-
Directions is the list of telephone destinations that are part of this telephone zone.
|
Every telephone direction may be included in one and only one telephone zone. |
Telephony directions
Telephone direction is a set of telephone numbers. The attribution of a particular number to a direction is checked by means of regular expressions. Telephone directions are used to classify phone calls for subsequent tariffication.
A telephone zone has the following settings:
-
ID is assigned automatically.
-
Zone.
-
Type: local, innerzone, intercity and international coverage.
The type is assigned automatically when the direction is included in some zone. Every telephone direction may be included in one and only one telephone zone.
-
Full name.
-
Called prefix is a prefix or a regular expression to check the called number.
-
Calling prefix is a prefix or a regular expression to check the calling number.
A regular expression is built according to the POSIX 1003.2.
-
Incoming and outgoing trunk.
-
PBX ID.
-
The Skip option cancels the accounting for this direction.
If theSkip option is enabled, no calls will be identified as belonging to this direction.
The list of directions is kept ordered lexicographically by called prefix, then by calling prefix, then by incoming trunk, and then by outgoing trunk. The search is performed from the beginning of the list till the first match. Directions with matching called prefix are sorted by the calling prefix in a descending order. Directions with both prefixes matching are sorted by the incoming trunk, etc.
Search goes from the beginning of the sorted list until the first match. To be identified with the direction, a call must match all parameters (called prefix, calling prefix, incoming trunk, outgoing trunk, PBX ID) which are set for this direction.
|
It is recommended to create the default direction with called prefix |
Main parameters
The Additional page combines following tabs:
Read more about each tab below.
Accounting periods
The tab contains the list of accounting periods.
|
An accounting period can not be removed. |
|
When you edit an existing period, you can change its end date and select a reporting period. |
An accounting period has the following settings:
-
Start time is the date and time when the period begins.
-
End time is the time when the period ends. When creating a new period, the end time is not entered, and calculated automatically.
Once a period finishes, a new period of the same type is created automatically.
-
Period type that takes one of the following values: Daily, Weekly, Monthly, Quarterly, Annual, Custom duration.
Monthly period ends in the next calendar month after its start, on the same day of month. However, if the starting date exceeds the number of days in the next month (say, January 30), the period lasts only till the end of the next month.
-
Report period allows you to link the invoices generation date to a calendar month. Is only available for a monthly period type.
-
Custom duration is the length of period in seconds. Enabled only if Period type is set to Custom duration. The shortest possible duration is 3600 seconds.
-
Enabled Set number of charges option allows set the Charges per week for the periodic part of the cost.
|
Helpful links: Basic system objects ⇒ Accounting periods and time ranges |
Charge policies
Every charge policy contains certain rules for recalculation of periodic component of a service price, prepaid services amount and refunding rules. In particular, these are the periodic fee, prepaid traffic and calls amount recalculation settings.
A charge policy has the following parameters:
Full name |
|||||
Main |
Recalculation on service link creation
Do not charge without block
System block settings
|
||||
Recalculation on block |
Three types of blocking: Administrative, Usercp, System
|
||||
Repay |
At what moment a refund should be made in case of debt to the user (when the customer’s account has been charged excessively):
|
||||
Block timemarks |
At what moment to check the funds in the account. The check time is only used if the Set system block on funds lack option is activated. If at some point there are enough funds in the account to provide the service for the rest of the current accounting period, the account is charged and the service is provided. |
||||
|
Helpful links: Basic system objects ⇒ Charge policy |
Coefficient scheme
The tab contains the list of coefficient schemes.
|
You can delete only the coefficient scheme that is not used. |
A coefficient scheme has the following parameters:
-
Name
-
Comments
-
Cost
-
Since is the ordinal number of the accounting period from which the coefficient starts to apply,
-
Till is the ordinal number of the accounting period, at the end of which the coefficient is no longer applied
The ordinal number of the accounting period is set automatically. Numbering order of accounting periods is individual for each service link and starts from zero: 0 – ordinal number of accounting period valid at the moment of creating the service link, 1 – ordinal number of the first full accounting period, 2 – ordinal number of the second full accounting period, etc. depending on the time period of the service link.
-
Coefficient is a numerical multiplier applied to the cost of the service over a specified period of time
In those periods when the coefficients from the scheme are not valid, the cost of service is 100%.
-
|
Helpful links: Basic system objects ⇒ Coefficient scheme |
Other
The Other page combines following tabs:
Read more about each tab below.
Contract type
Contract type is an additional comment to a service. The same of contract type may be added to any number of services.
|
After editing the contract type, its value will change in all services where this type is used. In case of removing the contract type from the system, its value will be automatically deleted from all services. |
A contract type has the following settings:
-
ID
-
Name
-
Creation date
-
Modification date
Traffic classes
|
You can delete only the traffic class that is not used. |
|
After deleting a class from the billing, the related traffic is displayed in the reports as unidentified, and the class is still displayed as an existing one. |
A traffic class has the following settings:
-
ID
-
Local traffic policy: To receiver, To sender, Both.
-
Traffic class name
-
The Don’t save option. If it is enabled, detailed information on the traffic of this class will not be saved. May be worthwhile to set for the free traffic or in other cases when the detailed information is unlikely to ever become necessary. Reduces the raw traffic data files size.
-
Time range. If it is defined, the traffic class will only act at the specified time.
-
Graph color is the color to represent the traffic of this class in the graphic reports.
-
The Display option. If it is enabled, the traffic of this class will be displayed in graphical reports.
-
The Fill in option sets fill style for the graph reports.
You can add Subclasses to a class with the following parameters:
Source, |
|
Common part |
|
Types (IPv4 vs. IPv6) of the source and destination addresses must coincide; type of the router IP does not have to follow them and may be arbitrary.
If theNetFlow provider is not set, its address does not take part in the logic of determining whether a subclass belongs to a class.
If Skip is checked, the affiliation with subclass is interpreted negatively in the classification, i.e. it means that the traffic does not belong to the given class and needs to be checked against other classes. This may be useful if some address or a group of addresses needs to be pick out as a separate class.
|
Helpful links: Basic system objects ⇒ Traffic classes |
Time ranges
The tab contains a list of time ranges registered in the billing.
|
You can delete only the time range that is not used. If a range is used, i.e. it is linked to services, first remove those service links and then remove the range. |
A time range has the following settings:
-
ID is number (assigned automatically).
-
Name of the time range.
-
Ranges is a set of time intervals within the range.
-
Priority is the order of importance of the ranges if they overlap. The higher the value of the number specified in this parameter, the higher the priority of the time range.
If the two time ranges overlap, the ambiguous time is appropriated to the one with higher priority. In the case of equal priority the outcome is platform-dependent and generally unreliable. Such collisions are to be avoided.
-
Days is individual days to be included in the range.. These days are included as a whole, from 12:00 a.m. till 11:59 p.m. If both intervals and days are set in the range, they will be combined.
|
Helpful links: Basic system objects ⇒ Accounting periods and time ranges |
Payment methods
The tab contains the list of payment methods.
The predefined payment methods (those with ID<100) are not editable. User methods are automatically given sequential IDs starting from 100. These methods are functionally equivalent to the predefined Cash payment method. User methods are editable, but can not be removed.
Currencies
The tab contains the list of currencies registered in the billing.
A currency has the following parameters:
-
ID is the digital currency code according to ISO 4217.
-
Abbreviation is the three-letter currency code according to ISO4217.
-
Full name.
-
Percent is an artificial correction to the course used when updating it online.
-
Rate is the exchange rate against the internal system currency.
-
Currency rate history contains the history of former exchange rates in the system. The first line of the table contains the current currency exchange rate.
In the Currency window, click Online update to update the currency exchange rate (adjusted for Percent, if it is different from 0).
Russian rouble exchange rate is always 1. The Online update button is available if the value of the system currency ISO code parameter is 810 (see Tarification Settings), i.e. if the system currency is the Russian ruble.
IP zones
Each IP zone has an ID, Name and list of subnets included in the zone. Each Subnet must have a Network and a Gateway.
|
An IP zone can not be removed. |
Buildings
If you specify House from the reference book in the user’s Contacts,the IP addresses for the user are issued from the IP zone associated with the house.
A house has the following parameters:
-
ID.
-
Connected on is a date of network connection.
-
ZIP code, Country, Province/State, City, Street, Building#, Constr.#.
-
IP zones in which the house is included.
Streets
The tab contains a list of streets registered in the billing.
A street has the following parameters: Country, Province/State, City, Street.
Banks
Banks registered in the billing can be linked to a user on the User ⇒ Personal tab.
A bank has the following parameters: BIN, Name, City, Correspondent account.
Companies
The tab contains the list of legal entities whose details can be used in document templates. When selecting a company, its data will be automatically inserted into document templates.
For a company you can specify the following parameters: Detals (company name, legal and actual addresses, ITIN, reg code), Executive managers, Bank and Contract. You can select a bank from the list of banks registered in billing.
Reports on payments
The upper part of the window contains the filter settings:
-
number of lines per page,
-
time interval,
-
period of time that corresponds to one of the accounting periods: Current day / week / month / year,
-
group of users, if you want to report data only for a particular group;
-
type of documents: Invoice / VAT invoice / acceptance report / detail invoice, if you want a report on documents issued.
Once you have defined the filter settings, click to generate a report.
|
To generate a report by one user, go to the Main ⇒ Users, find the user in the list, go to the tab of one of the reports, set up a filter and generate a report. |
| Name | Purpose of the report | Data in the report: |
|---|---|---|
Payments |
This report provides information about payments made by a certain user during the given time span. |
|
Internal transfer |
This report provides information about the internal transfers of funds, i. e. the transfers between different accounts of one user, made either via web interface or via |
|
Expiring payments |
This report summarizes the information on expiring payments during the selected time span |
|
Other charges |
This report provides information on charge-offs, not related to services. The charges are included in the report for the following reasons:
In addition, the report contains rebates for the services not used because of blocking, if some of the user’s service links have their recalculation options set correspondingly. |
|
Documents |
You can generate the following types of reports in the tab:
|
|
|
Helpful links: Basic system objects ⇒ Payments |
Reports on services
The upper part of the window contains the filter settings:
-
number of lines per page,
-
time interval,
-
period of time that corresponds to one of the accounting periods: Current day / week / month / year,
-
group of users, if you want to report data only for a particular group;
-
traffic type: Groupped by IP / hour / day / month / group, if you want a traffic report;
-
traffic collector in the detail traffic report.
Once you have defined the filter settings, click to generate a report.
|
To generate a report by one user, go to the Main ⇒ Users, find the user in the list, go to the tab of one of the reports, set up a filter and generate a report. |
| Name | Purpose of the report | Data in the report: |
|---|---|---|
Main |
This report shows information about the transactions on users' personal accounts for a specified period of time. |
|
Services |
This report summarizes information on charge-offs from the user account made during the given time span for the provided services. |
|
Custom charges report |
This report provides information on charge-offs made at the request of the Rentsoft system integration module |
|
Traffic |
This report provides information about the volume of transferred IP traffic for each personal account and traffic class for a specified period of time |
|
Detailed traffic report |
This report is built on the basis of the original data about the transferred traffic. |
|
Telephony |
Report on telephony sessions is based on RADIUS server statistics and summarizes data on telephony sessions (calls). |
|
Telephony directions |
This report summarizes the calls made to different telephone destinations |
|
Other reports
The upper part of the window contains the filter settings:
-
number of lines per page,
-
time interval,
-
period of time that corresponds to one of the accounting periods: Current day / week / month / year,
-
group of users, if you want to report data only for a particular group;
-
type of user change for user change log.
Once you have defined the filter settings, click to generate a report.
|
To generate a report by one user, go to the Main ⇒ Users, find the user in the list, go to the tab of one of the reports, set up a filter and generate a report. |
| Name | Purpose of the report | Data in the report: |
|---|---|---|
Blockings |
The report provides information on all the blockages implemented during a selected period of time |
|
User change log |
The report provides information on changes in user properties and some other system objects (services, tariff plans, charge policies) for the selected period: |
|
Sessions |
Report on modem sessions and VPN sessions, which is based on RADIUS server statistics and summarizes data on dialup access sessions. |
|
DHCP lease |
This report provides the lease history of IP addresses issued by the built-in DHCP server |
|
Profiles
The tab contains a list of equipment profiles.
A profile has the following parameters:
-
Name of profile.
-
Ports capacity – number of ports in a profile. May be several numbers, separated by commas.
-
Ports start with 0 option.
-
On the REMOTE ID, PORT ID and VLAN ID tabs, if Enable is checked, the following options are available:
-
Type – String or Binary.
-
Disposition is a suboption of the option 82 to which the offset is applied.. Suboption code is considered to be the start of the suboption and the start of the offset. If the Option 82 value is set, the offset starts at the beginning of the whole option 82.
-
Offset in bytes shows the beginning of this parameter in respect to the beginning of the option or one of its parts.
-
Length in bytes.
-
Switches
The tab contains a list of switches added to the billing.
A switch has the following parameters:
| Tab | Parameters: |
|---|---|
Main |
|
Device parameters |
|
Access parameters |
IP, login and password. These parameters might be used in firewall rules. |
Ports usage |
after adding the switch to the billing, it is assigned an ID and in the properties appears Ports usage tab, which shows the number of free and used ports. |
Linked pools |
Pool ID and gateway. |
DHCP options |
ID, type and value of additional DHCP options. These options and their values will be included in the DHCP response if a DHCP client includes those options in the DHCP request. |
DHCP pools
The tab contains a list of DHCP pools added to the billing.
A DHCP pool has the following parameters:
| Tab | Parameters: |
|---|---|
Main parameters |
|
Dynamic ranges |
|
DHCP options |
ID, type and value of additional DHCP options. These options and their values will be included in the DHCP response if a DHCP client includes those options in the DHCP request. |
DHCP lease
This page contains the list of active and expired DHCP leases.
The list has the following parameters:
-
ID is an automatically assigned record number;
-
IP is the leased IP address;
-
MAC is the client’s MAC address;
-
Server id;
-
Client id is a HostName attribute of the DHCP option 12 from the client’s DHCP request;
-
Expired is the date of the IP address lease expiration;
-
Updated is the start date of the IP address lease;
-
Flags is the lease status:
-
Static – the address has been assigned statically (has been entered in IP group settings);
-
Dynamic – the address has been assigned dynamically;
-
Static, Modified – the address has been assigned statically, after that IP group settings have changed, or it has been removed;
-
Dynamic, Modified – the address has been assigned dynamically, after that IP group settings have changed, or it has been removed.
-
Documents
Read more about each tab below.
Document templates
The page contains the list of document templates.
A document template has the following settings:
-
ID,
-
Type: bill, TAX invoice, user info sheet, etc.,
-
Full name of the template,
-
Path to the file,
-
Created / Modified.
Profiles of documents
The page contains the list of document profiles.
Profile of documents is a set of templates for document types that can be generated in the billing. You can assign a profile to a user to define the document format for this user.
|
By default, a profile number one (default) is assigned to all users. This profile cannot be deleted. |
To assign a different document profile to a user, click on the line with the user's details and go to User ⇒ Other.
Replacements in documents
The page contains the list of replacements that can be used in document templates. Here you can add new replacements and edit existing ones, as well as delete replacements that are no longer used.
|
Helpful links: Basic system objects ⇒ Documents Modules ⇒ Document templates Quick start ⇒ Edit a template и Use an alternative document number |
Systems
Read more about each tab below.
Main
| Tab | Parameter | Default | |||
|---|---|---|---|---|---|
System ISO сurrency code |
810 (Russian roubles) |
||||
Bytes in tariffing unit of kilobyte |
1024 |
||||
Minimal periodic charge threshold in units of system currency |
0.1 |
||||
Number of periodic charges in the accounting period for flowing charge method |
64 |
||||
Traffic aggregation timeout before the next charge |
900 |
||||
Minimal traffic charge threshold in units of system currency
|
5 |
||||
“Discard old prepaid traffic when tariff is changed” option |
Off |
||||
“Force modification of prepaid traffic in dangerous cases” option |
Off |
||||
Collecting data from traffic collectors period |
60 |
||||
“Save balance to balance history on closing discount period” option |
Off |
||||
“Create invoice when charge is zero” option |
Off |
||||
Card user`s login prefix |
_card |
||||
Callback/ringdown setting for auto created dialup service links |
0 |
||||
CID value for auto created dialup service links |
Empty string |
||||
CSID value for auto created dialup service links |
Empty string |
||||
Length of pin code part user as telephony service link login |
0 |
||||
Email address to copy low balance notifications |
Empty string |
||||
“Send low balance notifications by the internal messaging system” option |
Off |
||||
List balance notification borders separated by space |
1 |
||||
Email address of balance notification message sender |
admin |
||||
Subject of low balance notification message |
Notification |
||||
Template of low balance email notification |
Text with variables |
||||
Subject of payment email notification |
Payment |
||||
Template of payment email notification |
Text with variables |
||||
Subject of invoice email notification |
UTM invoice |
||||
Template of invoice mail notification |
Invoice |
||||
SMTP server host |
127.0.0.1 |
||||
SMTP server port |
25 |
||||
SMTP fully qualified domain name |
localhost |
||||
“Create a bill document per each telephony provider” option |
Off |
||||
“Add telephony number to the bill document rows” option |
Off |
||||
“Create bill documents of an old format” option |
Off |
||||
Rules for invoice generating |
default |
||||
Rules for prepaid invoice generating
|
single |
||||
Directory for generated documents |
/netup/utm5/doc/storage |
||||
“Generate printed forms” option |
Off |
||||
“including bills” option |
Off |
||||
“including invoices” option |
Off |
||||
“including certificates of completion” option |
Off |
||||
“including bill details” option |
Off |
||||
“days for keeping created documents(0-forever)” option |
0 |
||||
Minimal value of the RULE_ID variable in the firewall rules |
5000 |
||||
Login prefix delimiter |
: (colon) |
||||
Removal timeout of dynamically allocated IP address |
900 |
||||
“Encrypt passwords of users and service links” option |
Off |
||||
Group of system users which receives messages from customers |
0 |
||||
“Don't append telepohy direction/zone ID to the telepony report rows” option |
Off |
||||
Maximal number of rpcf_search_users_lite results |
5 |
||||
Hotspot session timeout from the moment of last refresh |
600 |
||||
“Enable 'internet status' for the personal account when the payment has been received from the external system” option |
Off |
||||
“Send notification email when the payment has been received from the external system” option |
Off |
||||
Collecting statistic from traffic collectors period |
60 |
||||
Archive database name |
Empty string |
||||
Hide password in service link |
Off |
||||
Login realm for VPN users |
Empty string |
||||
Period of loading of recent sessions to the RADIUS server on the startup |
86400 |
||||
“Enable billing of RADIUS Accounting-Stop packets” option |
Off |
||||
“Enable billing of RADIUS Interim-Update and Accounting-Stop packets” option |
Off |
||||
Default vat rate |
0 |
||||
Address |
Empty string |
||||
Username |
Empty string |
||||
Password |
Empty string |
||||
Operator |
Empty string |
||||
Nationality |
Empty string |
||||
Region |
Empty string |
||||
Location |
Empty string |
||||
Megogo partner id |
Empty string |
||||
Megogo user prefix |
Empty string |
||||
Megogo salt |
Empty string |
||||
Period type for new Megogo discount period |
3 |
||||
Duration for new Megogo discount period |
0 |
||||
Iptvportal address |
Empty string |
||||
Iptvportal username |
Empty string |
||||
Iptvportal password |
Empty string |
||||
Lifestream address |
Empty string |
||||
Lifestream user prefix |
Empty string |
IP pools
The page contains a list of pools added to the billing, from which IP addresses are issued to users of dial-up access services.
|
If there are several IP pools with the same name in the billing, the order of issuing addresses from them is regulated by the parameter |
An IP pool has the following parameters: ID, name and address.
Archive DB
This page contains an interface for automatic DB archiving.
To create an archive, click .
A archive has the following parameters:
-
ID of archive;
-
Start time is the time, when first archive record was created;
-
End time is the time, when last archive record was created;
-
Status of the archive (OK, Verify, Unable to verify, Need repair).
|
You can do archiving once in 28 days. |
In order for the archived data to be used in reports, the archived tables structure must comply with the core requirements. Press Verify to verify the archived tables structure. As a result of the check, the status of the archives will change. If the archive fulfills the core requirements, the archive status is OK if not, the status is Need repair.
To adjust the structure of the archive tables to the requirements, press Verify. In case of success, the status will change from Need repair to OK. Otherwise the status will change to Unable to verify.
|
You can fix the structure of tables with the status Unable to verify only manually. |
|
Helpful links: System maintenance ⇒ Checking database structure |
ISG attributes
The page contains a list of ISG attributes that can be used to describe how a RADIUS server communicates with an intelligent IPoE gateway (in particular, Cisco ISG). To use attributes, set them as parameters for a registered NAS.
An ISG attributes has the following parameters:
-
ID of attribute profile which assigned automatically, when the profile is added to the billing;
-
Name;
-
Attribute id;
-
Vendor id.
Inventory
Read more about each tab below.
NetFlow providers
The page contains the list of NetFlow providers registered in the system.
An NetFlow provider has the following parameters:
-
ID – assigned automatically;
-
Traffic collector that should process the information coming from this NetFlow provider;
-
Name – must be unique;
-
IP address of the NetFlow provider;
-
Comments.
Traffic collectors
The page contains the list of available traffic collectors registered in the system.
A collector has the following parameters:
-
ID – assigned automatically;
-
Name must match the value of
tc_nameparameter in the configuration file of the traffic collector; -
Comments;
-
Uptime since the launch of this collector;
-
Netflow records that have been processed by this collector;
-
Netflow error records is the number of non NetFlow records.
To configure the traffic collector, open it for editing and click Properties. In the opened window, you can see the following settings:
-
Path to .utm file is the directory path for storing detailed traffic
-
Raw process script is the script executed when closing the detailed statistics file
-
Max file size for detailed traffic
-
Max files count for detailed traffic
-
Records send limit is the limit of records in the detailed report
-
Max buffer size of detailed statistics
-
Duration between commits (sec)
-
Multiplicator for traffic
Customer portal
The pages of this section of the menu contain sets of parameters for configuring various operations, which are available to the user in his personal cabinet.
|
The applicability of sets to a particular user is determined based on group affiliation and priorities. |
Read more about each tab below.
Switch tariff
The page contains sets of parameters for switching a tariff plan.
The applicability of sets to a particular user is determined based on group affiliation and priorities (read more above).
To configure the tariff switch, use the following parameters:
-
ID – assigned automatically;
-
Group of users to which this set is applicable;
-
Active option – if enabled, this set is available to users;
-
Instant change – if on, the tariff plan is changed immediately; if off, the tariff is changed at the end of the accounting period;
-
Instant change count is the maximum allowed number of plan switches during one accounting period;
-
Tariff plan list from which the user can choose the next tariff. Click
and in the opened window, set the parameters:-
Tariff;
-
Min balance is the minimum value of the user’s balance required to switch plans;
-
Service is a one-time service used to collect fee for the plan switch;
-
Free if balance more then is the minimum of the user’s balance required to switch plans for free.
Enable the Use option if you want to set a minimum balance or balance for free activation.
-
|
Helpful links: Basic system objects ⇒ Tariff plans |
Payment systems
|
Payment systems are available for connection and configuration if you have a Telecom license. |
The page displays a list of added to the billing payment systems that users can use to pay for services through the web interface of their personal cabinet. The list is divided into user groups.
Availability of payment systems for a particular user is determined by group affiliation.
Click and in the opened window, select:
-
Group of users who will have access to the payment system;
-
Payment system you want to add to the billing.
Click on one of the payment systems added to the billing to expand the parameter panel and make changes. After you finish setting up the payment system, click on  over the list of parameters.
|
Please note that if the same payment system is available to different user groups, it must be configured for each group separately. |
| Payment systems | Parameters: |
|---|---|
Sberbank |
|
QIWI |
|
Yandex |
|
PayPal |
|
Promised payment
The page contains sets of parameters for promised payments.
The applicability of sets to a particular user is determined based on group affiliation and priorities (read more above).
To configure the promised payments, use the following parameters:
-
ID – assigned automatically;
-
Group of users to which this set is applicable;
-
Max payment that can be made;
-
Until balance not positive – if enabled, automatically sets the minimum possible payment amount so that the balance becomes positive;
-
Expires in (days) – this is the due date for the promised payment;
-
Interval between uses (days) – minimum interval, after which the user can reuse the Promised payment service;
-
Min balance is the minimum value of the user’s balance required to use the promised payment;
-
Service is a one-time service used to collect fee for the promised payments;
-
Free if balance over is the minimum balance value required to make promised payments for free.
-
Active option – if enabled, this set is available to users.
Enable the Use option if you want to set a minimum balance or balance for free activation.
|
Helpful links: Basic system objects ⇒ Payments |
Transfer funds
The page contains sets of parameters that allow users to transfer funds between their own accounts.
The applicability of sets to a particular user is determined based on group affiliation and priorities (read more above).
To configure the transfer funds, use the following parameters:
-
ID – assigned automatically;
-
Group of users to which this set is applicable;
-
Active option – if enabled, this set is available to users.
Voluntary suspension
The page contains sets of voluntary blocking parameters.
The applicability of sets to a particular user is determined based on group affiliation and priorities (read more above).
In case of voluntary blocking, the periodic fee is recalculated according to the parameters set in the properties of the service link.
To configure the voluntary suspension, use the following parameters:
-
ID – assigned automatically;
-
Group of users to which this set is applicable;
-
Minimal duration (seconds);
-
Maximum duration (seconds);
-
Interval between uses (seconds);
-
Min balance is the minimum value of the user’s balance required to use the voluntary suspension;
-
Service is a one-time service used to collect fee for the voluntary suspension;
-
Free if balance over is the minimum balance value required voluntary suspension for free.
-
Self unlock – If enabled, the user can terminate the voluntary blocking prematurely;
-
Active option – if enabled, this set is available to users.
Enable the Use option if you want to set a minimum balance or balance for free activation.
|
Helpful links: Basic system objects ⇒ Account and Charge policies |
Quick start
|
The web interface is under development, so the section contains only those pages that are already available. |
Add a new user (customer)
-
Go to the Main ⇒ Users page and click
above the list of users. -
In the opened window, type in the login, user name and set the password.
-
Check Payment in advance box if necessary.
-
Click
and the user will appear on the list.Together with the account, the user's main personal account will be created and the billing currency will be set at Russian roubles (RUR). If you want to change the currency for billing the user, click on the line with user details, go to the User ⇒ Other tab, select Currency from the list and click
-
Configure the user account. Click on a user data line and go to Tariffication ⇒ Accounts. Click on the line with the personal account details to edit its parameters, make the necessary changes and click
Add a personal account to user
-
Find a user in the list – enter any information about the user into the search field and click

-
Click on a user data line and go to Tariffication ⇒ Accounts.
-
Click
above the list of personal accounts and in the opened window fill in the required fields:Loan
Account credit. You can change it manually or by making a payment using the Credit method. By default is 0 (zero).
VAT rate
It is applied when issuing invoices. By default is 0 (zero).
External account ID
It is for integration with some external system. By default is empty string.
Sale tax rate
It is applied when issuing invoices. By default is 0 (zero).
Internet status
Internet status: on or off. By default is on.
Block
Status of blocking: active or admin block. By default is active.
Auto enable internet
The option allows to configure the automatic activation of the Internet when making a payment and exiting the blocking. By default is disable.
Unlimited mode
The option allows all charge-offs from the user account to be made at zero cost. By default is disable.
-
Press
After creating a personal account, you can edit its parameters. Click on a personal account to expand the panel with its data, make the necessary changes and click
Connect a service to user
-
Find a user in the list.
-
Click on the user data line and go to Tariffication ⇒ Service links.
-
Click
and in the opened window, select one of the available services, and then click  to open the window with the selected service options. If necessary, change the service parameters, fill in the fields and press to add the service, i.e. create a service link.
Delete a user
-
Go to Users page and find a user in the list.
-
On the user data line, click on

-
Confirm the removal in the window that opens.
Download a user memo
-
Go to Users page and find a user in the list.
-
On the user data line, click on

-
In the opened window, rename the file, if necessary, select the file format (.pdf or .odt) and click

Make a payment to a user account
-
Go to Users page and find a user in the list.
-
On the user data line, click on
-
In the opened window, select a personal account from the list to open a form for making a payment and fill in the necessary fields:
Payment
Enter the amount of payment. By default is 0 (zero).
Currency
The list of currencies that are added to the billing. By default is ruble (RUR).
Payment date
By default is the current date.
Burn date
Turn on the option and set an expiry date. By default is not set.
Payment method
Select a method from the list. By default is Cash payment.
Other settings
Comments
Enter comments for the administrator and user, if necessary.
Payment extern number
If the payment is being done on demand of some external document, enter the number of that document.
Invoice number
If the payment is being done on demand of some internal invoice, select the number of that invoice from the list.
Switch internet on
Enable this option if you want to enable the Internet for the user. The Internet will be activated if the user's balance becomes positive after making this payment.
-
Press
Make a promised payment
-
Go to Users page and find a user in the list.
-
On the user data line, click on
, to open the corresponding window. -
Enter the amount of the promised payment and click
Add a tariff to a user
-
Go to Users page and find a user in the list.
-
Click on the user data line and go to Tariffication ⇒ Tariff links.
-
If the user has more than one personal account, select from the list the personal account to which you want to link the tariff, and then click
-
In the opened window, select the Current tariff plan and Next tariff plan (or leave Do not change) and Accounting period, and then click
to create the tariff link. -
For each service included in the tariff there will be a window where you can modify service parameters, if necessary. Click
to add the service or click  to remove the service from the tariff plan for this user.
Create a traffic class
-
Go to Tariffication ⇒ Other ⇒Traffic classes and click
above the class list. -
In the opened window, specify the Class ID (e.g. 15), name of the class (e.g. Night Incoming), select the time range (e.g. Night) and add subclasses of traffic.
-
Click
above the list of traffic subclasses. In the Addressee group enter the IP address and subnet mask for local network, in the Source group enter the source network address and subnet mask (e.g. enter 0.0.0.0/0 if source of the traffic doesn’t matter) and click . -
After setting all necessary parameters, click
in the Traffic classes window to add it to the billing.
Create an IP traffic service
-
Go to Tariffication ⇒ Services/Tariff and click
above the list of services. -
In the opened window, select the IP traffic service and click
-
In the IPTV service window enter the service name, comment and select the Supplier to invoice (your company name).
-
Go to Service parameters and enter cost of the service, charge method and, if necessary, fill in other parameters or leave the default values.
-
Go to Tariffication borders and click
. In the opened window, select a traffic class for the border, enter the border position in bytes (0) and cost for traffic exceeding the border in currency units per megabyte. Press -
If you want to add prepaid traffic, go to the Prepaid traffic and click
. In the opened window, select the class and volume of traffic and specify how much traffic can be collected. Press -
After setting all necessary parameters, click
in the service window to add the service to the billing.
Create the NetUP IPTV service and connect it to a user
-
Go to Tariffication ⇒ Services/Tariff and click
above the list of services. -
In the opened window, select the IPTV service and click
-
In the IPTV service window enter the service name, comment and select the Supplier to invoice (your company name).
-
Go to Service parameters and specify the cost of the service, the charge method, the IPTV system type ⇒ NetUP and select the media content or content group to which you want to grant access to users of this service. If necessary, fill in other parameters or leave the default values. After setting all necessary parameters, click
to add the service to the billing. -
Go to Users and find the user you want to connect the IPTV service to in the list.
-
Click on the user data line and go to Tariffication ⇒ Accounts.
-
If the user has more than one personal account, select from the list the personal account to which you want to link the service and go to IPTV settings.
-
Click
opposite the IPTV access card as result, you will see the number of the access card for this personal account. -
Go to Tariffication ⇒ Service links and click
above the list of services attached to the user. -
Select the IPTV service you have created from the list, choose the accounting period in the window that opens and click
Add a card pool
-
Go to Main ⇒ Card pools and click
above the list pools services. -
In the opened window, fill in the required fields:
Cards count
is the number of cards to be generated. By default is 100 (one hundred).
Balance
is the monetary value of one card. Required field.
Currency
Currency of card value. By default is ruble (RUR).
PIN code length
is the number of digits in the PIN codes to be generated. By default is 8 (eight).
The Unique PIN codes option is available for generating PIN codes. Turn it on to ensure that the PIN codes are unique.Random numbers
enable this option to generate random numbers (identifiers) for cards. By default – this option is disabled, card IDs are in a row.
Activate before
date and time of card validity. By default is the current date and time. Turn on the Not installed option if you do not want to limit the validity of cards.
Days to use
is the optional term of expiration of the payment made when the card gets activated. If not set, the payment is not expiring. By default is 0 (zero).
Tariff ID
Tariff, which will be connected to the card user after card activation and registration in the billing.
The created cards may be neither edited nor removed.If the tariff for the card users contains some services with periodic component, on user’s registration those get attached to the system accounting period, which is since 1/1/1970 till 1/19/2038. Therefore only the services with no or negligible periodic payment are suitable to include in such tariff plans.
-
Click
and the new pool will appear on the list.
Edit a card pool
-
Go to the Main ⇒ Card pools and click
 opposite one of the pools to open the editing window.
 -
In the opened window, you can see the following possibility:
-
click
above the list of cards if you want to add cards to the selected pool; -
click on the line with the card data and click
 or
or  to perform the corresponding action;
 -
click
above the list of cardholders at the bottom of the window if you want to add a system user who is allowed to automatically register users based on cards from this pool; -
click
nex to the system user to remove this user from the owner list.
-
-
Press
to save the changes.
Edit a template
-
Go to the Settings ⇒ Documents ⇒ Document templates and click
opposite one of the templates to open the editing window. -
In the opened window, press
to save the current template to an *.odt format. -
Open the saved file in LibreOffice and make the necessary changes. To add a new variable, go to the Insert ⇒ Field ⇒ More fields and on the Variables tab , select the desired variable from the list or enter its name in the Name field and press Insert.
Make sure that the variable you want to add is available for this template type (see Modules ⇒ Document templates).
If an array of values corresponds to a variable (the variable is iterated), it should be placed in one of the cells in a table row, for example:
IP addresses
IP address
Subnet mask
Gateway
Login
Password
MAC address
<IP address>
<Subnet mask>
<Gateway>
<Login>
<Password>
<MAC address>
In this case a necessary number of rows will be inserted into the table when generating the documents.
If none of the variables returns a corresponding value, the corresponding rows will be removed from the resulting document.
Use an alternative document number
|
An alternative document number separate document numbering for different service providers. The alternative document number may be used for generating invoices, VAT invoices, etc. |
-
Open with LibreOffice the .odt document template where you want to use the alternative number and remove the <doc number> field.
-
Go to Insert ⇒ Field ⇒ More fields and select the Variables tab:
-
in the Type – User field,
-
in the Select column – document.alt_number,
-
in the Format column - Text.
Press Insert, and then Close.
-
-
As a result, the <alternative number> will be displayed in the document template instead of <doc number>. Save the changes and close the template.
-
In the billing web interface, go to Reference book ⇒ Companies, click
to open a legal entity profile for editing, or to add a new legal entity. In the opened window, go to the Contract and specify the format of the alternative document number in the Number format field.In general, the alternative number has the following format:
prefix{alt_number(количество_символов)}postfix. For exampleABC#{alt_number(5)}-DEwill appear asABC#00001-DE. -
Press
to save the changes.
Configure invoice document settings
In the admin web interface, on the Settings ⇒ Systems ⇒ Main ⇒ Invoice document tab you can see Rules for invoice generating and Rules for prepaid invoice generating that define the rules for aggregation of account positions.
An aggregation rule consists of comma-separated field names. To have service-related positions included in a single invoice, the field values must be equal for these services.
For example, the rule is company.id, which means that entries that share the same service provider will get into the same Invoice.
Let’s suppose we have three services:
-
(1) IP traffic,
-
(2) Hotspot from one service provider (sharing the same company.id=1)
-
(3) telephony service from another service provider (company.id=2).
Services (1) and (2) must generate two entries each - A, B and C, D respectively. Service (3) also generates two invoice entries - E, F. In this case two invoices will be formed:
-
the first invoice will contain entries A, B, C, and D;
-
the second one – will contain entries E and F.
The following field names are allowed for setting the rule:
| Field | Description |
|---|---|
tariff.link_id |
is a tariff link ID |
tariff.id |
is a tariff plan ID |
tariff.name |
is a tariff plan name |
service.link_id |
is a service link ID |
service.type |
is a service type |
service.id |
Is a service ID |
service.name |
is a service name |
company.id |
is the service provider ID |
company.name |
is the name of the service provider |
Use colon to separate rules for services that are included in a tariff plan from ones that are not (common services). In this case, if a user have a tariff plan and a common service connected, two the personal will be generated. If a user have only a tariff plan connected, a single Invoice will be generated.
The following preset rules could be used as well:
| Rule | Description |
|---|---|
default |
Create an invoice with a certain fixed set of fields. |
single |
All services will be included in a single invoice. |
separate |
Two invoices will be generated: one is for tariff plan services and the other is for common services. |
Create a charge policy
-
Go to the Tariffication ⇒ Additional ⇒ Charge policies and click
-
In the opened window, enter Name for the policy and enable the necessary options on each of the tabs:
Main
Select what you want to recalulate on service link creation (at the moment of service connection): periodic fee, traffic, telephony.
And enable the Don`t charge without block, if during the blocking the user's account should be charged for some services.
This condition works only if the Recalc periodic fee option is set for the blocking type that applies to the user (see below).
For example, a user is in User blocking. In order for the periodic fee to be charged during this blocking, you must enable the following options:
-
Do not charge periodic fee;
-
Recalculate the periodic fee in the group of options Recalculation on block, on the tab with settings for the User block.
Recalculation on block
For each type of lock (Administrative, User, System) enable the necessary options:
-
Do not charge periodic fee means that the account won’t be charged for the periodic fee while it is in block.
-
Recalc periodic fee means that the periodic fee will be recalculated proportionally to the time spent in block during the current accounting period.
-
Decrease prepaid traffic similar to the periodic fee.
-
Recalc prepaid telephony similar to the periodic fee.
Repay
Check the events that you want to be coupled with refund when excessive amount of money was withdrawn from the user’s account:
-
on block expire;
-
on payment;
-
on charge period end;
-
on remove service link.
System blocking
Enable the Set system block on funds lack option to block users when the balance is negative, and set the time to check the users' balance.
-
-
Press
to save the changes.