
Device purpose
NetUP Stream Processor is a multifunctional software-hardware complex designed to solve video streaming problems. General functions can be divided into several parts:
-
Receiving any IP streams: from third-party providers, cameras, videoconferences, VoD, encoders or other arbitrary streams, as well as loading media files;
-
High performance processing of received streams or media files: transcoding, converting formats, animated or static graphics overlay (logos, timers etc.), recording streams to archive (CacthUP&TimeShift) and protection with tokens and AES-encryption, mosaic channel creation;
-
Broadcasting of received and processed streams or media files in the most popular and demanded formats directly to the user’s or any other devices.
Quick start
Before you start the NetUP Stream Processor:
1) Connect the Ethernet cable to the 1st port on the front panel;
2) Plug in the device to the power supply.
After turning on the device, wait a few minutes for it boot up. Now you need to launch the web interface.
For this you need:
1) Have a PC or Smart device with a web browser in the same local network;
2) Set up a network connection at the headend using the LCD-panel;
3) Make sure that any sources of IP streams are available from this network for interaction.
Launch the web interface and open the Stream Processor module, which is used for receiving, processing and streaming IP streams. The following articles will be helpful for you in setting up:
First launch of the web interface
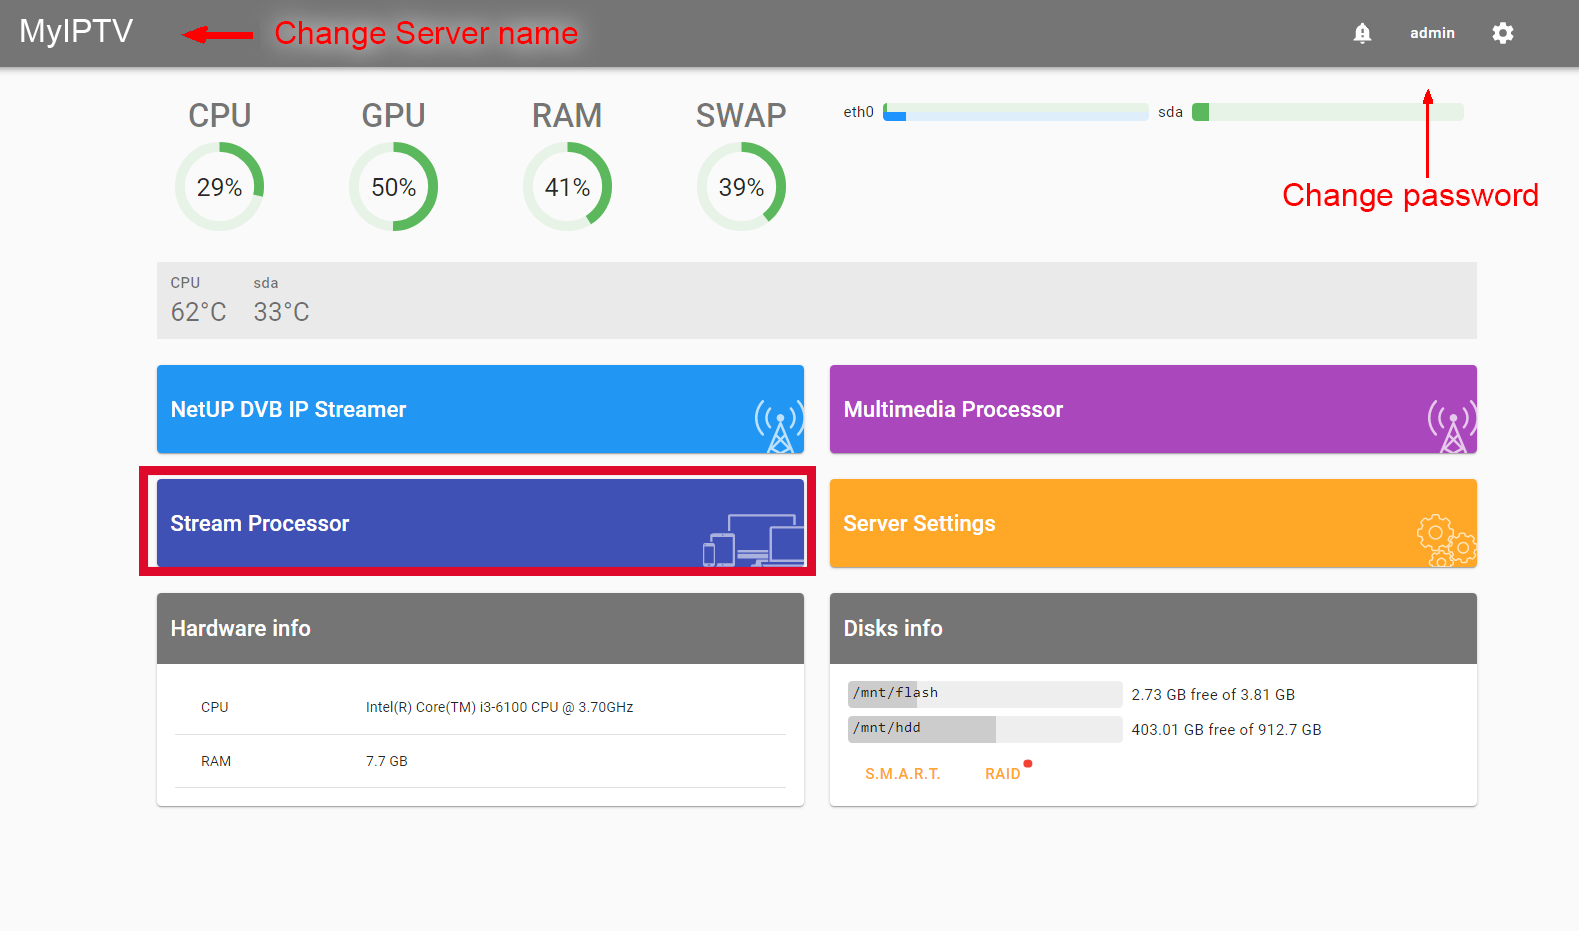
Open a browser and write the IP address that you set up using the LCD-panel
|
Enter the default login and password: admin and netup123 |
|
In the header you can set any name to the device. |
As result, the Home page opens. It contains the values of the main server parameters and links to modules included in your license.
|
It is strongly recommended to change the password immediately after the first log in. To do it, click on the user name in the upper-right corner of the Home page and select Change password. |
The Server settings module is available for any configuration.
|
The network adapter №1 on the front panel of the NetUP Stream Processor is the eth0 in the web interface, №2 – eth1, №3 – eth2, №4 – eth3. |
Useful tips
-
To create any processing or streaming node, you need to select a source. The source field supports Search by names of nodes.
-
To control the processing result, you can create an output stream in the Streaming tab and press Quick Preview icon:

-
Use Copy button on the created output streams. In addition to the copy function, it shows a list of all links for this stream.

How to receive a stream?
1) Open the web interface and go to the Stream Processor module.
The interface based on three main tabs: receiving, processing, streaming;
2) Open the Receiving tab, then in the lower-right corner press Start receiving and select the required protocol. In this example, we use UDP, other protocols are configured similarly.

3) In the opened form you need to fill in (all fields are required):
-
Alias - name of the source. Not transmitted, valid only within the Stream Processor for quick search when setting up;
-
Source type - type of received stream;
-
IP address and Port - IP address of your arbitrary stream.
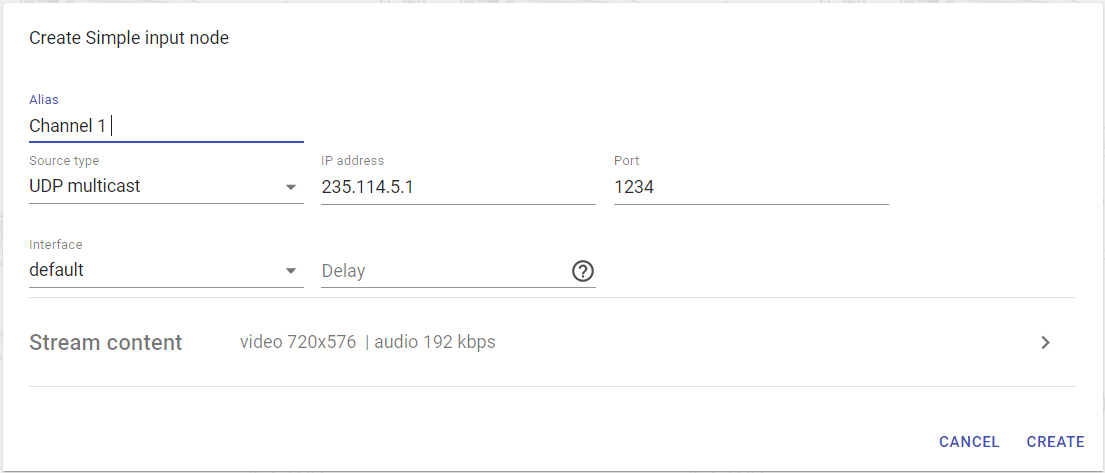
Press Create.
A line with the created stream will immediately appear. After a few seconds the bitrate will be determined and will be available a quick preview. The stream is received and ready for further processing.

How to change the video-audio codec?
1) Start Receiving an arbitrary IP stream or load a source file.
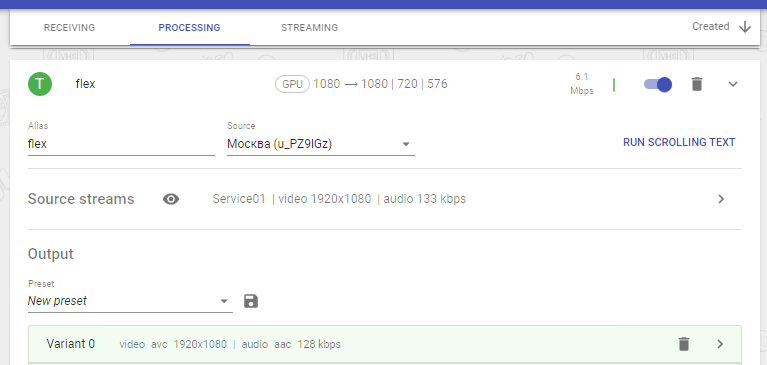
2) Open Processing tab, in the lower-right corner, press Start Processing > Transcoder.
3) In the opened form fill in the transcoding settings:
-
Alias - name of the source. Not transmitted, valid only within the Stream Processor for quick search when setting up;
-
Source - choose the source for processing; These can be input streams or streams from other processing nodes. Field supports Search.
-
Output - General processing settings for video, audio, subtitles.
|
See more settings details in the transcoding section |
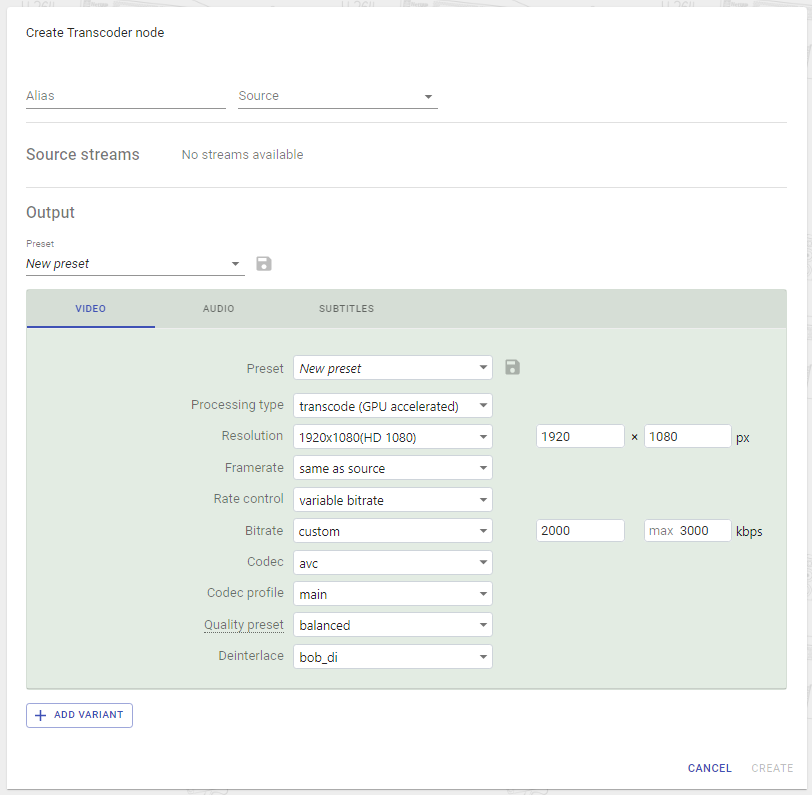
4) Press Create and the line with specified processing settings will displayed immediately.

Processing has started, now it can be selected when creating other nodes or output streams.
How to broadcast a stream?
After receiving and processing (mosaic, transcoding, graphics overlay, etc.) streams, you need to set up their streaming:
1) Go to the Streaming tab, in the lower-left corner, press Start streaming and select needed format.
2) In the opened form fill in the settings accordance with the selected protocol: As a source you can select both the input stream for pass-through (streaming as-is, without processing) or any processed stream.
3) Press Save and streaming starts.

You can copy the IP address of the stream and try to run on any player or device that can play IP streams.
LCD panel
Stream Processor equipped with an LCD panel and control buttons. You can use them for the initial setup of the device, monitoring load of the LAN-interfaces and CPU and setup IP addresses for network adapters.
Launch
Before you start the NetUP server, plug the network and power cables into the device and then switch power on.
After starting, the LCD screen displays Starting… or Startup…. It depends on a model of your device. Then the screen indicates the total rate of input and output traffic.
Screens
Use Up and Down buttons to navigate through menu elements:
-
Reboot system – restart server
-
Shutdown system – shutdown server
-
Generate (Reset) password – generate a new admin password. Press Enter to shut down, reboot server or to generate new password.
-
IPTV [CPU]v – show CPU load level.

First number is the total CPU load. Three subsequent numbers give, correspondingly, the portions of CPU load related to user tasks (u-ser), system tasks (s-ystem), and awaiting data from the peripherals (w-ait).
-
Network setup – set IP address and subnet mask. See the following article for the setup procedure.
How to set IP address and subnet mask?
Use Up and Down buttons to move to the Network setup screen and press Enter.
|
If your device does not display the Network setup screen, press Fn button on any statistics screen and then press Enter. The network configuration screen will appear. |
2) Press Up and Down buttons to select the network interface, then press Enter.

Press Enter to select an octet for editing and then press Up or Down to change it. The selected octet will be indicated by a symbol “ >”.
Select the last octet of the IP address and press Enter to go to edit the subnet mask.
Press Up or Down to increase or decrease the number of mask bits and press Enter to go to the save dialog.
Use Up and Down buttons to select one of the following options: Save changes – to save IP address and subnet mask, Discard – to cancel changes. The selected option is emphasized with brackets. Press Enter to confirm the selection.
General processing settings
Transcoding
The feature is intended to change the video-audio codecs and other settings for any streams connected to the device.
By default it is recommended to use the GPU accelerated processing type as the most performed. This type is based on Intel Quick Sync Video (QSV) technology. NetUP platforms supplied with Stream Processor software support this technology.
In case of using Stream Processor software based on servers without QSV support, the CPU transcoding option is allowed. The performance of this method is very low. The CPU is not designed for such operations.
Transcoding methods on CPU and GPU can be used simultaneously within the same server.
The general method for Processing setup is described in the Quick start section.
In the Video settings pay attention to the Processing type:
-
transcode (GPU accelerated) is the recommended processing mode. The only mode for overlaying text, graphics, changing codecs, etc.;
-
transcode (CPU accelerated) - processing type on the CPU. Graphics overlay and text in this mode is not available;
-
bypass - do not make changes to the video stream;
-
discard - exclude video from the total output stream.
Other settings:
-
Resolution: templates or custom settings;
-
Framerate: templates or as in the source;
-
Rate control: CQP, CBR, VBR, LA;
-
Bitrate: templates or custom. Target and max;
-
Codec: mpeg2, avc, hevc;
-
Codec profile: Depends on codec
-
Quality preset: best, balanced, fast;
-
Deinterlace: off, adi, bob_di.
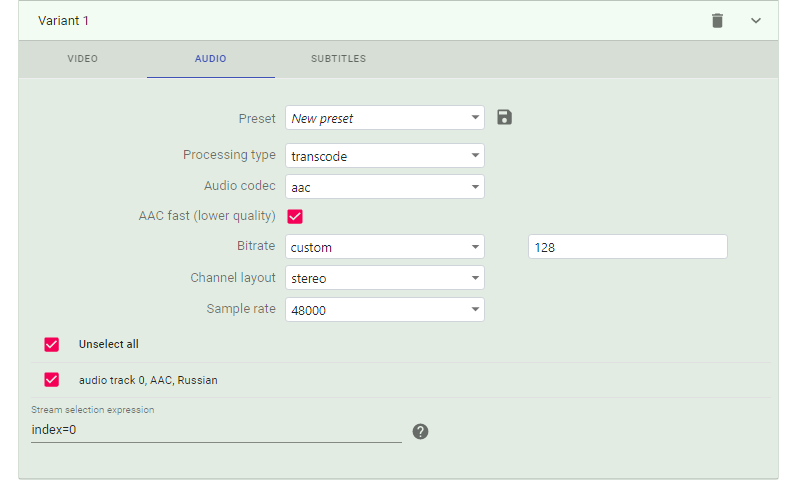
In the audio tab available the following settings:
-
Processing type:the same as video;
-
Audio codec: ac3, aac, mp2, mp3;
-
AAC fast: on\off;
-
Bitrate: templates or custom;
-
Channel layout: mono, stereo, stereo_downmox;
-
Sample rate: templates.
Audio and subtitle settings allow to select elementary streams both visually (by checking the necessary ones) and in advanced mode.
Processing presets
The following types of presets are possible for transcoding:
-
General processing preset. Includes settings immediately for video, audio and subtitles;
-
Local processing preset. Located inside the video or audio tab and includes the settings of only the selected tab.
To create a general processing preset, configure all three tabs of the transcoding, press the save preset button and set a name.
To create a local processing preset, do the same, in one video or audio tab.
|
All created presets available for use in any processing of the system. |
Processing options
You can add different processing variants for a specific stream to create adaptive streams or other purposes.
To add a variant just press Add variant in the settings of transcoder processing. After configuring the settings press Save. The variant will be available for selection in the output streams.
|
Any overlay settings will apply to all node variants simultaneously. |
Selection of elementary streams
Stream Processor allows to create expressions for selecting elementary streams for audio and subtitles. This feature is better then streams selection using PIDs. Because PIDs can change dynamically (for example, when inserting) and are also used only in the MPEG-TS standard. In our case, streams selection is performed by any attributes and their combinations.
For this feature, go to the processing settings of the stream and open the audio or subtitles tab.
Supported operators
-
⇐ - less than or equals to
-
>= - greater than or equals to
-
< - less than
-
> - more than
-
= - equals
-
!= - not equals
-
& - logical AND
-
| - logical OR
For grouping conditions supported the parentheses ( ). Spaces around operators and operands are ignored.
Supported attributes
-
index - elementary stream index (numbering in order, from 0)
-
program - program number / DVB-service
-
pid - elementary stream PID
-
codec - media codec (examples for audio: mp2, aac, ac3)
-
language - 3-letter language code (ISO 639-2)
Expression examples
Selection of first audio stream:
index=0selection of all audio streams with MP2 codec:
codec=mp2selection of all audio streams with MP2 and AAC codecs:
codec=mp2 | codec=aacselection of all audio streams with MP2 and AAC codecs and russian language:
(codec=mp2 | codec=aac) & lang=rusSubtitle processing
Stream Processor allows to perform the operation of converting dvb-teletext subtitles to webvtt format.
|
You can use WebVTT only in HLS with adaptive playlist! |
Setting method:
1) Ensure the reception of the stream in which there are definitely dvb-teletext subtitles.
2) Perform processing, if necessary. When setting up processing on the subtitles tab, you must select the subtitle tracks that will be forwarded to the resulting stream. At this stage, only the processing of Audio and Video takes place, the subtitles are simply forwarded through the node in their original form.
3) Create an output HLS stream in an adaptive version.
4) While configuring the output node, expand the Subtitles menu at the bottom of it:
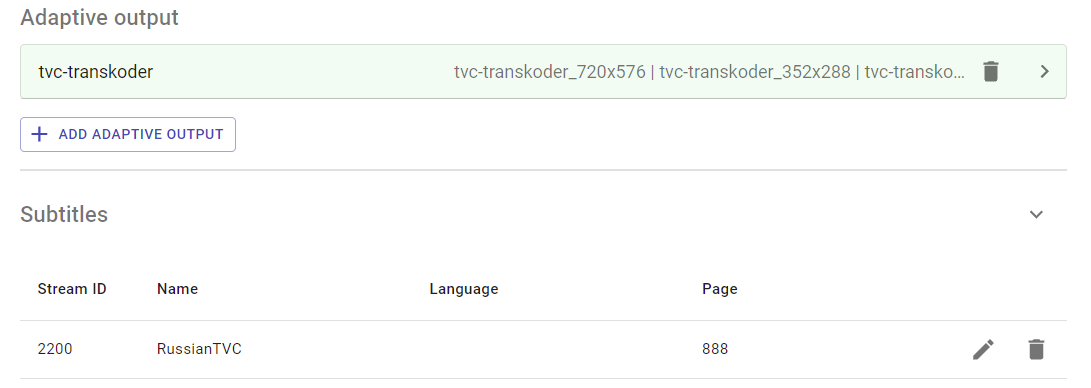
Click the Add Subtitlesbutton, then set a custom name and specify the teletext subtitle page number. Page 888 is used quite often. Save these changes.
5) For work, you need to use a link to an adaptive playlist as a playlist, even if there is only one stream.
Playlists and streaming from media files
Stream Processor allows you to download arbitrary video files and collect playlists from them, if you have the required license. Each playlist broadcasting as a separate stream.
To start broadcasting from one or several files:
1) Open the Receiving tab, in the lower-right corner press Start receiving.
2) In the opened form choose Source type ⇒ Media file and fill inAlias (arbitrary).
3) Press on Media files to open uploading and settings menu.
4) Upload the files for streaming one by one. It will be displayed in the Uploaded media files list. To add file to the playlist click on it and it will move to the Current playlist
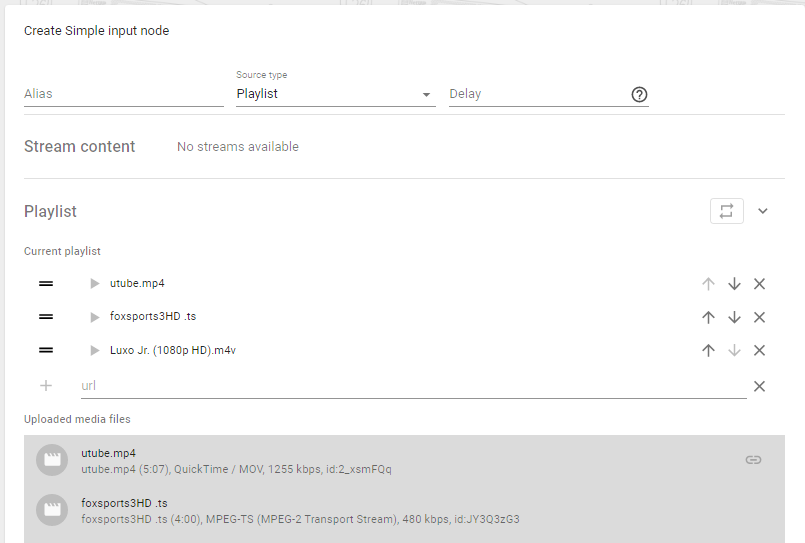
5) If there is only one file, then you can press Save If there are several files, then you can sort them using drag and drop or arrows. You can also activate the option Repeat.
6) After you have formed and saved the playlist, you need to configure its streaming
Mosaic creation
This function allows you to create a mosaic channel from arbitrary input streams:
1) Choose a tab Processing, in the lower-right corner press Start Processing Mosaic.
2) The field Resolution defines this setting to the final output mosaic channel.
The manual resolution limit depends on the selected codec.
3) Choose the optimal grid dimension. The grid is needed only for useful movement of elements with the mouse. The mosaic elements can be of arbitrary size and position. The exact settings of the size and position of elements can be set when adding them using the X, Y, width, height fields.
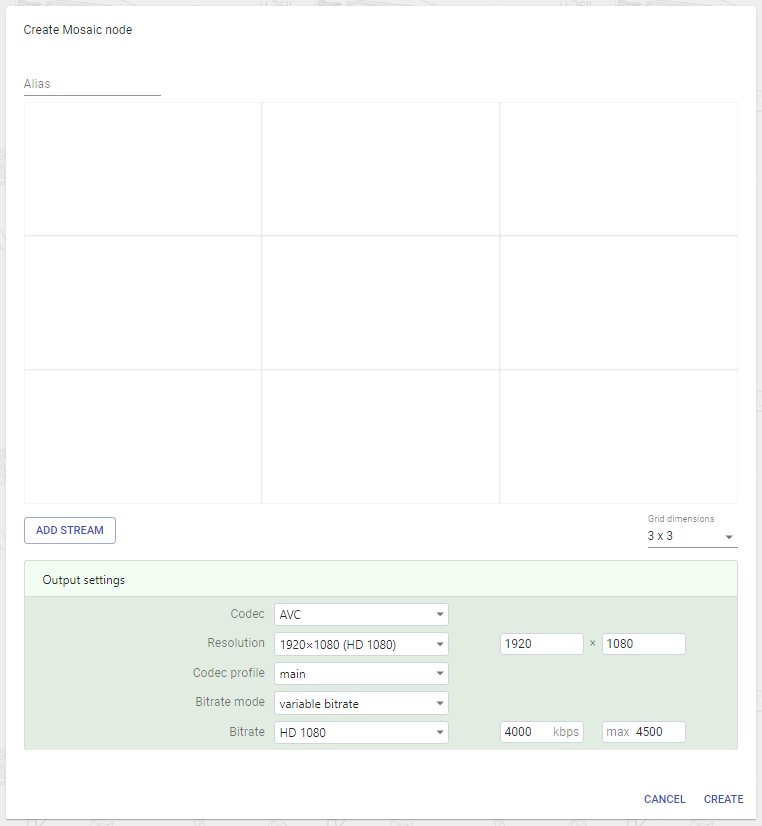
4) Select the required stream and place it on the screen. Add streams until you achieve the desired result.
5) Specify the processing settings.
6) Press Save. The operation is now started and you can create an output stream.
|
This operation is highly loaded. Load depends on the settings of incoming streams. Basically from the selected Mosaic resolution and codec. |
Scrolling text overlay
To overlay a one-time scrolling text, follow these steps:
1) Open the tab Processing, perform transcoding with the stream on which you want to overlay the scrolling text.
|
Overlay is possible only if you set the Processing type = transcode (with GPU acceleration). |
2) At the top of the transcoding settings window press button Run scrolling text.
3) Fill in the text. The operation will start immediately after press the Run button.
|
The operation of scrolling text overlay takes about 7 seconds after you press the Run. |
Static image overlay
This function allows you to overlay an arbitrary image on any stream. The overlay takes place immediately without disruptions or artifacts in the stream. Application:
1) Open the tab Processing, perform transcoding with the stream on which you want to overlay the image.
|
Overlay is possible only if you set the Processing type = transcode (with GPU acceleration). |
2) After the transcoding settings, open the Overlay menu below.
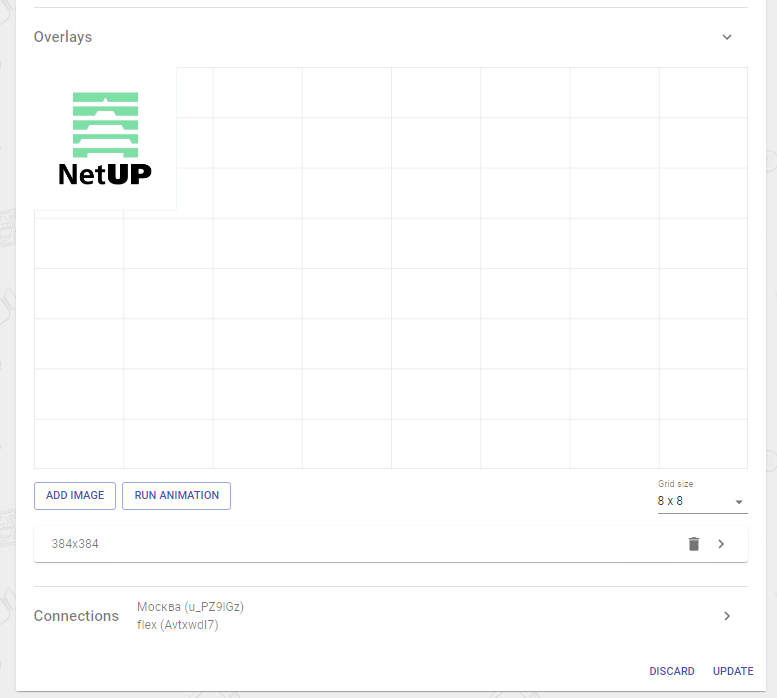
3) Set the optimal Grid size. The grid is needed only for useful movement of elements with the mouse. More detailed editing of the image, it size and position is possible using the fields in the right of its preview when loading.
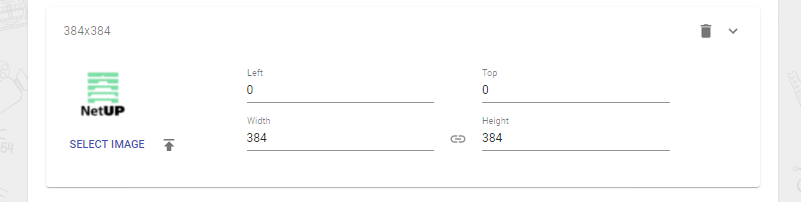
4) Download the needed image. Multiple images can be used.
|
All the most popular vector and raster image formats are supported. Recommended: PNG, JPEG, SVG |
|
The operation of static graphics overlay takes about 7 seconds after you press the Run. Depends on the amount of graphics. Optimized graphics are recommended. |
|
Not recommended to use images with a resolution higher than 4K. |
5) Place the images, then press the Save button. The overlay takes place immediately.
You can quickly control the result by running the stream from the Streaming tab in any player or by using the preview icon: ![]()
Animation overlay
To overlay animation you can use any popular codecs and containers, including with an alpha channel.
Tips for preparing media files
1) The frame rate of the animation must be the same as the overlayed stream.
2) Try to make the minimum normal resolution for the animation file. The time to prepare the animation overlay directly depends on this!
|
With optimal media files, the animation overlay takes approximately 8-10 seconds for HD and SD streams after you press Start animation overlay. |
3) Do not use any soundtrack for animation, it will be ignored.
How to overlay animation?
1) Open the tab Processing, perform transcoding with the stream on which you want to overlay the image.
|
Overlay is possible only if you set the Processing type = transcode (with GPU acceleration). |
2) After the transcoding settings, open the Overlay menu below.
3) Set the optimal Grid size.
4) Press Run Animation to open the material selection field.
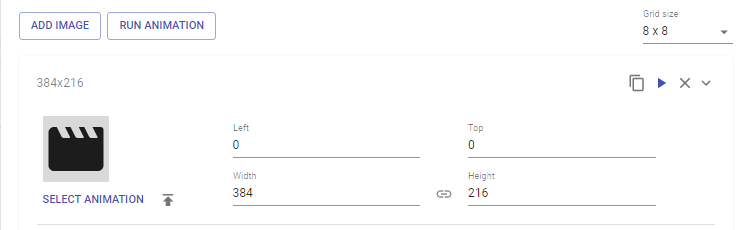
5) Upload and select the animation video, then set the size and position.
6) Click the play button on the right side of the screen. from this moment preprocessing of the animation and its launch starts.
Streams reception configuring
For the general method of setting up streams reception, see the section Quick start - How to receive a stream?
Delay of received streams
A small delay function is available for received streams. This is disabled by default.
To use the function, you need to enter the delay duration in the corresponding field when adding a stream on the receivingtab. Range of valid values: 0 - 60 seconds.
Demultiplexing MPTS
Stream Processor allows to receive and demultiplex (“parse") the incoming MPTS stream into separate SPTS.
The operation is performed as follows:
1) Add incoming MPTS stream on the Receiving tab. After adding in its properties, Stream Content menu will be displayed. Inside will be a list of available channels.
2) Transcoding If the task is to get from MPTS > SPTS - move to step 3!. On the Processing tab, create a node and select the MPTS input stream. After that, you will be able to choose which of the channels within this stream will process the created transcoding node.
3) Create a node in the Streaming tab. As a source for it, you can choose the result of transcoding from the MPTS or the input node. At this stage, you will receive SPTS links depending on the selected protocol.
Streaming configuring
HLS and Dash
Recommended for use in OTT solutions. Setting Storage duration is intended for configuration CatchUP & PauseTV services.
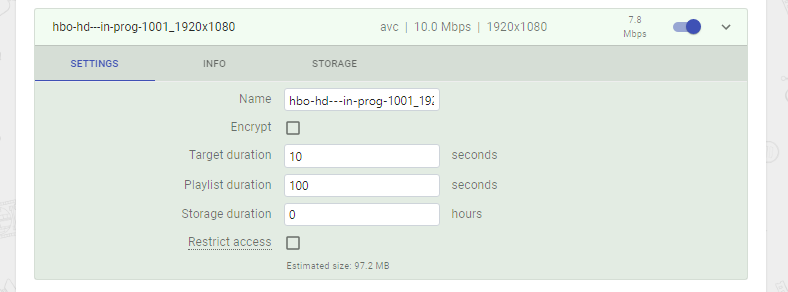
HLS and Dash streams are automatically added to the CatchUP manager.
Adaptive streams
Adaptive streams are only available for streaming using the HLS and Dash protocols.
To create an adaptive playlist, you need to:
1) Create Processing with Transcoder type and different Variants.
2) Create an output stream and select the created processing as a source.
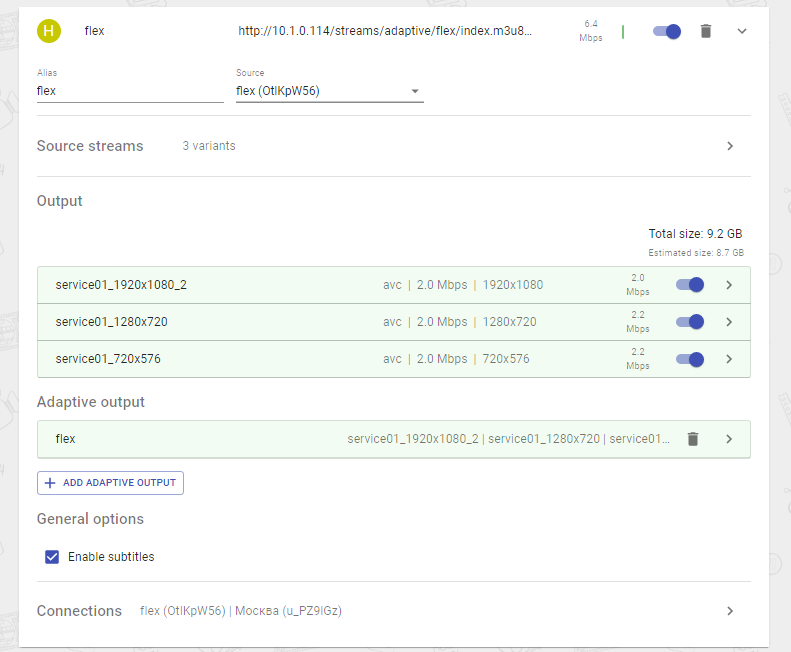
3) Choose the variants to be included in the playlist and click Add adaptive output.
4) In the opened form confirm again which streams will be add to playlist and if necessary change the storage directory. Press Save.
5) In the list of output streams, click Copy, there you can find a link to the created playlist.
CatchUp manager
This function is intended for online monitoring of all recorded HLS streams, their actual Disk usage and viewing timelines. To launch the CatchUp manager, click on the icon in the upper-left corner of the interface.
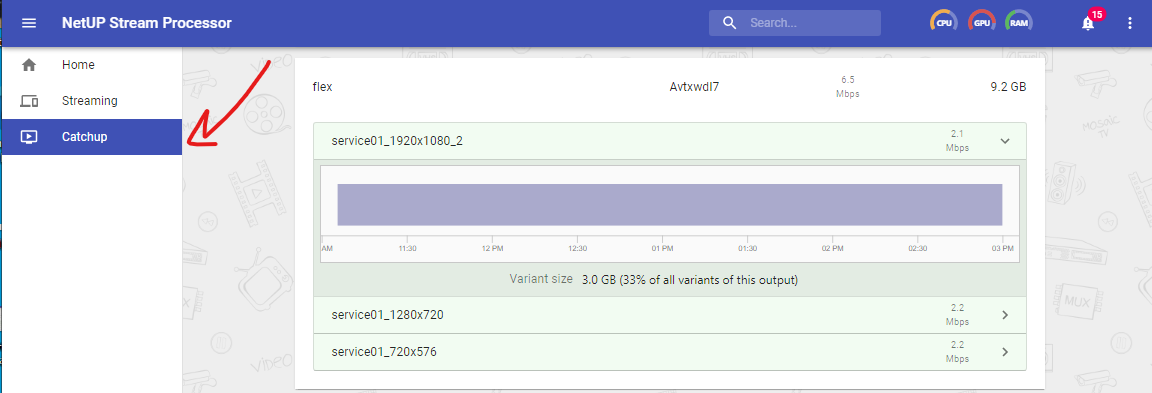
When you create any HLS-stream in the Streaming tab (with storage duration = 0 hours by default), it immediately moves to the CatchUp manager and is marked as a not recording. If a non-zero hours storage duration is specified for a stream, then the stream is marked as recording.
You can set the storage duration for already created streams directly from the stream manager page. To do this, in the lower right corner, click the Edit CatchUP button. The opened window has its own quick help:
Start recording streams: go to not recording, select streams, set storage duration to a desired value. Start recording Press Add. Change storage duration for streams: go to recording, select streams, set new storage duration. Check apply to existing records to update storage duration. Press Update. Delete records: go to recording, select streams, set storage duration to 0 to stop recording selected streams. Check apply to existing records to also delete the recordings of the selected streams that have already been made. Press Update.
The option apply to existing records allows you to set a new storage duration for all old chunks of the stream. The time is counted from the date of creation of a specific chunk.
|
Technically, every chunk in the system has a creation date and storage duration. After the storage duration expires, chunk is automatically deleted. |
General settings
Language selection
There are two ways to change the language:
1) Select during authorization in the web interface;
2) In any screen, press the Settings icon, which is located in the upper-right corner and go to the Settings
Settings backup
Stream Processor allows to save node settings. This does not include presets, overlays, general settings. The function is available from the top-right Settings menu.
To full backup of the system you need General Server Settings. You can access them through the main web interface page.
Server settings module
Launch the web interface of NetUP.tv. Log in and click on the corresponding button on the Home page to go to the module and set up the server.
The side menu of the module allows access to the following pages:
To hide or show the side menu, click on ![]()
To go back to the Home page, click on Home
Modules
There are two tabs on the page: Modules and Services.
Module contains a certain set of functions that are responsible for the operation of a NetUP.tv component, for example, dvb-gw is responsible for the operation of NetUP DVB IP Streamer.
Service is a utility that is responsible for starting or stopping a module.
Use the Modules tab for the following actions:
-
Install or update modules either individually or all together.
-
Uninstall a module or view the full information about it.
-
Upload a module.
|
Drag your files to the web page and the upload dialog will open automatically |
After uploading and installing a new module, go to the tab Services to run this module. Click on the corresponding button in front of the service responsible for the module, and then confirm the action in the window that opens. Similarly, you can stop some services if you do not plan to use corresponding modules.
Firmware
Open this page to upload, install or delete a firmware.
|
Drag your files to the web page and the upload dialog will open automatically |
Firmware of different versions of the NetUP.tv system may not be consistent with each other.
If you need to downgrade to previous firmware releases, contact the NetUP technical support department
|
Please note that you can upload incompatible firmware and it will appear in the list. A warning message will appear only when you try to install this firmware |
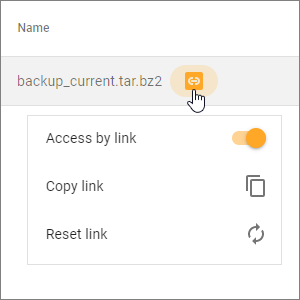
Backup
The NetUP.tv system provides automatic backup once a day.
Backups are tar.bz2 archives that contain the system settings.
The latest automatic backup is available for download at the link. You can open or close access to the archive, as well as copy or reset the link.
To create or upload backup , click on  in the lower right corner and select an action.
To restore system settings, select an archive, click on ![]() and confirm the action in the window that opens.
and confirm the action in the window that opens.
|
Before restoring a backup, make sure that the backup was NOT created during the period when you used the firmware related to the another release. The release number is the first two digits of the product version, for example, 2.0, 2.2, etc. |
Licence
Open this page to get information about uploaded licenses (license numbers, components, expiration dates and restrictions) or to upload a new one.
To update a license, click on 
In the opened window, select the files you want to load, or drag them, wait for the download to finish and close the window.
|
Before uploading a new license, make sure this license is fully compatible with the old one |
Connections
Open this page to see all NetUP.tv systems. Each of the systems has a separate panel. The panel displays a list of services with which interaction is possible. Addresses of interacting services are links.
Expand a panel and click on the pen icon next to the service you want to edit. In the opened window write the address manually or check Auto detect box to detect the address automatically, then click on Save.
Network
Open this page if you want to:
-
Cofigure interfaces which are related to the network interfaces on the front panel of your streamer. The №1 network interface on the streamer front panel is the eth0 in the web interface, №2 – eth1, №3 – eth2, №4 – eth3

-
Enable or Disable NetUP support tunnel
Each of the interfaces, DNS and NetUP support tunnel has a panel. Expand a panel to access the settings.
Configure interfaces
An interface settings panel has a list of the IP addresses assigned to this interface and buttons to add IPv4 and IPv6 address. Click on one of the buttons to add IP address or click on an existing address to edit it. Write or edit the address, click on ![]() , and then click on APPLY.
, and then click on APPLY.

If IP address is not the main or the last remaining IP address, you can delete it. Click on ![]() next to the IP address and click on APPLY at the bottom of the panel.
next to the IP address and click on APPLY at the bottom of the panel.
|
You cannot delete the address assigned for the main interface. It is used for the component’s interaction and thus is absolutely crucial for the system’s operation. The default main interface is eth0 |
To remove interface configuration, click on ![]() and select the corresponding option.
and select the corresponding option.
Under an interface name you can see its status: UP– the network cable is connected and the interface is configured or DOWN – the interface is not configured. If some interface is not configured, click on ![]() and create an empty configuration for it to see whether the cable is connected to the corresponding interface on the streamer front panel.
and create an empty configuration for it to see whether the cable is connected to the corresponding interface on the streamer front panel.
Create VLAN, VTUN, BOND
To create a virtual interface, click on  at the bottom of the page and select one of the following types: VTUN, bond or VLAN. In the opened dialog fill in the fields and click on CREATE.
To delete a virtual interface, expand its panel, click on ![]() and select Remove interface configuration.
and select Remove interface configuration.
Routing
The page contains two lists of routing rules: System routing rules and User routing rules. You can edit, add or remove user routing rules. The system routing rules are needed for correct system operation and can’t be edited.
Users & Roles
There are two tabs on the page: Users and Roles.
Use the Users tab for the following actions:
-
Add a new user.
-
Delete users or change their passwords.
-
Assign roles to users, i.e. configure access rights for them.
To create and configure a role, go to the Roles tab.
Time
Open this page to set the date and time of your server, as well as select your time zone.
|
Set the correct time zone before uploading the license. Time zone changes after the server reboot |
In the web interface, you can enable time synchronization with the time server of your choice. Time are synchronized with debian.pool.ntp.org by default
FAQ
How to grant access to the server?
If you need to provide NetUP support with access to your server, follow these steps:
-
Make sure your server has Internet access. The server can be connected to the Internet directly or through an intermediate server.
-
Choose one of the ways to provide access to your server and do the necessary preparatory steps.
Tunnel (recommended way)
-
Log in to the web interface of the server you want to provide access to, go to the Server settings module and open the Network page.
-
Expand the NetUP support panel and specify Host and Port, then enable the tunnel.
Before specifying a port, make sure that access to it is allowed.
If you selected tuns.netup.tv, make sure that DNS is configured correctly. -
Notify NetUP support that you have enabled the tunnel and give the following information:
-
The Local IP which will appear on the NetUP support panel after enabling the tunnel;
-
credentials for access;
-
the number of your license.
-
Public IP
-
Make sure that 22 and 80 TCP ports are available.
-
Check the reliability and, if necessary, change the password to access your server.
-
Give the following information to NetUP support:
-
The public IP address of your server;
-
credentials for access.
-
-
How and why to use a debug cable?
When a network connection to the NetUP server is impossible, use the debugging cable supplied with the server. Connect the port on the server’s front panel to the COM port on any PC and open a terminal program. A Linux console will show up in the terminal window.
Use the following connection parameters:
Speed (bit/s) |
19200 |
Data bits |
8 |
Parity |
None |
Stop bits |
1 |
Flow control |
None |
API GraphQL
This document contains a basic description of the API and some examples of interaction with it.
How does Stream Processor work?
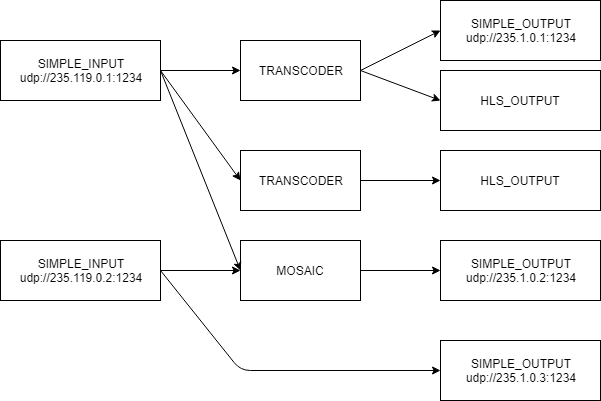
NetUP Stream Processor is designed for processing multimedia streams and includes three tabs: input, processing node and output.
The nodes are connected to each other, connected in a directed graph, in which the stream is directed from the input (source of multimedia data) through the processing node to the output.
The role of the input is to receive the stream (INPUT), the role of the processing node is to transform it (PROCESSING), the role of the output is streaming (OUTPUT).
One input can be a source for multiple processing nodes or connected to multiple outputs. One processing node can receive streams from several inputs (for example, a MOSAIC-type node) or duplicate data into several outputs (for example, a TRANSCODER-type node). This way, efficient use of resources is achieved.
| Node type | Role | Description |
|---|---|---|
SIMPLE_INPUT |
INPUT |
Receives streams of almost any format (containers, protocols) |
TRANSCODER |
PROCESSING |
Node for adaptive video and audio transcoding. Depending on the configuration, it can have one or many adaptive options, synchronized by key frames and DTS (I-frame alignment). |
MOSAIC |
PROCESSING |
Combines multiple video streams into one grid (mosaic). Does not convert audio streams |
SIMPLE_OUTPUT |
OUTPUT |
Streaming UDP multicast |
HLS_OUTPUT |
OUTPUT |
Streams HLS (adaptive streams). Creates media and master playlists, cuts HLS segments |
HP_OUTPUT |
OUTPUT |
Streams HTTP progressive (MPEG TS by HTTP) |
RTMP_OUTPUT |
OUTPUT |
Node for publishing RTMP streams |
All nodes have a common set of parameters:
|
Global node identifier |
|
Specific node type (For example TRANSCODER, HLS_OUTPUT) |
|
Node name from user (any string) |
|
Node role: INPUT, PROCESSING, OUTPUT |
|
Node status: STOPPED, STARTING, STARTED, STOPPING |
|
Node enabled / disabled: true / false |
|
Node source |
|
Elementary streams leaving the node |
|
List of micro-nodes that this node includes (information for debugging) |
|
Statistics (bitrates of streams) |
|
The value is set if the node terminated with an error |
To connect a node, specify the source - feed and its parameters in the request: id: number, node: string, select?: stringWhere id - source number (numbering from zero), node - source node identifier, select - a rule for choosing a program in the case of MPTS, by default - the first program in the order of their declaration in PAT.
|
Usually a node has one source, but in the case of a mosaic, there are several sources and the request must specify parameters for each of them. |
After the start, each node announces its own set of elementary streams: video, audio, subtitles. In the case of MPEG-TS, many programs can be available in one stream, each of which has several elementary streams, thus, the number of elementary streams can be tens or hundreds.
Information about elementary streams is dynamic - constantly updated. For example, in the MPEG-TS format, the set of programs may change, or the set of elementary streams of each program may change due to advertise insertion. Each time the set of elementary streams changes, the node announces a new list, and subsequent nodes react to the changes.
Each elementary stream has a set of required parameters:
|
Node output number |
|
Group number (a group of elementary streams is a program or an adaptive variant) |
|
Media type (video, audio, subtitles, etc.) |
In addition, optional parameters are available: program, program_name, provider, provider_name, pid, codec, codec_profile, bitrate, resolution, language, frame_ratewhich in general may not be available. For example, program_name and pid are MPEG-TS specific parameters. They are not available with other streams.
How to begin?
If you have already worked with our API or with similar services on other platforms, you can skip this section.
|
Kindly note:
|
Use Playground for preparing and testing requests. On the SCHEMA tab, you will find a list of operators and related parameters, and on the DOCS tab, their detailed descriptions.
|
Required parameters are marked with an exclamation mark (!) |
API requests are divided into three types:
|
receiving data |
analog in REST - GET, in CRUD model - Read |
|
data change |
analog in REST - POST / PUT / PATCH, in CRUD model - Create / Update / Delete |
|
subscription to events |
To pass input data with a query, write it to QUERY VARIABLES as a JSON object. Objects are made up of pairs key: value where key is string and value is a valid JSON data type (string, number, object, array, boolean, or null).
Replies to requests come in JSON format.
Authorization
Only authorized users can work with the API.
If you use HTTP Basic Authentication, then each request must contain your login, password and headerContent-Type: application/json. For example,
curl http://admin:netup123@10.1.0.190/stream-processor/api/graphql -H 'Content-Type: application/json' -d '{"query":"{dot}"}'
POST request for authorization must be sent to http://<IP-address>/system/api/login
The request must contain:
| Parameter | type | value |
|---|---|---|
Header |
||
|
string |
application/json |
Body |
||
|
String |
Login |
|
String |
Password |
For example,
curl -X POST http://10.1.0.190/system/api/login -H 'Content-Type:application/json' -d '{"username":"admin","password": "netup123"}' -D -
As a result of the successful execution of the POST request, the API will return a JSON object containing the username and cookies (session and session.sig).
In case of an error, the API response will contain a JSON object with the message AUTH_LOGIN_OR_PASSOWRD_INCORRECT
API: Practical examples
The requests with which you need to transfer incoming data are divided into two parts: BODY and QUERY VARIABLES. The responses come in the form of a JSON object.
Get a list of nodes
Enter in the request the parameters that must be specified in the response for each stream, for example:
query { nodes { id type ...inputParams ...hlsOutputParams } } fragment inputParams on SimpleInputNode { id type alias disabled inputConfig: config { uri } state } fragment hlsOutputParams on HLSOutputNode { id type alias disabled hlsConfig: config { uri variants { key_update_period encrypt storage_duration name playlist_duration target_duration pmt_pid } variant_sets { variants name } } state }
In response, you will receive a list of all available nodes that match your request, for example:
{ "data": { "nodes": [ { "id": "qB1BNX3o", "type": "TRANSCODER" }, { "id": "YNI4sn1H", "type": "HLS_OUTPUT", "alias": "Russia HD", "disabled": false, "hlsConfig": { "uri": null, "variants": [ { "key_update_period": 50, "encrypt": false, "storage_duration": 0, "name": "rossiya-hd_640x350", "playlist_duration": 100, "target_duration": 10, "pmt_pid": null }, { "key_update_period": 50, "encrypt": false, "storage_duration": 0, "name": "rossiya-hd_960x540", "playlist_duration": 100, "target_duration": 10, "pmt_pid": null }, { "key_update_period": 50, "encrypt": false, "storage_duration": 0, "name": "rossiya-hd_1280x720", "playlist_duration": 100, "target_duration": 10, "pmt_pid": null } ], "variant_sets": [ { "variants": [ 0, 1, 2 ], "name": "rossiya-hd" } ] }, "state": "STARTED" }, { "id": "e8MBljU2", "type": "SIMPLE_INPUT", "alias": "NatGeo HD", "disabled": false, "inputConfig": { "uri": "udp://234.5.2.227:1234" }, "state": "STARTED" }, ... { "id": "CxJjGNbr", "type": "SIMPLE_INPUT", "alias": "Test", "disabled": true, "inputConfig": { "uri": "udp://234.5.2.50:1234" }, "state": "STOPPED" } ] } }
|
Open DOCS ⇒ nodes(…):[MacroNode!]! IMPLEMENTATIONS and select the node type to see the set of parameters available to it |
Add incoming stream
Use a request type mutation and insert in QUERY VARIABLES stream parameter values, for example:
mutation createInput( $feeds: [InputFeed!] $config: InputSimpleInputNodeConfig! $alias: String! ) { createSimpleInputNode(feeds: $feeds, config: $config, alias: $alias) { ...inputParams } } fragment inputParams on SimpleInputNode { id type alias role disabled config { uri } feeds { id node select } state error { what params } } ---------------- QUERY VARIABLES: {"alias": "Channel2", "config": {"uri": "udp://224.119.5.6:1234"}}
Server response example:
{ "data": { "createSimpleInputNode": { "id": "fde2DYhO", "type": "SIMPLE_INPUT", "alias": "Channel2", "role": "INPUT", "disabled": false, "config": { "uri": "udp://224.119.5.6:1234" }, "feeds": null, "state": "STARTING", "error": null } } }
Add a Transcoder node
Use a request type mutation and insert in QUERY VARIABLES transcoding parameter values, for example:
mutation createTranscoderNode( $feeds: [InputFeed!] $alias: String! $config: InputTranscoderConfig! ) { createTranscoderNode(feeds: $feeds, alias: $alias, config: $config) { ...processingParams } } fragment processingParams on TranscoderNode { id type feeds { id node } streams { media program program_name provider_name pid codec codec_profile resolution { width height } } alias disabled state error { what params } config { variants { video { codec codec_profile bitrate { target max } resolution { width height } bypass } audio { codec bitrate channel_layout sample_rate aac_fast fix_wraps allowed_pts_diff bypass } subtitles { select bypass } } } } ---------------- QUERY VARIABLES: { "feeds": [ { "id": 0, "node": "JjA4SOkq" } ], "alias": “Transcoder3", "config": { "variants": { "video": { "codec": "avc", "bypass": false, "codec_profile": "main", "resolution": { "width": 1280, "height": 720 } }, "audio": { "aac_fast": true, "allowed_pts_diff": 50, "bitrate": 128, "bypass": false, "channel_layout": "stereo", "codec": "aac", "fix_wraps": true, "sample_rate": 48000 }, "subtitles": [ { "bypass": true } ] } } }
Server response example:
{ "data": { "createTranscoderNode": { "id": "WI2EHzf4", "type": "TRANSCODER", "feeds": [ { "id": 0, "node": "JjA4SOkq" } ], "streams": [ { "media": "video", "program": 2050, "program_name": "15 TV3", "provider_name": "RTRS", "pid": 2051, "codec": "avc", "codec_profile": “main", "resolution": { "width": 1280, "height": 720 } }, { "media": "audio", "program": 2050, "program_name": null, "provider_name": null, "pid": 2052, "codec": "aac", "codec_profile": null, "resolution": null } ], "alias": "Transcoder3", "disabled": false, "state": "STARTED", "error": null, "config": { "variants": [ { "video": { "codec": "avc", "codec_profile": "main", "bitrate": null, "resolution": { "width": 1280, "height": 720 }, "bypass": false }, "audio": [ { "codec": "aac", "bitrate": 128, "channel_layout": "stereo", "sample_rate": 48000, "aac_fast": true, "fix_wraps": true, "allowed_pts_diff": 50, "bypass": false } ], "subtitles": [ { "select": null, "bypass": true } ] } ] } } } }
Add Mosaic node
Use a request type mutation and insert in QUERY VARIABLES the IDs of streams that you want to include in the mosaic, for example:
mutation createMosaicNode( $feeds: [InputFeed!] $alias: String! $config: InputMosaicConfig! ) { createMosaicNode(feeds: $feeds, alias: $alias, config: $config) { id } } ---------------- QUERY VARIABLES: { "alias": "Mosaic", "feeds": [ { "id": 0, "node": "K0MhX7rL" }, { "id": 1, "node": "ug_g7Rdd" }, { "id": 2, "node": "rE-wV9uk" }, { "id": 3, "node": "JjA4SOkq" } ], "config": { "in": [ { "left": 960, "top": 540, "width": 960, "height": 540 }, { "left": 0, "top": 540, "width": 960, "height": 540 }, { "left": 960, "top": 0, "width": 960, "height": 540 }, { "left": 0, "top": 0, "width": 960, "height": 540 } ], "out": { "video": { "resolution": { "width": 1920, "height": 1080 } }, "subtitles": [{}], "audio": [{}] } } }
Server response example:
{ "data": { "createMosaicNode": { "id": "RSPPF4TJ" } } }
Add Adaptive Stream (HLS)
To add an adaptive stream, first add a node of the Transcoder type with the options for streams you want to combine into an adaptive stream, and then use the request type mutation and insert in QUERY VARIABLES data of the streams you need, for example:
mutation createHLSOutput( $alias: String! $config: InputHLSOutputNodeConfig! $feeds: [InputFeed!] ) { createHLSOutputNode(alias: $alias, config: $config, feeds: $feeds) { ...outputParams ...outputParamsForHLSOutput } } fragment outputParams on MacroNode { id type role disabled state feeds { id node select } alias error { what params } } fragment outputParamsForHLSOutput on HLSOutputNode { hlsOutputConfig: config { uri variants { key_update_period encrypt storage_duration name bandwidth playlist_duration target_duration pmt_pid width height disabled } variant_sets { variants name } } } ---------------- QUERY VARIABLES: { "alias": "HLS", "config": { "variants": [ { "bandwidth": 0, "encrypt": false, "key_update_period": 50, "name": "15-tv3_720x576_11", "playlist_duration": 100, "storage_duration": 0, "target_duration": 10 }, { "bandwidth": 0, "encrypt": false, "key_update_period": 50, "name": "15-tv3_1280x720_12", "playlist_duration": 100, "storage_duration": 0, "target_duration": 10 }, { "bandwidth": 0, "encrypt": false, "key_update_period": 50, "name": "15-tv3_720x576_22", "playlist_duration": 100, "storage_duration": 0, "target_duration": 10 } ], "variant_sets": [] }, "feeds": [ { "id": 0, "node": "O8spPfLu" } ] }
Server response example:
{ "data": { "createHLSOutputNode": { "id": "fDDYkm_N", "type": "HLS_OUTPUT", "role": "OUTPUT", "disabled": false, "state": "STARTED", "feeds": [ { "id": 0, "node": "O8spPfLu", "select": null } ], "alias": "HLS2", "error": null, "hlsOutputConfig": { "uri": null, "variants": [ { "key_update_period": 50, "encrypt": false, "storage_duration": 0, "name": "15-tv3_720x576_11", "bandwidth": 0, "playlist_duration": 100, "target_duration": 10, "pmt_pid": null, "width": null, "height": null, "disabled": null }, { "key_update_period": 50, "encrypt": false, "storage_duration": 0, "name": "15-tv3_1280x720_12", "bandwidth": 0, "playlist_duration": 100, "target_duration": 10, "pmt_pid": null, "width": null, "height": null, "disabled": null }, { "key_update_period": 50, "encrypt": false, "storage_duration": 0, "name": "15-tv3_720x576_22", "bandwidth": 0, "playlist_duration": 100, "target_duration": 10, "pmt_pid": null, "width": null, "height": null, "disabled": null } ], "variant_sets": [] } } } }